How to Create a Search Form in Google Sheets – Google Apps Script Tutorial
[ad_1]
Have you ever struggled with navigating a massive spreadsheet? You can do away with the endless scrolling and unlock the power of targeted data retrieval with a custom search form using Google Apps Script.
In this hands-on guide, we’ll craft a search tool that seamlessly integrates with your spreadsheet, allowing you to:
- Search across multiple tabs: Effortlessly query data from different sections of your spreadsheet with dedicated input fields.
- Master AND & OR searches: Find exactly what you need with both AND and OR search functionalities, ensuring precise or flexible matching based on your requirements.
- Boost your productivity: Save valuable time by eliminating manual searches and filtering through only the relevant data points.
Ready to transform your spreadsheet into a dynamic search hub? Follow along as we explore the world of Google Apps Script and empower you to become a spreadsheet search master!
You can find all the code and related assets in this GitHub repo.
Table Of Contents
Understanding the Spreadsheet Structure
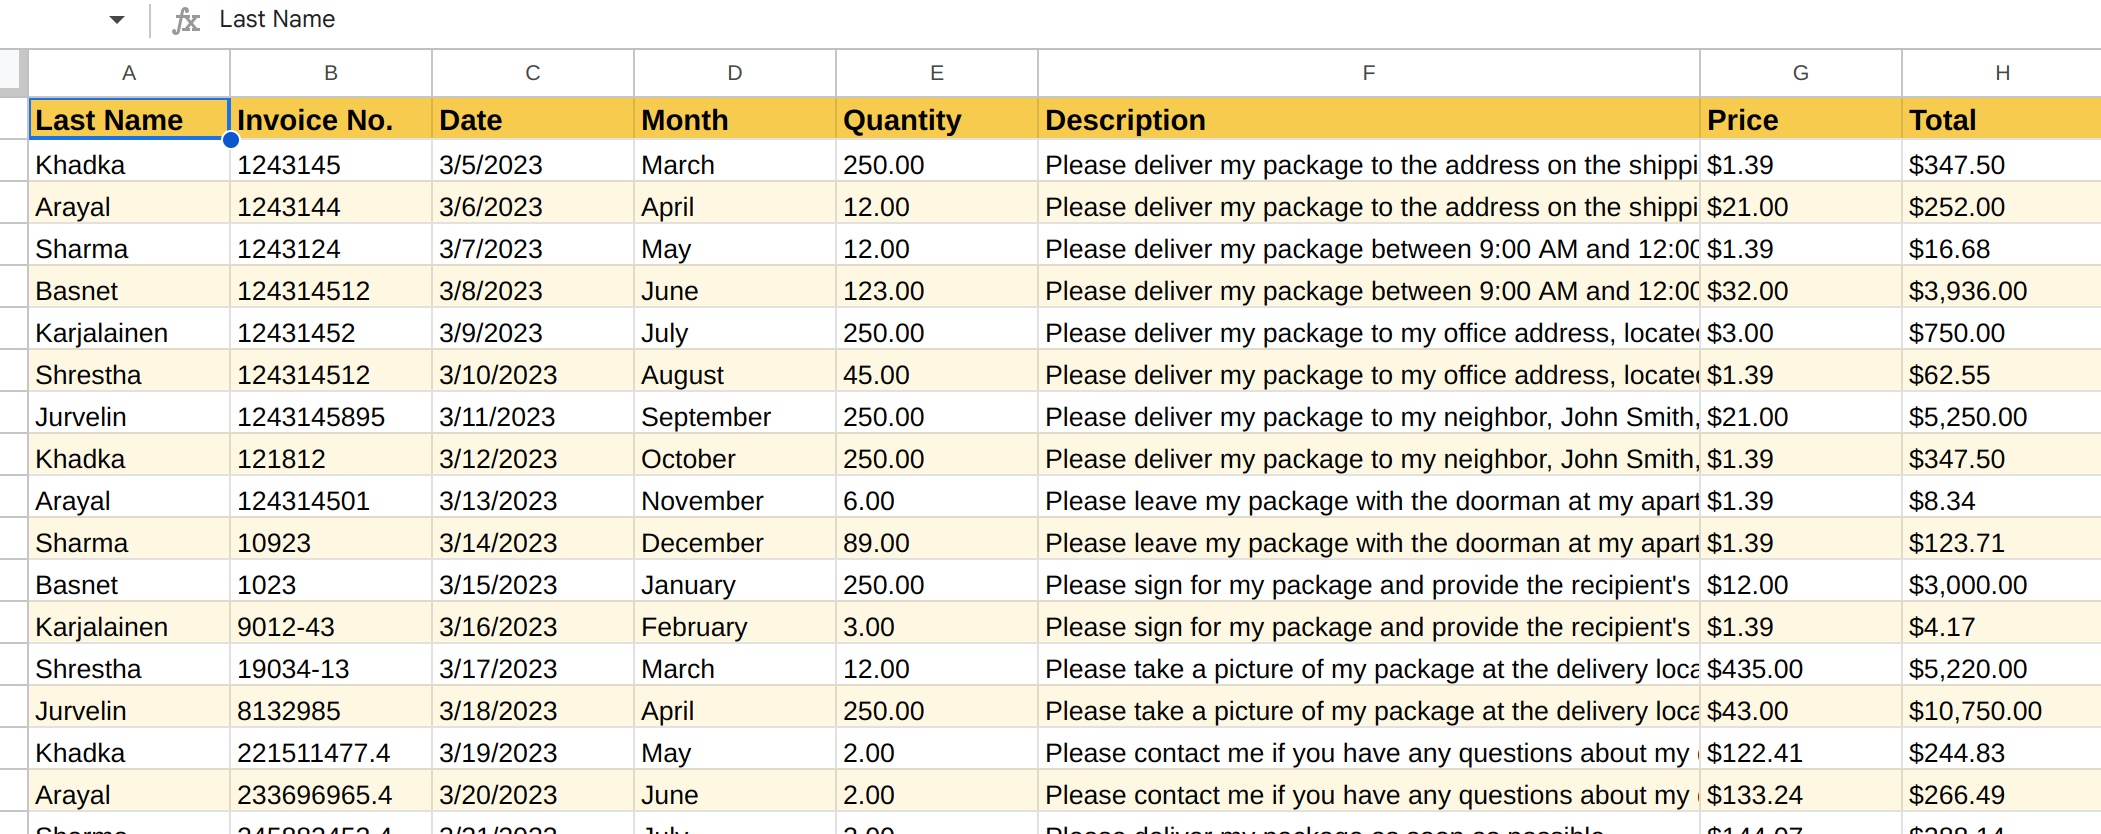

As portrayed in the image above, there are five tabs in the spreadsheet. The data is divided into three tabs by year: 2021, 2022 & 2023.

All the columns are the same in these three tabs.
Let’s look at the structure of your dedicated search tab. It’s divided into two key sections:
- Search Form (Rows 1-7): This is where you interact with your data. Each input field corresponds to a specific column in your other spreadsheet tabs, allowing you to tailor your search queries. Think of them as filters, helping you hone in on the information you need.
- Search Results (Rows 8+): This is where you’ll find the data you sought. Each result includes the relevant information you specified in your search, along with an additional column named “Sprd Name – Row Index.” This acts as a convenient map, pinpointing the exact spreadsheet tab and row where each result originates from. No more hunting through endless rows – you’ll be laser-focused on the data you need.
By understanding this organized layout, you can navigate your search experience efficiently and retrieve the information you require swiftly.

How to Build the Search Form – Dynamic Dropdowns and Logic
The search form has three input fields: Client, Quantity, and Description. Each utilizes a dropdown menu automatically populated with unique values from the Config spreadsheet tab. But how does this magic happen?
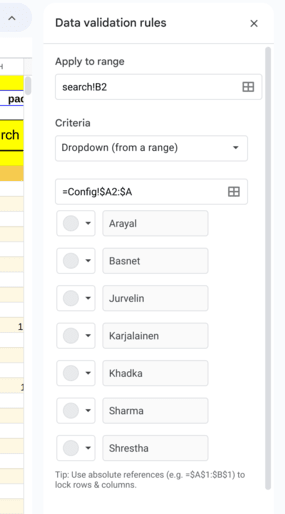
Here’s what happens behind the scenes:
- Data Source: Values for the dropdowns are meticulously collected from three separate tabs: 2021, 2022, and 2023.
- Combining Forces: A clever formula merges these values into a single, consolidated list.
- Splitting it Up: This combined list is then transformed into an array, allowing individual values to be accessed.
- Rearranging the Data: Transposition magic turns the row of values into a column, making them easier to work with.
- Duplicate Removal: The
UNIQUEfunction eliminates any repeated values, ensuring a concise and organized list. - Sorting it Out: Finally, the remaining values are sorted alphabetically for your browsing convenience.
Here’s the formula used: SORT(UNIQUE(TRANSPOSE(split(TEXTJOIN(",",TRUE,'2021'!A2:A1001)&","&TEXTJOIN(",",TRUE,'2022'!A2:A1001)&","&TEXTJOIN(",",TRUE,'2023'!A2:A1001),","))))

AND vs OR Search
A dedicated checkbox (located in G4:G5) serves as the control center for your search logic. When checked, it activates the AND search, requiring all specified criteria to be present in the results.
Leaving it unchecked switches to the OR search, providing more flexible results as long as any criterion matches.
Remember, the downloadable spreadsheet retains all the pre-configured formulas and data validation rules, making setup a breeze. We’ll dive into crafting the magical search function in the next step!
How to the Create Search Function With Google Apps Script
Open script editor from Extensions>Apps Script
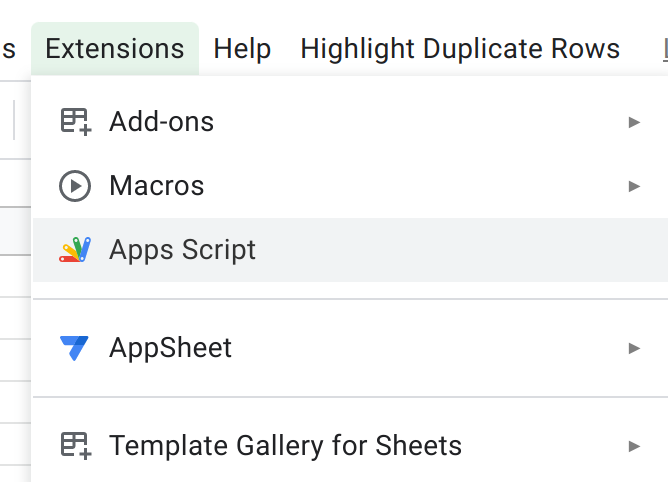
For this project, you’ll create two files search.gs and utils.gs in the editor.
Inside the search.gs file, let’s first fetch our spreadsheet and input terms.
var ss = SpreadsheetApp.getActiveSpreadsheet();
var searchSheet = ss.getSheetByName("search");
var _2023Sheet = ss.getSheetByName("2023");
var _2022Sheet = ss.getSheetByName("2022");
var _2021Sheet = ss.getSheetByName("2021");
// ranges for name, description and quantity columns for each tab
var nameRangeNotation = 'A2:A'
var descriptionRangeNotation = 'F2:F'
var quantityRangeNotation = 'E2:E'
// value for input boxes
var clientName = searchSheet.getRange('B2:C2').getValue();
var quantity = searchSheet.getRange('E2').getValue();
var description = searchSheet.getRange('G2:H2').getValue();
var hasIncludeAllSelected = searchSheet.getRange('G4:G5').getValue();Now below this code, we’ll create the function search, which will orchestrate everything from the top.
/**
 * The main function assigned to search button in the spreadsheet. It orchestrates search opearaion.
 */
function search() {
  try {

    let status;

    if (hasIncludeAllSelected) {
      //perform AND search
      const newData = andSearch(clientName, description, quantity);

    }
    else {
         }


  } catch (e) {
    console.log(e)

  }
}In this project, we’ll build our functions one step at a time. Let’s start by determining the search type based on the checkbox in G4:G5.
If the box is checked, we’ll activate the AND search functionality. This means all specified criteria in the input fields must be present in the results. To handle this, we’ll call a dedicated function named andSearch().
We’ll create this function next, directly below the existing search function.
This approach ensures our script adapts to the user’s chosen search type, providing accurate and relevant results based on their needs.
How to Create the andSearch() Function
/**
 * Performs "AND" search for the given keywords in their respective columns Last Name, Descroption and Quantity for
 * tabs 2021, 2022, 2023. Returns new nested arrays for search results to be filled in search spreadsheet.
 * @param {String} name
 * @param {String} description
 * @param {String} quantity
 * @returns {Array<Array<String>>?} - [[],[],[]]
 */
function andSearch(name = null, description = null, quantity = null) {

  // get matching index for each sheet.
  const _2021SheetNameSearchIndexes = name === "" ? [] : searchSheetByColumn(_2021Sheet, nameRangeNotation, name);
  const _2021SheetQuantitySearchIndexes = quantity === "" ? [] : searchSheetByColumn(_2021Sheet, quantityRangeNotation, quantity);
  const _2021SheetDescriptionSearchIndexes = description === "" ? [] : searchSheetByColumn(_2021Sheet, descriptionRangeNotation, description);


  const _2022SheetNameSearchIndexes = name === "" ? [] : searchSheetByColumn(_2022Sheet, nameRangeNotation, name);
  const _2022SheetQuantitySearchIndexes = quantity === "" ? [] : searchSheetByColumn(_2022Sheet, quantityRangeNotation, quantity);
  const _2022SheetDescriptionSearchIndexes = description === "" ? [] : searchSheetByColumn(_2022Sheet, descriptionRangeNotation, description);

  const _2023SheetNameSearchIndexes = name === "" ? [] : searchSheetByColumn(_2023Sheet, nameRangeNotation, name);
  const _2023SheetQuantitySearchIndexes = quantity === "" ? [] : searchSheetByColumn(_2023Sheet, quantityRangeNotation, quantity);
  const _2023SheetDescriptionSearchIndexes = description === "" ? [] : searchSheetByColumn(_2023Sheet, descriptionRangeNotation, description);


 //.... continue

}This function takes three parameters, each corresponding to a user-defined search term: name, description and quantity.
If any of these search terms are blank, we simply assign an empty array as the result. This efficiently handles scenarios where users leave certain fields unfilled.
The core logic relies on the searchSheetByColumn function. Think of it as a data detective that checks specific columns within spreadsheet tabs. It takes three crucial arguments:
- sheet: The specific tab to search within (for example: “2021”).
- rangeNotation: The column range to target (for example: “A2:A”).
- searchVal: The value to match within the chosen column (for example: “Khadka”).
Using this information, searchSheetByColumn scans the designated column and returns an array containing the row indexes where the searchVal is found in that sheet.
Searching Input Value In a Column
Let’s create the function searchSheetByColumn in the utils.gs file now.
/**
 * Searches the given keyword in the given column inside the given spreadsheet tab.
 * It returns all the matching indexes of data. Indexes are index from array not row.
 * @param {Spreadsheet} sheet - sheet to search from
 * @param {String} rangeNotation - range of the column in the given spreadsheet
 * @param {String} searchVal - keyword to search
 * @returns {Array<number>} - [1,23,12,45,12]
 */
function searchSheetByColumn(sheet, rangeNotation, searchVal) {
  const data = sheet.getRange(rangeNotation).getValues().flat().filter(String); // get data
  if (data.length < 1) return [];
  // filter only matching rows indexes
  // got from https://stackoverflow.com/a/58980987/6163929
  const allIndexes = data.map((val, index) => ({ val, index }))
    .filter(({ val, index }) => rangeNotation === quantityRangeNotation ? Number(val) === Number(searchVal) : val.toLowerCase().includes(searchVal.toLowerCase())
    )
    .map(({ val, index }) =>
      index + 1
    ) // +1 because we extract data from second row in notation later on have to match with whole data array
  return allIndexes;
}The code above does the following:
- Retrieves data from the specified range and sheet using
sheet.getRange(rangeNotation).getValues().flat(). - Removes empty values by filtering with
filter(String). - Iterates through data and indexes and applies
mapto create an array of objects with both values and their corresponding indexes. - Converts both search term and data values to numbers using
Number(). - Filters for exact matches using
rangeNotation === quantityRangeNotation ? Number(val) === Number(searchVal) - Converts both search term and data values to lowercase.
- Filters for matches using
val.toLowerCase().includes(searchVal.toLowerCase()) - Extracts matching indexes using
map(({ val, index }) => index + 1). - Adds 1 to correct for starting extraction from the second row.
How to Match All Criteria with AND Search
Add the following piece of code in andSearch function.
function andSearch(name = null, description = null, quantity = null) {

// ..... continuing on from previous codes
  // matching indexes of rows in AND search
  const _2021SheetMatchingRowsIndexes = filterRowsIndexesWithAllSearchTerms(_2021SheetNameSearchIndexes, _2021SheetQuantitySearchIndexes, _2021SheetDescriptionSearchIndexes);
  const _2022SheetMatchingRowsIndexes = filterRowsIndexesWithAllSearchTerms(_2022SheetNameSearchIndexes, _2022SheetQuantitySearchIndexes, _2022SheetDescriptionSearchIndexes);
  const _2023SheetMatchingRowsIndexes = filterRowsIndexesWithAllSearchTerms(_2023SheetNameSearchIndexes, _2023SheetQuantitySearchIndexes, _2023SheetDescriptionSearchIndexes);
//..........
}Remember the AND search? Its goal is to unearth data points that tick every box you’ve specified. To achieve this, we need to filter only rows that contain all your search terms – name, quantity, and description – across all three spreadsheets.
Enter the filterRowsIndexesWithAllSearchTerms function, to be created in the utils.gs file. This handy tool combs through each row and ensures it matches every criterion you’ve laid out. So, how does it work its magic? We’ll explore the code next!
/**
 * Function filters only rows that consist all three keywords provided by user input
 * @param {Array<String>} arr1
 * @param {Array<String>} arr2
 * @param {Array<String>} arr3
 * @returns {Array<String>?}
 */
function filterRowsIndexesWithAllSearchTerms(arr1, arr2, arr3) {
  // create a nested array
  const arr = [arr1.length > 0 ? [...arr1] : "", arr2.length > 0 ? [...arr2] : "", arr3.length > 0 ? [...arr3] : ""].filter(String);

  // return empty if the master arrays length is lesser than number of search terms
  if (arr.length < 1 || arr.length < numberOfInputFieldEntered) return [];

  const matchingIndexes = [];

  if (arr.length === 3) {

    arr[0].forEach((val) => {
      if (arr[1].includes(val) && arr[2].includes(val)) {
        matchingIndexes.push(val)
      }

    });

  }
  else if (arr.length === 2) {
    arr[0].forEach((val) => {
      if (arr[1].includes(val)) {
        matchingIndexes.push(val)
      }

    });


  }
  else {

    matchingIndexes.push(arr[0]) //just push the array thats not empty
  }
  return matchingIndexes.flat();

}Here’s what the code does:
The function takes three arrays as input, each representing matching indexes from one spreadsheet based on your search terms. However, we understand users might not fill in every search field.
To handle this, the function first creates a “master array” containing only non-empty arrays from the three inputs. Think of it as filtering out any blank search results. const arr = [arr1.length > 0 ? [...arr1] : "", arr2.length > 0 ? [...arr2] : "", arr3.length > 0 ? [...arr3] : ""].filter(String);
If the master array ends up being empty, it means no rows matched any of your search terms – the function simply returns an empty array, indicating no results found.
Similarly, if the master array has fewer elements than the total search terms you entered, it signifies an incomplete AND search. In this case, the function returns an empty array, letting you know that no results match all criteria. arr.length < numberOfInputFieldEntered
But when all three arrays have matches, the function begins its work, it iterates through the first array, meticulously checking if each index value exists in both the second and third arrays. If it does, that index is considered a match and added to a separate “matchingIndexes” array. This guarantees that only rows containing all your search terms are included: arr[0].forEach((val) => { if (arr[1].includes(val) && arr[2].includes(val)) { matchingIndexes.push(val)}
If only two arrays have matches, the function performs a simpler check, verifying if each value in the first array exists in the second. Any match is added to “matchingIndexes.” arr[0].forEach((val) => if (arr[1].includes(val)) { matchingIndexes.push(val)}.
Else if only one array is present, the function simply uses that array directly.
In summary, the function ensures that only rows containing all your chosen search terms survive – a powerful tool for precise data retrieval!
Next, in your search.gs file right after you declared the variable hasIncludeAllSelected for the checkbox, create input value counter.
var numberOfInputFieldEntered = [clientName, description, quantity].filter(String).length;With this, we now have indexes for the rows from the AND search. Now, continue with your andSearch function and get data from those indexes.
Bringing Search Results to Life
function andSearch(name = null, description = null, quantity = null) {
//.... contnung from above
  // get data from row indexes
  const _2021SheetMatchingRows = fetchDataByRowIndexes(_2021Sheet, _2021SheetMatchingRowsIndexes)
  const _2022SheetMatchingRows = fetchDataByRowIndexes(_2022Sheet, _2022SheetMatchingRowsIndexes)
  const _2023SheetMatchingRows = fetchDataByRowIndexes(_2023Sheet, _2023SheetMatchingRowsIndexes)
}Now that we have the matching row indexes, it’s time to retrieve the actual data. Enter the fetchDataByRowIndexes function, residing in the utils file. This handy tool serves as your data retriever, fetching information based on the provided indexes.
/**
 * Funciton extracts the rows of provided indexes+1, from the given spreadsheet tab.
 * @param {Spreadsheet} sheet - sheet to search from
 * @param {Array<number>} indexes - indexes of row to extract values.
 * @returns {Array<Array<Srting>>} - Arrays of nested rows in the indexes from the given sheet.
 */
function fetchDataByRowIndexes(sheet = _2021Sheet, indexes = []) {
  // console.log("Inside fetchDataByRowIndexes() provided indexes are:" + indexes)

  if (indexes.length < 1) return [];

  const data = sheet.getDataRange().getValues();
  const newData = [];

  for (let i = 0; i < indexes.length; i++) {
    newData.push([...data[indexes[i]], `${sheet.getName()} - ${indexes[i] + 1}`])
  }
  // console.log("Inside fetchDataByRowIndexes() data from procvided indexes:" + newData)
  return newData;
}The retrieved data isn’t just dumped onto the search sheet – it gets a special touch. The function adds an extra value for the column named Sprd Name - Row Indexes with `${sheet.getName()} - ${indexes[i] + 1}` .
This column acts like a roadmap, displaying both the originating spreadsheet name and the corresponding row index for each result. So, at a glance, you know exactly where each piece of data came from.
Remember, this additional information is added as the last column in the search sheet. With this valuable context, search results become even more informative and easier to navigate.
How to Deduplicate Data to Ensure Accuracy
The next step is to ensure that our search results are free of duplicates, no matter from the sheet they originated. After all, who wants to see the same item twice? So, append this code in the andSearch function:
//.. continue inside andSearch Function
 // filter duplicate rows
  const _2021SheetMatchingUniqueRows = filterDuplicateRows(_2021SheetMatchingRows);
  const _2022SheetMatchingUniqueRows = filterDuplicateRows(_2022SheetMatchingRows);
const _2023SheetMatchingUniqueRows = filterDuplicateRows(_2023SheetMatchingRows);To create this function let’s jump back to the file utils.gs again.
/**
 * Takes Duplicate data that might have resulted from different individual column searches and only returns unique rows
 * in each column from the serach results.
 * @param {Array<String>} arr
 * @returns {Array<String>}- [[],[]]
 */
function filterDuplicateRows(arr) {
  if (arr.length < 1) return [];
  const delimiter = "*---*--*";
  // console.log("Inside filterDuplicateRows() arr to check:" + arr)

  const strArr = arr.map(row => row.join(delimiter)).flat();
  // console.log("Inside filterDuplicateRows() strArr:" + strArr)

  const uniqueArrays = [...new Set(strArr)].map(str => str.split(delimiter))
  // console.log("Inside filterDuplicateRows() uniqueArrays:" + uniqueArrays)

  return uniqueArrays;

}Here’s what we did:
- Creating a Unique Fingerprint: We began by crafting a special “delimiter,” a combination of characters highly unlikely to appear within your actual data. Think of it as a unique tag for each row.
const delimiter = "*---*--*"; - Joining Forces: Next, we mapped through each row, joining its elements with this delimiter to create a single string. This allows us to compare strings for uniqueness instead of individual data points.
const strArr = arr.map(row => row.join(delimiter)).flat(); - Duplicate Detective: We leveraged the power of JavaScript’s Set object, renowned for its ability to hold only unique values. By converting our string array into a Set, we effectively remove any identical entries:
[...new Set(strArr)] - Back to Our Roots: Finally, we converted the unique strings back into an array of arrays, splitting them using the same delimiter we used earlier. This gives us a clean, deduplicated set of results.
map(str => str.split(delimiter))
Note: This uniqueness is based on the combined “Sprd Name - Row Indexes” value, ensuring true uniqueness across spreadsheets. Without this, duplicates can exist naturally.
With this final step, we’ve achieved accurate and streamlined search results, ready to be combined and presented from the andSearch function.
// inside andSearch function append at last

  const andSearchResult = [..._2023SheetMatchingUniqueRows, ..._2022SheetMatchingUniqueRows, ..._2021SheetMatchingUniqueRows]

  if (andSearchResult.length < 0) return;
  return andSearchResult;
}Find the completed andSearch function below.
/**
 * Performs "AND" search for the given keywords in their respective columns Last Name, Descroption and Quantity for
 * tabs 2021, 2022, 2023. Returns new nested arrays for search results to be filled in search spreadsheet.
 * @param {String} name
 * @param {String} description
 * @param {String} quantity
 * @returns {Array<Array<String>>?} - [[],[],[]]
 */
function andSearch(name = null, description = null, quantity = null) {

  // get matching index for each sheet.
  const _2021SheetNameSearchIndexes = name === "" ? [] : searchSheetByColumn(_2021Sheet, nameRangeNotation, name);
  const _2021SheetQuantitySearchIndexes = quantity === "" ? [] : searchSheetByColumn(_2021Sheet, quantityRangeNotation, quantity);
  const _2021SheetDescriptionSearchIndexes = description === "" ? [] : searchSheetByColumn(_2021Sheet, descriptionRangeNotation, description);


  const _2022SheetNameSearchIndexes = name === "" ? [] : searchSheetByColumn(_2022Sheet, nameRangeNotation, name);
  const _2022SheetQuantitySearchIndexes = quantity === "" ? [] : searchSheetByColumn(_2022Sheet, quantityRangeNotation, quantity);
  const _2022SheetDescriptionSearchIndexes = description === "" ? [] : searchSheetByColumn(_2022Sheet, descriptionRangeNotation, description);

  const _2023SheetNameSearchIndexes = name === "" ? [] : searchSheetByColumn(_2023Sheet, nameRangeNotation, name);
  const _2023SheetQuantitySearchIndexes = quantity === "" ? [] : searchSheetByColumn(_2023Sheet, quantityRangeNotation, quantity);
  const _2023SheetDescriptionSearchIndexes = description === "" ? [] : searchSheetByColumn(_2023Sheet, descriptionRangeNotation, description);


  // matching indexes of rows in AND search
  const _2021SheetMatchingRowsIndexes = filterRowsIndexesWithAllSearchTerms(_2021SheetNameSearchIndexes, _2021SheetQuantitySearchIndexes, _2021SheetDescriptionSearchIndexes);
  const _2022SheetMatchingRowsIndexes = filterRowsIndexesWithAllSearchTerms(_2022SheetNameSearchIndexes, _2022SheetQuantitySearchIndexes, _2022SheetDescriptionSearchIndexes);
  const _2023SheetMatchingRowsIndexes = filterRowsIndexesWithAllSearchTerms(_2023SheetNameSearchIndexes, _2023SheetQuantitySearchIndexes, _2023SheetDescriptionSearchIndexes);

  // get data from row indexes
  const _2021SheetMatchingRows = fetchDataByRowIndexes(_2021Sheet, _2021SheetMatchingRowsIndexes)
  const _2022SheetMatchingRows = fetchDataByRowIndexes(_2022Sheet, _2022SheetMatchingRowsIndexes)
  const _2023SheetMatchingRows = fetchDataByRowIndexes(_2023Sheet, _2023SheetMatchingRowsIndexes)

  // filter duplicate rows
  const _2021SheetMatchingUniqueRows = filterDuplicateRows(_2021SheetMatchingRows);
  const _2022SheetMatchingUniqueRows = filterDuplicateRows(_2022SheetMatchingRows);
  const _2023SheetMatchingUniqueRows = filterDuplicateRows(_2023SheetMatchingRows);


  const andSearchResult = [..._2023SheetMatchingUniqueRows, ..._2022SheetMatchingUniqueRows, ..._2021SheetMatchingUniqueRows]

  if (andSearchResult.length < 0) return;

  return andSearchResult;

}Putting It All Together – Displaying Your Search Results
Now that we can retrieve search results based on your “AND” criteria, it’s time to integrate them into your search function.
We’ll continue from where we left off. In the if block, add the following code.
 if (hasIncludeAllSelected) {
      //perform AND search
      const newData = andSearch(clientName, description, quantity);
      // ..........................
      // new peice of code
       status = fillSearchWithResults(searchSheet.getDataRange().getValues(), newData)
       // ................................................
}Let’s create a new function, fillSearchWithResults, residing in the utils.gs file:
/**
 * To Fill search sheet with values
 * @param {Array<Array<Srting>>}  oldData - previous search results data
 * @param {Array<Array<Srting>>}  newData - new search result to fill
 */
function fillSearchWithResults(oldData, newData) {
  // console.log("Inside fillSearchWithResults() old data:", oldData.length);
  if (oldData.length >= 8) {
    searchSheet.getRange(8, 1, oldData.length - 7, 9).clear(); // clear until last filled data
  }
  SpreadsheetApp.flush();
  Utilities.sleep(1000);
  // console.log("Inside fillSearchWithResults() new Data:", newData);
  if (newData.length < 1) return 400;
  searchSheet.getRange(8, 1, newData.length, 9).setValues(newData);
  return 200;
}The function takes two key inputs:
- Current Search Sheet Data: This represents the existing information displayed in your search sheet.
- New Search Results: This is the fresh data retrieved using the previously explained functions.
Here’s what happens step-by-step:
- Clearing the Decks: If a previous search result exists (starting from row 8), the function clears it out to make space for the new findings.
if (oldData.length >= 8) { searchSheet.getRange(8, 1, oldData.length - 7, 9).clear(); } - Empty Results? No Problem: If the newly retrieved search results are empty, the function returns a special code: 400. This code, which we’ll use later, indicates to the user that no matching data was found.
if (newData.length < 1) return 400 - Data Display Time!: If there are indeed results, the function saves them into the search sheet, starting from row 8. Additionally, it returns a different code: 200. This code signifies a successful operation, and we’ll use it to show success messages to the user.
With this final piece in place, your “AND” searches will effortlessly bring relevant data to your fingertips, presented neatly in your search sheet.
How to Use OR Search to Find Data that Matches Any Term
Our journey continues! After setting up the “AND” search, we can now conquer the “OR” search, allowing you to find data containing any of your specified terms.
In the search function’s else block, we have the orSearch function. Its purpose is to sift through your data and identify rows containing at least one of your search terms.
Think of it as casting a wider net, capturing matches that meet any of your criteria.
  else {
      //perform OR serach
      let newData = orSearch(clientName, description, quantity);

      status = fillSearchWithResults(searchSheet.getDataRange().getValues(), newData)
}Create the function orSearch function below andSearch in the search file.
/**
 * Performs "OR" search for the given keywords in their respective columns Last Name, Descroption and Quantity for
 * tabs 2021, 2022, 2023. Returns new nested arrays for search results to be filled in search spreadsheet.
 * @param {String} name
 * @param {String} description
 * @param {String} quantity
 * @returns {Array<Array<String>>?} - [[],[],[]]
 */
function orSearch(name = null, description = null, quantity = null) {
  // get matching index for each sheet.
  const _2021SheetNameSearchIndexes = name === "" ? [] : searchSheetByColumn(_2021Sheet, nameRangeNotation, name);
  const _2021SheetQuantitySearchIndexes = quantity === "" ? [] : searchSheetByColumn(_2021Sheet, quantityRangeNotation, quantity);
  const _2021SheetDescriptionSearchIndexes = description === "" ? [] : searchSheetByColumn(_2021Sheet, descriptionRangeNotation, description);

  const _2022SheetNameSearchIndexes = name === "" ? [] : searchSheetByColumn(_2022Sheet, nameRangeNotation, name);
  const _2022SheetQuantitySearchIndexes = quantity === "" ? [] : searchSheetByColumn(_2022Sheet, quantityRangeNotation, quantity);
  const _2022SheetDescriptionSearchIndexes = description === "" ? [] : searchSheetByColumn(_2022Sheet, descriptionRangeNotation, description);

  const _2023SheetNameSearchIndexes = name === "" ? [] : searchSheetByColumn(_2023Sheet, nameRangeNotation, name);
  const _2023SheetQuantitySearchIndexes = quantity === "" ? [] : searchSheetByColumn(_2023Sheet, quantityRangeNotation, quantity);
  const _2023SheetDescriptionSearchIndexes = description === "" ? [] : searchSheetByColumn(_2023Sheet, descriptionRangeNotation, description);

  // get values from those indexes
  const _2021SheetNameSearch = fetchDataByRowIndexes(_2021Sheet, _2021SheetNameSearchIndexes);
  const _2021SheetQuantitySearch = fetchDataByRowIndexes(_2021Sheet, _2021SheetQuantitySearchIndexes);
  const _2021SheetDescriptionSearch = fetchDataByRowIndexes(_2021Sheet, _2021SheetDescriptionSearchIndexes);

  const _2022SheetNameSearch = fetchDataByRowIndexes(_2022Sheet, _2022SheetNameSearchIndexes);
  const _2022SheetQuantitySearch = fetchDataByRowIndexes(_2022Sheet, _2022SheetQuantitySearchIndexes);
  const _2022SheetDescriptionSearch = fetchDataByRowIndexes(_2022Sheet, _2022SheetDescriptionSearchIndexes);

  const _2023SheetNameSearch = fetchDataByRowIndexes(_2023Sheet, _2023SheetNameSearchIndexes);
  const _2023SheetQuantitySearch = fetchDataByRowIndexes(_2023Sheet, _2023SheetQuantitySearchIndexes);
  const _2023SheetDescriptionSearch = fetchDataByRowIndexes(_2023Sheet, _2023SheetDescriptionSearchIndexes);


  // filter duplicate rows
  const _2021SheetMatchingUniqueRows = filterDuplicateRows([..._2021SheetNameSearch, ..._2021SheetQuantitySearch, ..._2021SheetDescriptionSearch]);
  const _2022SheetMatchingUniqueRows = filterDuplicateRows([..._2022SheetNameSearch, ..._2022SheetQuantitySearch, ..._2022SheetDescriptionSearch]);
  const _2023SheetMatchingUniqueRows = filterDuplicateRows([..._2023SheetNameSearch, ..._2023SheetQuantitySearch, ..._2023SheetDescriptionSearch]);

  const orSearchResult = [..._2021SheetMatchingUniqueRows, ..._2022SheetMatchingUniqueRows, ..._2023SheetMatchingUniqueRows]

  if (orSearchResult.length < 0) return;

  return orSearchResult;

}Now, don’t be surprised if some things look familiar! The overall structure of the orSearch function resembles its “AND” counterpart. However, a key difference sets them apart:
Since an “OR” search requires just one matching term, we can get rid of the filterRowsIndexesWithAllSearchTerms function. Recall that function ensured all terms were present, which isn’t the case here.
In essence, the orSearch function works by iterating through each search term and its corresponding matching indexes. For each term, it retrieves the data from the spreadsheet using the familiar fetchDataByRowIndexes function.
Finally, it merges the retrieved data for all terms, creating a unified set of results, even if they come from different spreadsheets.
With this powerful tool in your arsenal, you can discover data points that might not have surfaced with an “AND” search, expanding your search capabilities and enriching your data exploration experience.
Keeping Users Informed – Toast Messages for Seamless Search
Now that our search functions are complete, let’s add a crucial element: user feedback! After all, keeping users informed throughout the search process leads to a smoother experience.
To avoid confusion, replace the search function with this one:
/**
 * The main function assigned to search button in the spreadsheet. It orchestrates search opearaion.
 */
function search() {
  try {
    SpreadsheetApp.getActiveSpreadsheet().toast("Searching Through Your Database...", 'Searching');

    let status;

    if (hasIncludeAllSelected) {
      //perform AND search
      const newData = andSearch(clientName, description, quantity);


      status = fillSearchWithResults(searchSheet.getDataRange().getValues(), newData)
      // console.log(status);
      if (status === 400) { throw new Error(SEARCH_STATUS.SEARCH_FAILURE); }
    }
    else {
      //perform OR serach
      let newData = orSearch(clientName, description, quantity);

      status = fillSearchWithResults(searchSheet.getDataRange().getValues(), newData)
      // console.log(status);

      if (status === 400) { throw new Error(SEARCH_STATUS.SEARCH_FAILURE); }
    }

    if (status === 200) {
      SpreadsheetApp.getActiveSpreadsheet().toast(SEARCH_STATUS.SEARCH_SUCCESFULL, 'Success');
    }

  } catch (e) {
    // console.log(e)
    if (e.Error === SEARCH_STATUS.SEARCH_FAILURE) {
      SpreadsheetApp.getActiveSpreadsheet().toast(SEARCH_STATUS.SEARCH_FAILURE, 'Not Found!');

    } else {
      SpreadsheetApp.getActiveSpreadsheet().toast(e, 'Error!');

    }

  }
}We’ll leverage the toast method provided by SpreadsheetApp to display brief, non-intrusive messages directly within the spreadsheet interface. Here’s what we’ll achieve:
Search Initiated: As soon as the user clicks the search button, a toast message appears: “Searching Through Your Database…” This lets them know the search is underway, preventing confusion or unnecessary waiting. SpreadsheetApp.getActiveSpreadsheet().toast("Searching Through Your Database...", 'Searching');
Success Stories: If the search returns any result (indicated by a status code of 200), a positive toast message pops up: “Search Was Successful!” This confirms the operation’s completion and reassures the user that relevant data was found. if (status === 200) { SpreadsheetApp.getActiveSpreadsheet().toast(SEARCH_STATUS.SEARCH_SUCCESFULL, 'Success'); }
Empty Findings: While not technically an error, an empty search result (status code of 400) triggers a slightly different message: “No items found with the given criteria.” This informs the user about the outcome without causing alarm. if (status === 400) { throw new Error(SEARCH_STATUS.SEARCH_FAILURE); }
Here’s what happens behind the scenes:
const SEARCH_STATUS = {
  SEARCH_SUCCESFULL: "Search Was Successfull!",
  SEARCH_FAILURE: "No items found with the given criteria.",
}- An “enum” called
SEARCH_STATUSin the utils.gs file stores these message strings for easy access and maintenance. - A “catch block” handles any unexpected errors, ensuring the user receives appropriate feedback even in unusual situations.
With these toast messages in place, your search functionality becomes more user-friendly and transparent. Remember, clear communication leads to happy user experience!
Putting It All Together – Testing Your Search Form
Now that you’ve built your powerful search functions, it’s time to see them in action! Follow these steps to test your search form directly within your spreadsheet:
- Save Your Scripts: Make sure you’ve saved all your code files (utils.gs and search.gs) before proceeding.
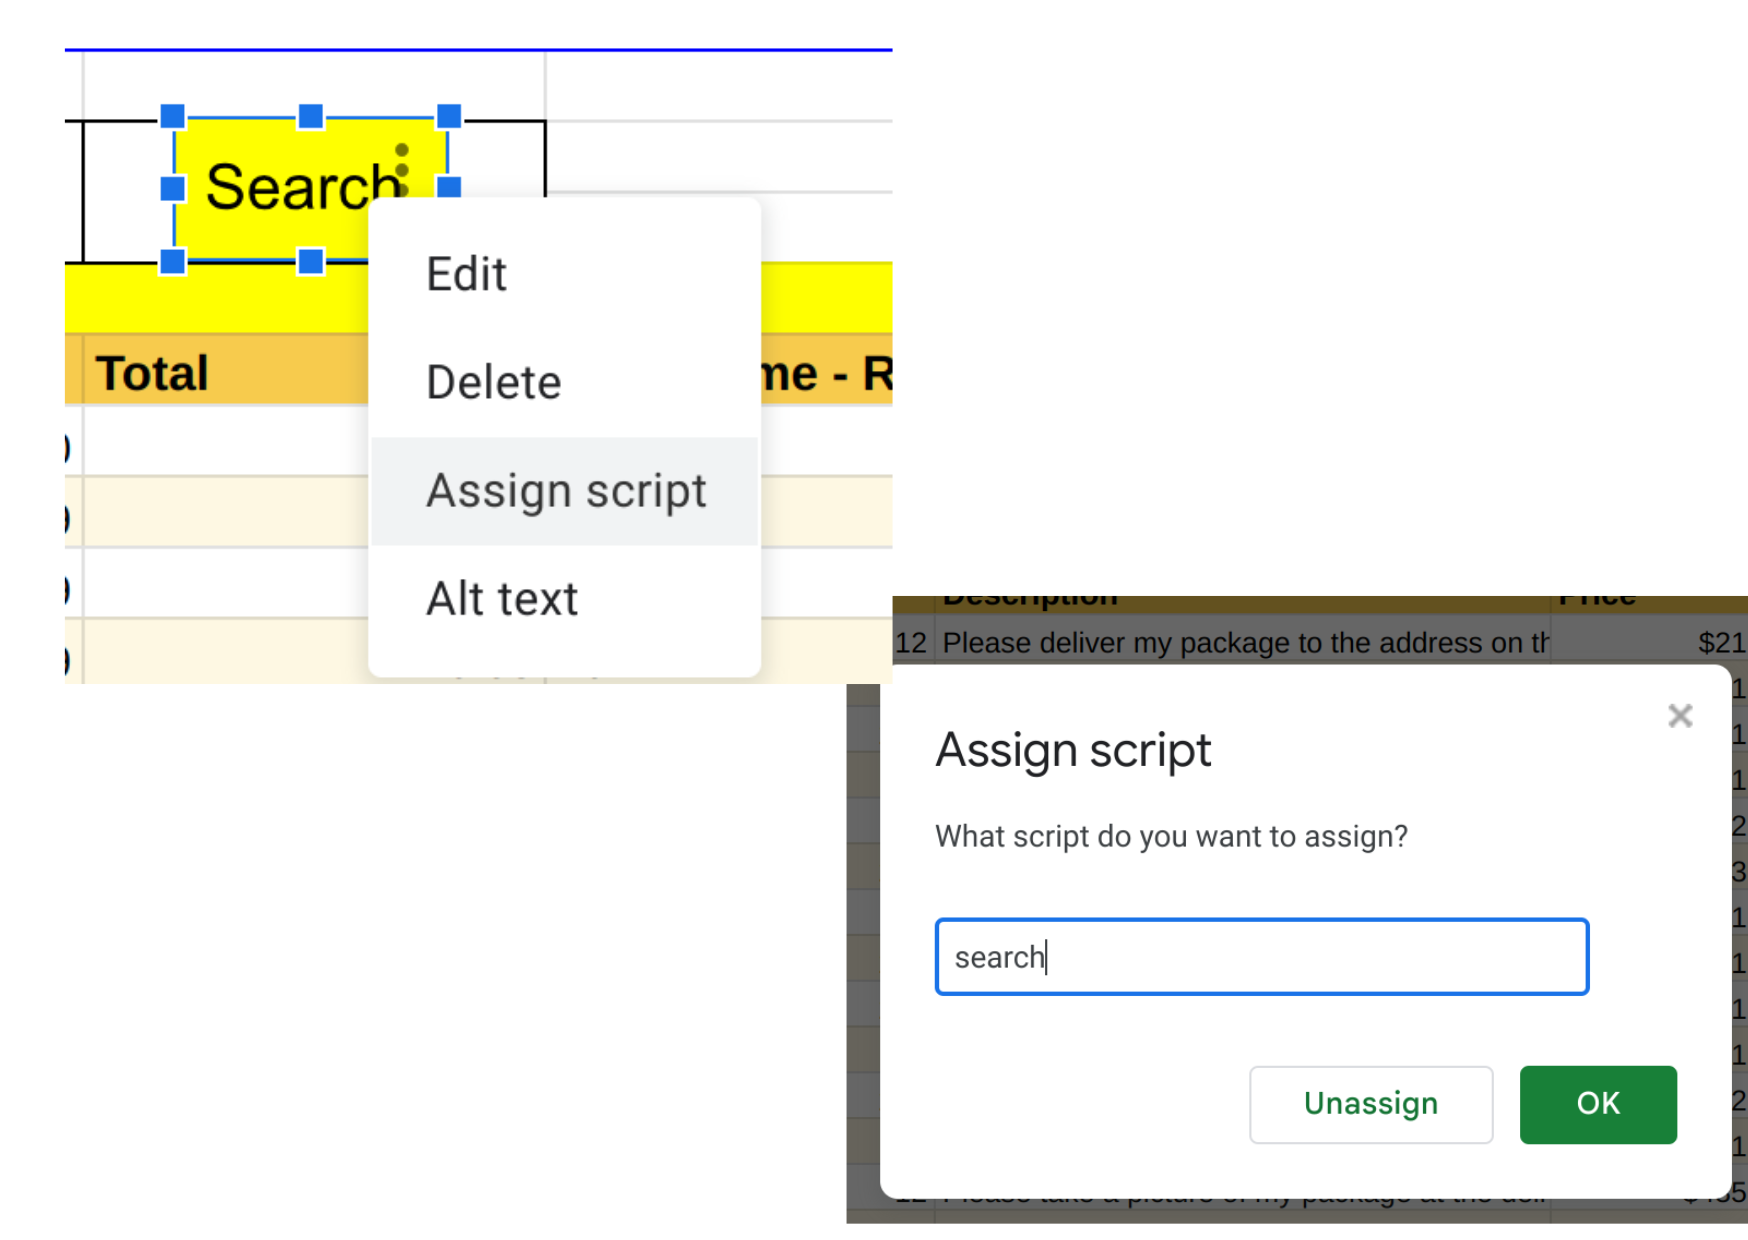
- Assign the Search Function: Right-click on the Search button in your form and select “Assign script.” In the popup window, type the name of the
searchfunction and click “OK.” This links the button to your code. - Ready, Set, Search: In your spreadsheet, experiment with different search combinations. Try entering terms in various combinations to see how the AND and OR searches yield different results.
Congratulations! You’ve Built a Powerful Search Engine in Google Sheets!
You’ve successfully accomplished an impressive feat: crafting a customized search engine within your Google Sheets. Let’s recap your achievements:
- Seamless Search Form: You created a user-friendly search form directly in your spreadsheet, simplifying data exploration.
- Scriptable Power: You harnessed the power of Apps Script to develop functions that handle various search operations behind the scenes.
- AND & OR Mastery: You implemented both AND and OR search functionalities, giving users flexibility in finding relevant data.
- Precise Matching: You designed a function that selects rows containing all specified search terms, ensuring accurate results.
- Duplicate Removal: You implemented a mechanism to eliminate duplicate entries, keeping your search results clean and concise.
- Informative Feedback: You integrated user-friendly toast messages to notify users about search progress and outcomes.
Exploring Customization Options
You’ve built a fantastic search engine, but remember, the journey doesn’t end here! With a bit of tweaking, you can adapt this tool to perfectly suit your specific needs and workflows. Here are some exciting possibilities to consider:
Diversifying Your Data: Break free from the confines of a single spreadsheet! Explore integrating with diverse data sources like inventory management systems, tax databases, or even restaurant reviews. With some adjustments to your code, you can unlock a wealth of information across different platforms.
Dynamic Search Inputs: Need more flexibility in your search criteria? Consider adding or removing input fields based on your evolving needs. This allows for more tailored searches and streamlines your data exploration process.
Detailed Search Logs: Keep track of your search history! Implement a log box to automatically record your latest search terms and the number of results found. This can be invaluable for revisiting past searches and analyzing trends.
Visual Appeal Matters: Enhance the user experience by giving your search form a visual makeover. Play with colors, fonts, and layout to create a more engaging and intuitive interface.
Speed Optimizations: Every second counts! Explore ways to optimize your search functions for faster response times. This might involve code refinement, data indexing, or leveraging caching strategies.
Taming Large Datasets: Working with massive databases? Don’t worry, you’ve got options! Implement logic to overcome the 6-minute runtime limit of Google Apps Script functions.
By exploring these avenues, you can transform your basic search function into a powerful and personalized data exploration tool. Remember, the possibilities are endless!
PS: How much more productive (or procrastinating) will you be with this new ability?
I am Nibesh Khadka. Share this blog & like the video if helpful! Find more of my contents at Script-Portal (Medium) & on my YouTube channel: CodingWithNibesh.
[ad_2]
Source link
