How to Build an Online Résumé on AWS Using S3, Route 53, CloudFront, and ACM
[ad_1]
If you’re new to AWS, you can probably appreciate the sense of overwhelm that comes from trying to understand all the different services (seriously, like, hundreds of them). What are they all for, and how do they work together?
And then once you’ve conquered some basic skills, the next challenge is how to demonstrate those skills to a potential employer. What kind of a project can you highlight on your résumé or CV, without breaking the bank?
In this hands-on tutorial, you’ll get help with both of those things by building your actual résumé/CV on AWS, by following these steps:
- Write code for your résumé using HTML, CSS and JavaScript
- Upload your files to a Simple Storage Service (S3) bucket that you configure for static website hosting, with public access
- Use Route 53 to set up a custom domain for your résumé
- Set up a TLS/SSL certificate with AWS Certificate Manager (ACM)
- Create a CloudFront distribution (that points to the files in S3) where you can apply the certificate.
Here’s what we’ll build:
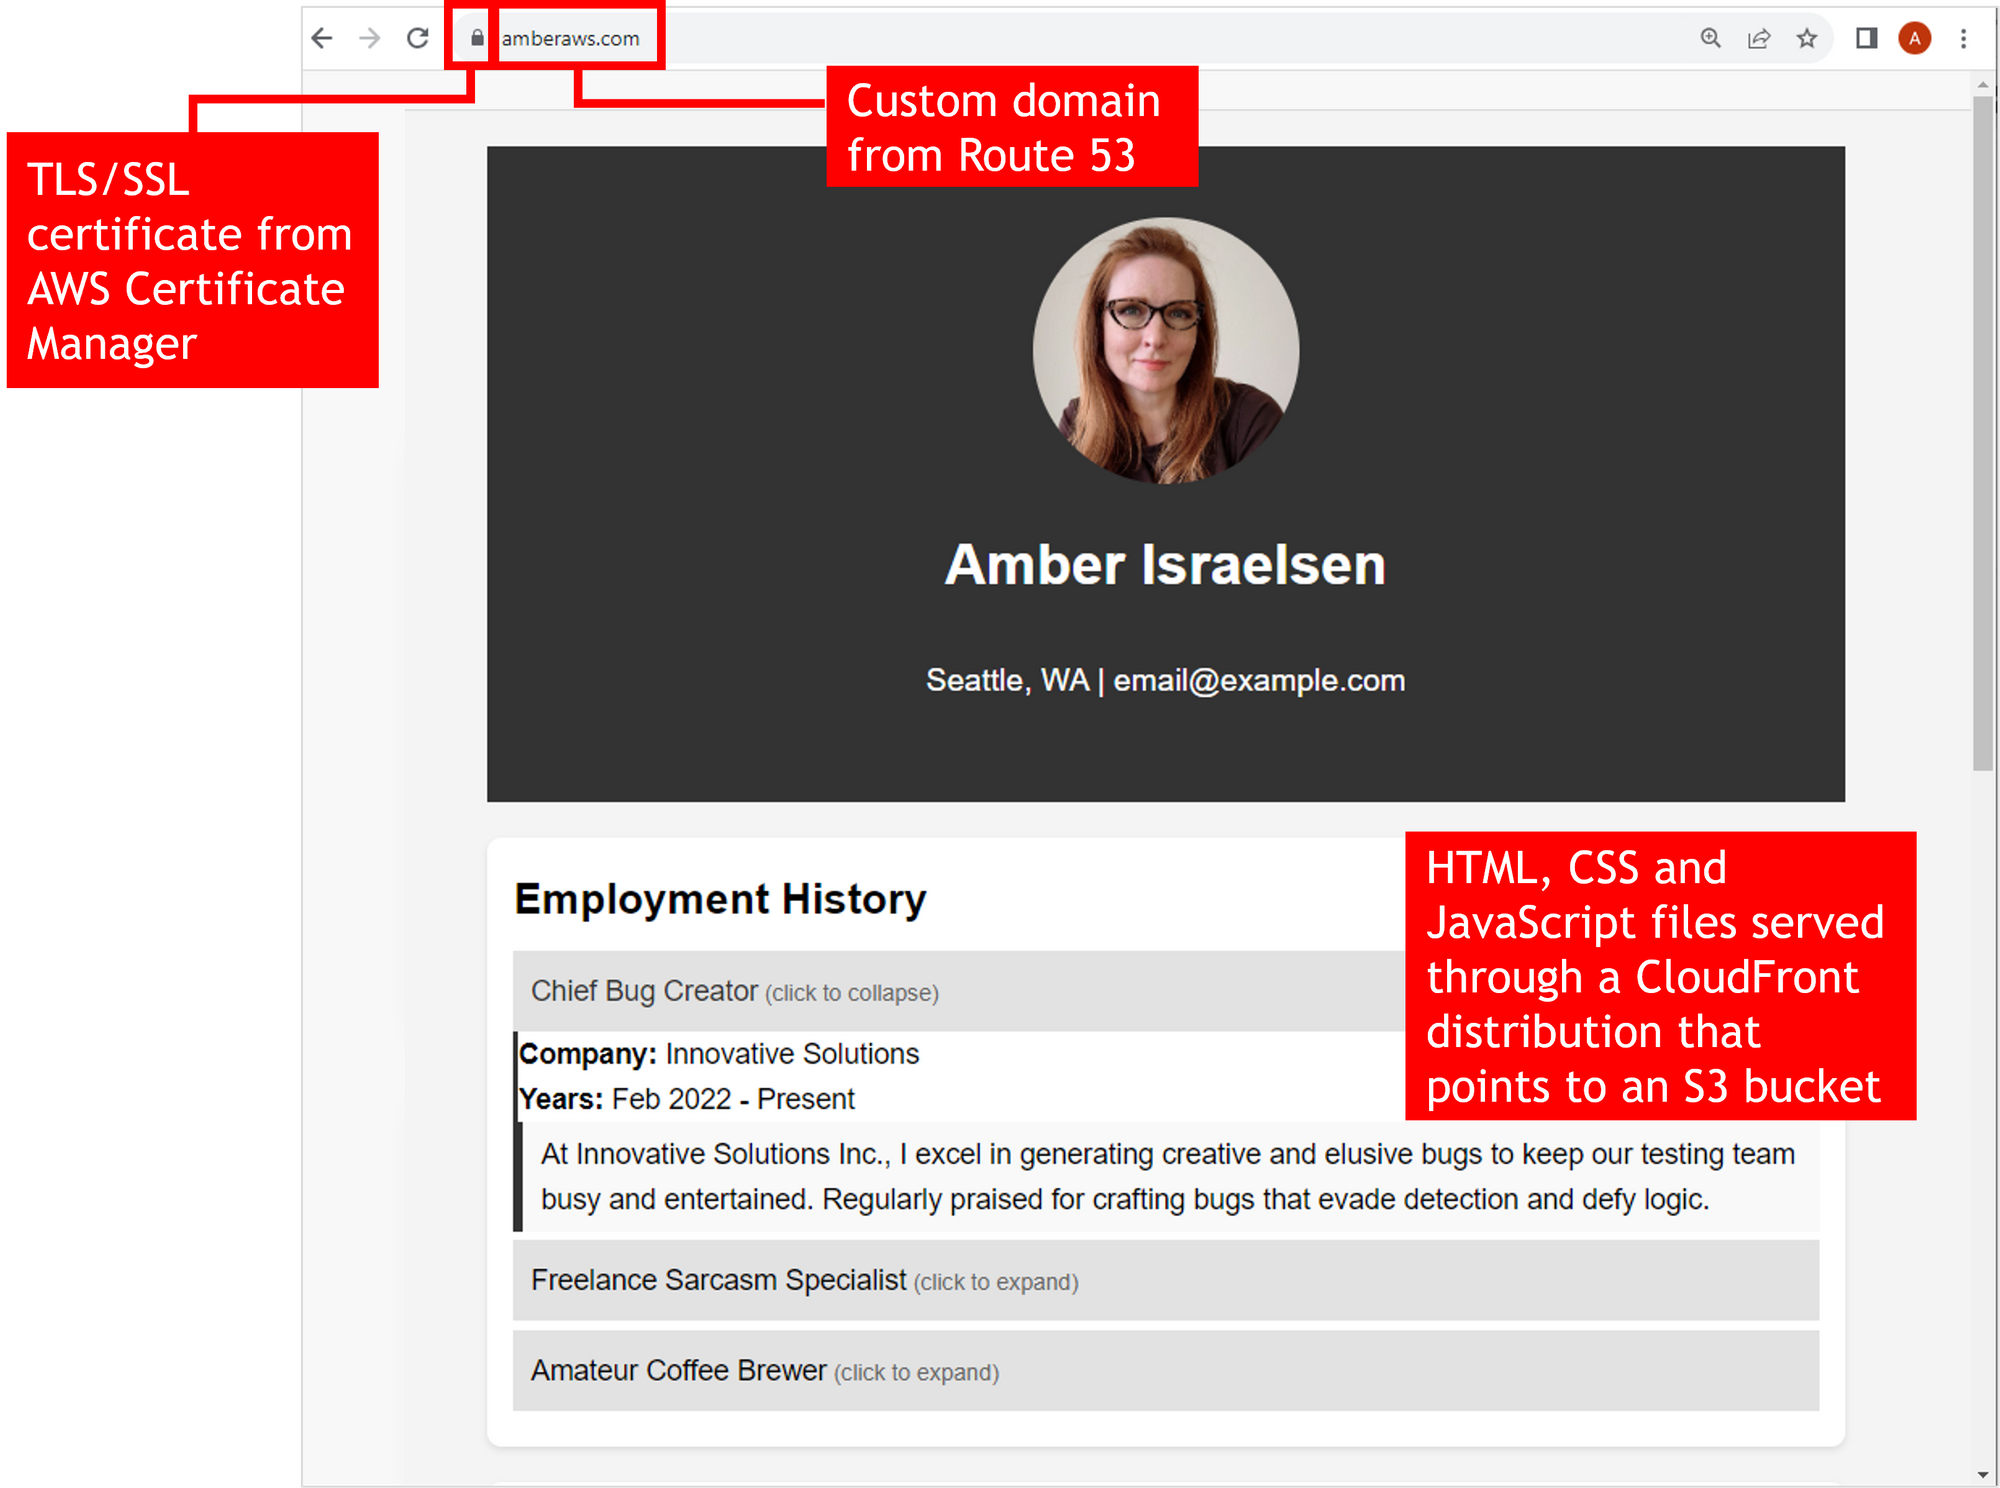
By the end of this tutorial, you’ll have more than just an online résumé. You’ll have a real-world project that you can use to dazzle your friends, family, network, and potential employers.
For a live walk-through of the project, check out this video:
Table of Contents
What You Need to Follow Along
To successfully complete this tutorial, you’ll need the following:
- An AWS account: You can set one up for free (though it does require a credit card for validation).
- Basic experience: Having some basic AWS experience will make the tutorial easier, but you should still be able to follow along if you’re a total newbie.
- Appropriate permissions: I’d suggest logging in as an IAM user with administrator privileges, or using your root account (though I’m obliged to say that working in your root account day-to-day is not recommended/not a best practice).
But First, What Will This Cost?
Before we get too far along, let’s break down the different services and what they’ll cost.
If you want to delete everything after the tutorial, be sure to see that section towards the end of this article. I’d also recommend setting up an AWS Budget so you can put a limit on spending and be notified if you’re going to exceed it (no surprise bills, please!).
- S3: Used to host website files. If you’re still in the AWS Free Tier, there should be no cost. Outside of the Free Tier, the cost should be minimal, as in cents.
- Route 53: If you decide to purchase a domain name through Route 53 (optional – you can also “bring your own” domain name from another provider), it will cost $10+. You’ll also need a hosted zone, which will run you 50 cents per month. And Route 53 queries (when someone visits your domain) will cost 40 cents per million queries.
- AWS Certificate Manager: A TLS/SSL certificate through ACM is free.
- CloudFront: Inside the Free Tier, there is no cost. Outside of the Free Tier, it will depend on traffic, but for our purposes, it will likely only cost cents. See the full pricing page for more info.
Create the Code (HTML, CSS, JavaScript) for Your Résumé
This section is where you can let your creativity (and your coding skills) fly. Nothing here is specific to AWS – it’s just good ol’ web development.
You’ll eventually be using an S3 bucket to host your résumé files (HTML, CSS and JavaScript). S3 can only host a static website, meaning you can’t include anything that requires server-side code. But front-end stuff all day long.
I won’t be too prescriptive for the code you use here – this is your résumé, after all. But you’ll want to highlight the “usual” résumé things: employment history, education, skills/certifications, and maybe things like honors/awards or hobbies to make you seem more human.
If you want to list skills of HTML, CSS and JavaScript on your résumé, you’ll ideally want to code this part by hand (wink, no ChatGPT help!), but you’re also welcome to use my code below as a starting point.
index.html file
<!DOCTYPE html>
<html lang="en">
<head>
    <meta charset="UTF-8">
    <meta name="viewport" content="width=device-width, initial-scale=1.0">
    <title>Online Resume - Your Name</title>
    <link rel="stylesheet" href="https://www.freecodecamp.org/news/aws-project-build-a-resume/styles.css">
</head>
<body>
    <div class="container">
        <header>
            <img src="headshot.jpg" alt="Headshot" class="headshot">
            <h1 id="name">Name</h1>
            <p id="contactInfo">Location | Email</p>
        </header>
        <section id="employmentHistory">
            <h2>Employment History</h2>
            <div id="timeline"></div> <!-- Placeholder for the JavaScript array -->
        </section>
        <section id="education">
            <h2>Education</h2>
            <ul>
                <li>Degree | University (Year)</li>
                <li>Degree | University (Year)</li>
                <!-- Add more list items as needed -->
            </ul>
        </section>
        <section id="skills">
            <h2>Skills/Certifications</h2>
            <ul>
				<li>Skill 1</li>
				<li>Skill 2</li>
				<li>Skill 3</li>
				<li>Skill 4</li>
                <!-- Add more list items as needed -->
			</ul>
        </section>
    </div>
    <script src="script.js"></script>
</body>
</html>
styles.css file
/* Base reset for padding and margin for all elements */
* {
    padding: 0;
    margin: 0;
    box-sizing: border-box;
}

/* Body styling */
body {
    font-family: 'Arial', sans-serif;
    line-height: 1.6;
    background-color: #f4f4f4;
}

/* Container for centering the content */
.container {
    width: 80%;
    margin: auto;
    overflow: hidden;
    padding: 20px;
}

/* Header styling */
header {
    background: #333;
    color: #fff;
    padding: 20px;
    text-align: center;
}

/* Header image and name styling */
.headshot {
    width: 150px;
    height: 150px;
    border-radius: 50%;
    display: block;
    margin: 20px auto;
}

header h1 {
    margin-bottom: 10px;
}

/* Contact information styling */
#contactInfo {
    font-size: 1.1em;
    margin-bottom: 20px;
    color: #fff;
    padding: 15px;
}


/* Section styling for employment, education, and skills */
section {
    background: #fff;
    margin: 20px 0;
    padding: 15px;
    border-radius: 8px;
    box-shadow: 0 2px 4px rgba(0,0,0,0.1);
}

section h2 {
    margin-bottom: 10px;
}

/* Timeline styling */
#timeline .entry {
    border-left: 3px solid #333;
    margin-bottom: 5px;
    cursor: pointer;
}

#timeline .entry-header {
    background: #e2e2e2;
    padding: 10px;
    margin-left: -3px;
}

#timeline .entry-header:hover {
    background: #ccc;
    color: #333;
}

/* Style for the job description content */
#timeline .entry-content p {
    padding: 5px 10px;
    background: #f9f9f9;
    border-left: 3px solid #333;
    display: block;
}

/* List styling for education and skills */
section ul {
    list-style: inside square;
    padding: 0 20px;
}

section ul li {
    padding: 2px 0;
}

/* Adjustments for active class */
.entry.active .entry-header {
    background-color: #e2e2e2;
    color: #333;
}

.entry.active .entry-content {
    display: block;
}

/* Visual cue for clickable items */
.entry .entry-header:after {
    content: ' (click to expand)';
    font-size: 0.8em;
    color: #666;
}

.entry.active .entry-header:after {
    content: ' (click to collapse)';
    font-size: 0.8em;
    color: #666;
}
script.js file
// Used on the résumé to make the employment history interactive (each job is clickable)
document.addEventListener('DOMContentLoaded', function () {
    // Placeholder array with employment history data
    const employmentHistory = [
        { id: 1, title: 'Job Title', company: 'Company Name', years: 'Year - Year', description: 'Description of what you did' },
        { id: 2, title: 'Job Title', company: 'Company Name', years: 'Year - Year', description: 'Description of what you did' },
        { id: 3, title: 'Job Title', company: 'Company Name', years: 'Year - Year', description: 'Description of what you did' }
        // Add more entries as needed
    ];

    const timeline = document.getElementById('timeline');

    // Create timeline entries
    employmentHistory.forEach(job => {
        // Entry container for job
        const entry = document.createElement('div');
        entry.className="entry";
        entry.id = 'entry-' + job.id;

        // Title header for job
        const header = document.createElement('div');
        header.className="entry-header";
        header.innerText = job.title;

        // Content container for job, initially hidden
        const content = document.createElement('div');
        content.className="entry-content";
        content.innerHTML = `<strong>Company:</strong> ${job.company}<br>
                             <strong>Years:</strong> ${job.years}<br>
                             <p>${job.description}</p>`;
        content.style.display = 'none';

        // Append header and content to the entry
        entry.appendChild(header);
        entry.appendChild(content);

        // Event listener to toggle content visibility
        header.addEventListener('click', function () {
            // Check if the clicked header's content is currently shown
            const isContentShown = content.style.display === 'block';
            // Hide all open contents
            document.querySelectorAll('.entry-content').forEach(el => {
                el.style.display = 'none'; // Hide content
            });
            // Deactivate all headers
            document.querySelectorAll('.entry').forEach(el => {
                el.classList.remove('active'); // Remove active class
            });

            if (!isContentShown) {
                // If it was not shown before, display it
                content.style.display = 'block';
                entry.classList.add('active');
            } // If it was shown, it will be hidden as part of the above loop
        });

        timeline.appendChild(entry);
    });
});
Create an S3 Bucket and Configure it for Static Website Hosting and Public Access
Now that you have your three code files (plus don’t forget a “headshot.jpg” to display your smiling face), you need somewhere to put them.
In AWS, S3 is a great option for inexpensive object (read: files) storage. And if you’re only using client-side code like you are, then you can configure S3 for static website hosting.
Create an S3 bucket
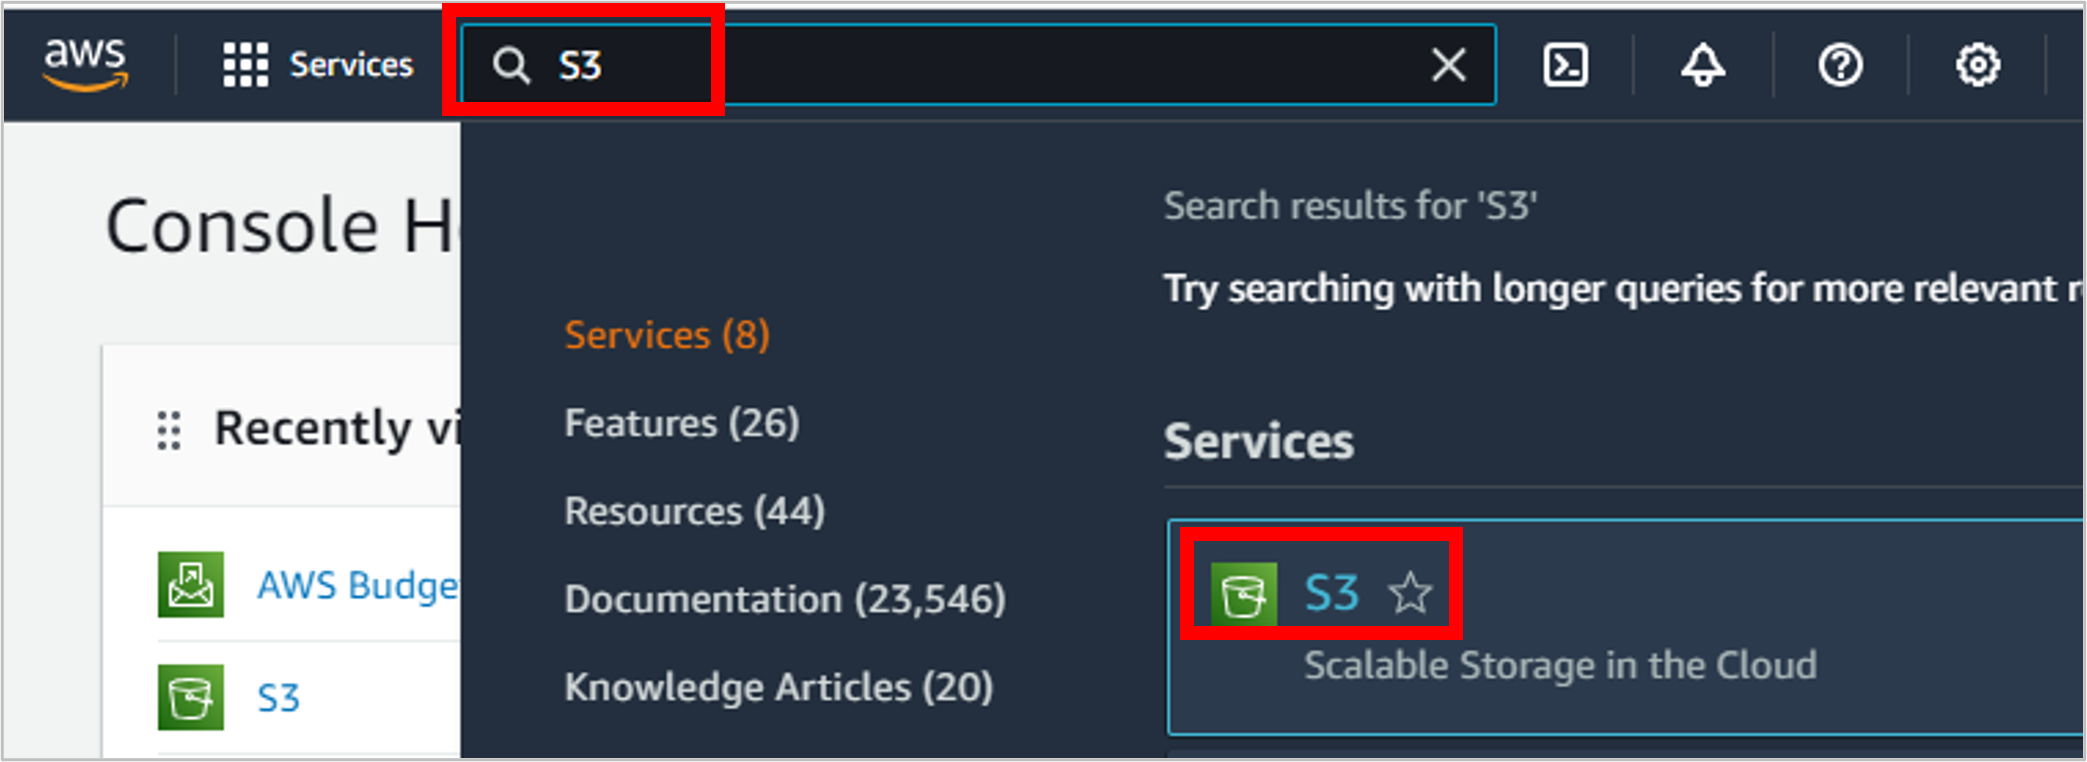
In the AWS Management Console, navigate to S3.
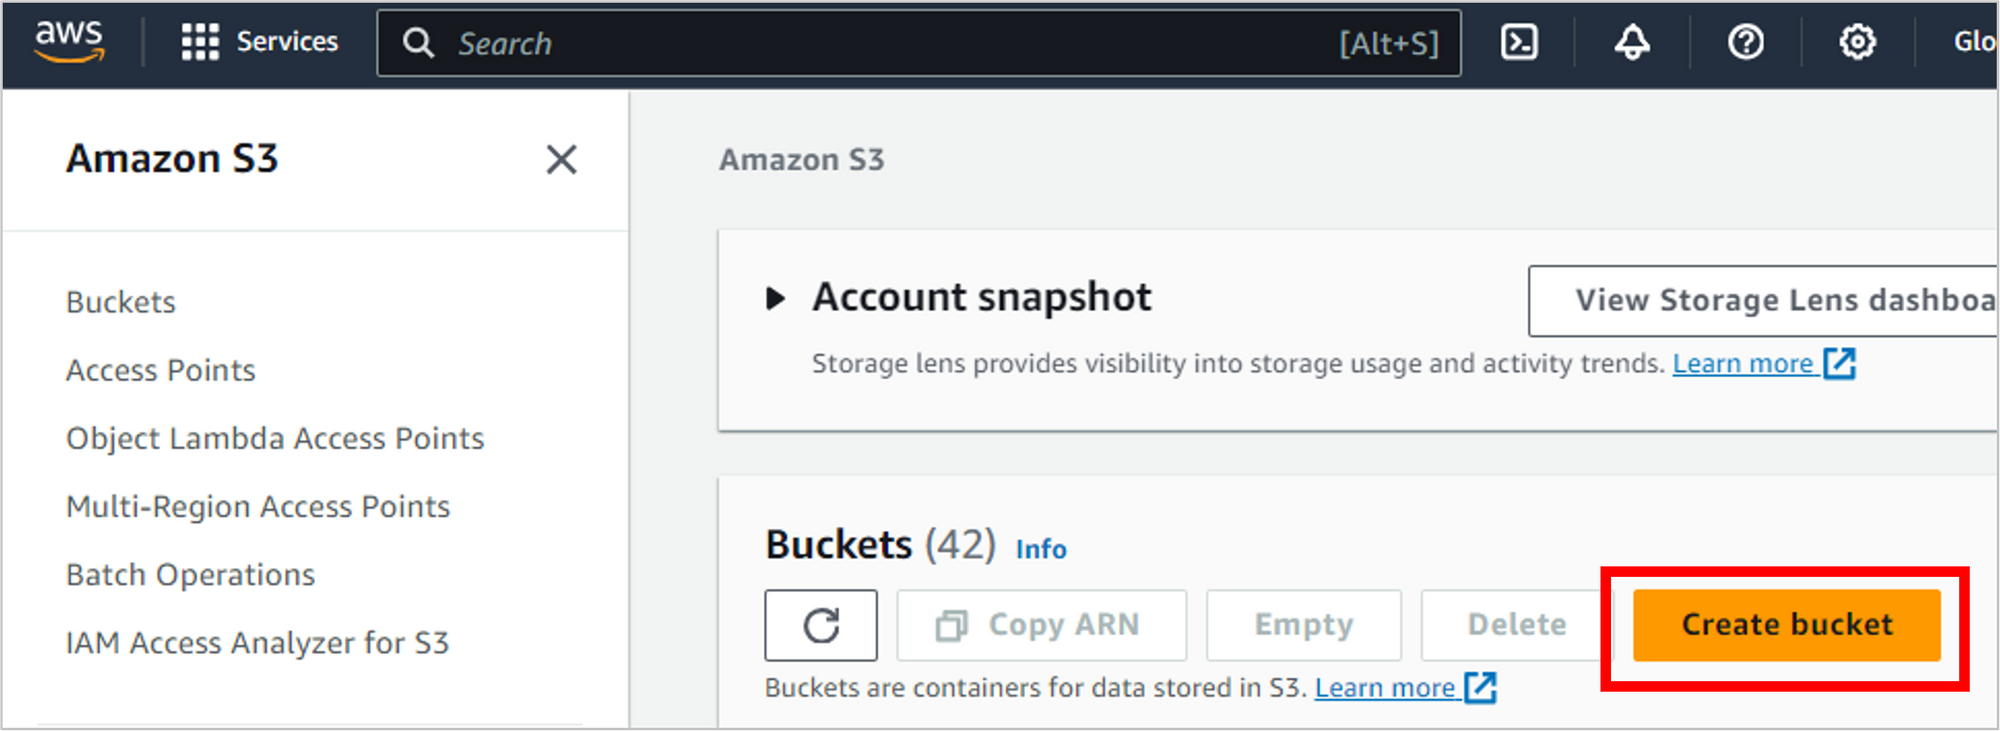
Click Create bucket.
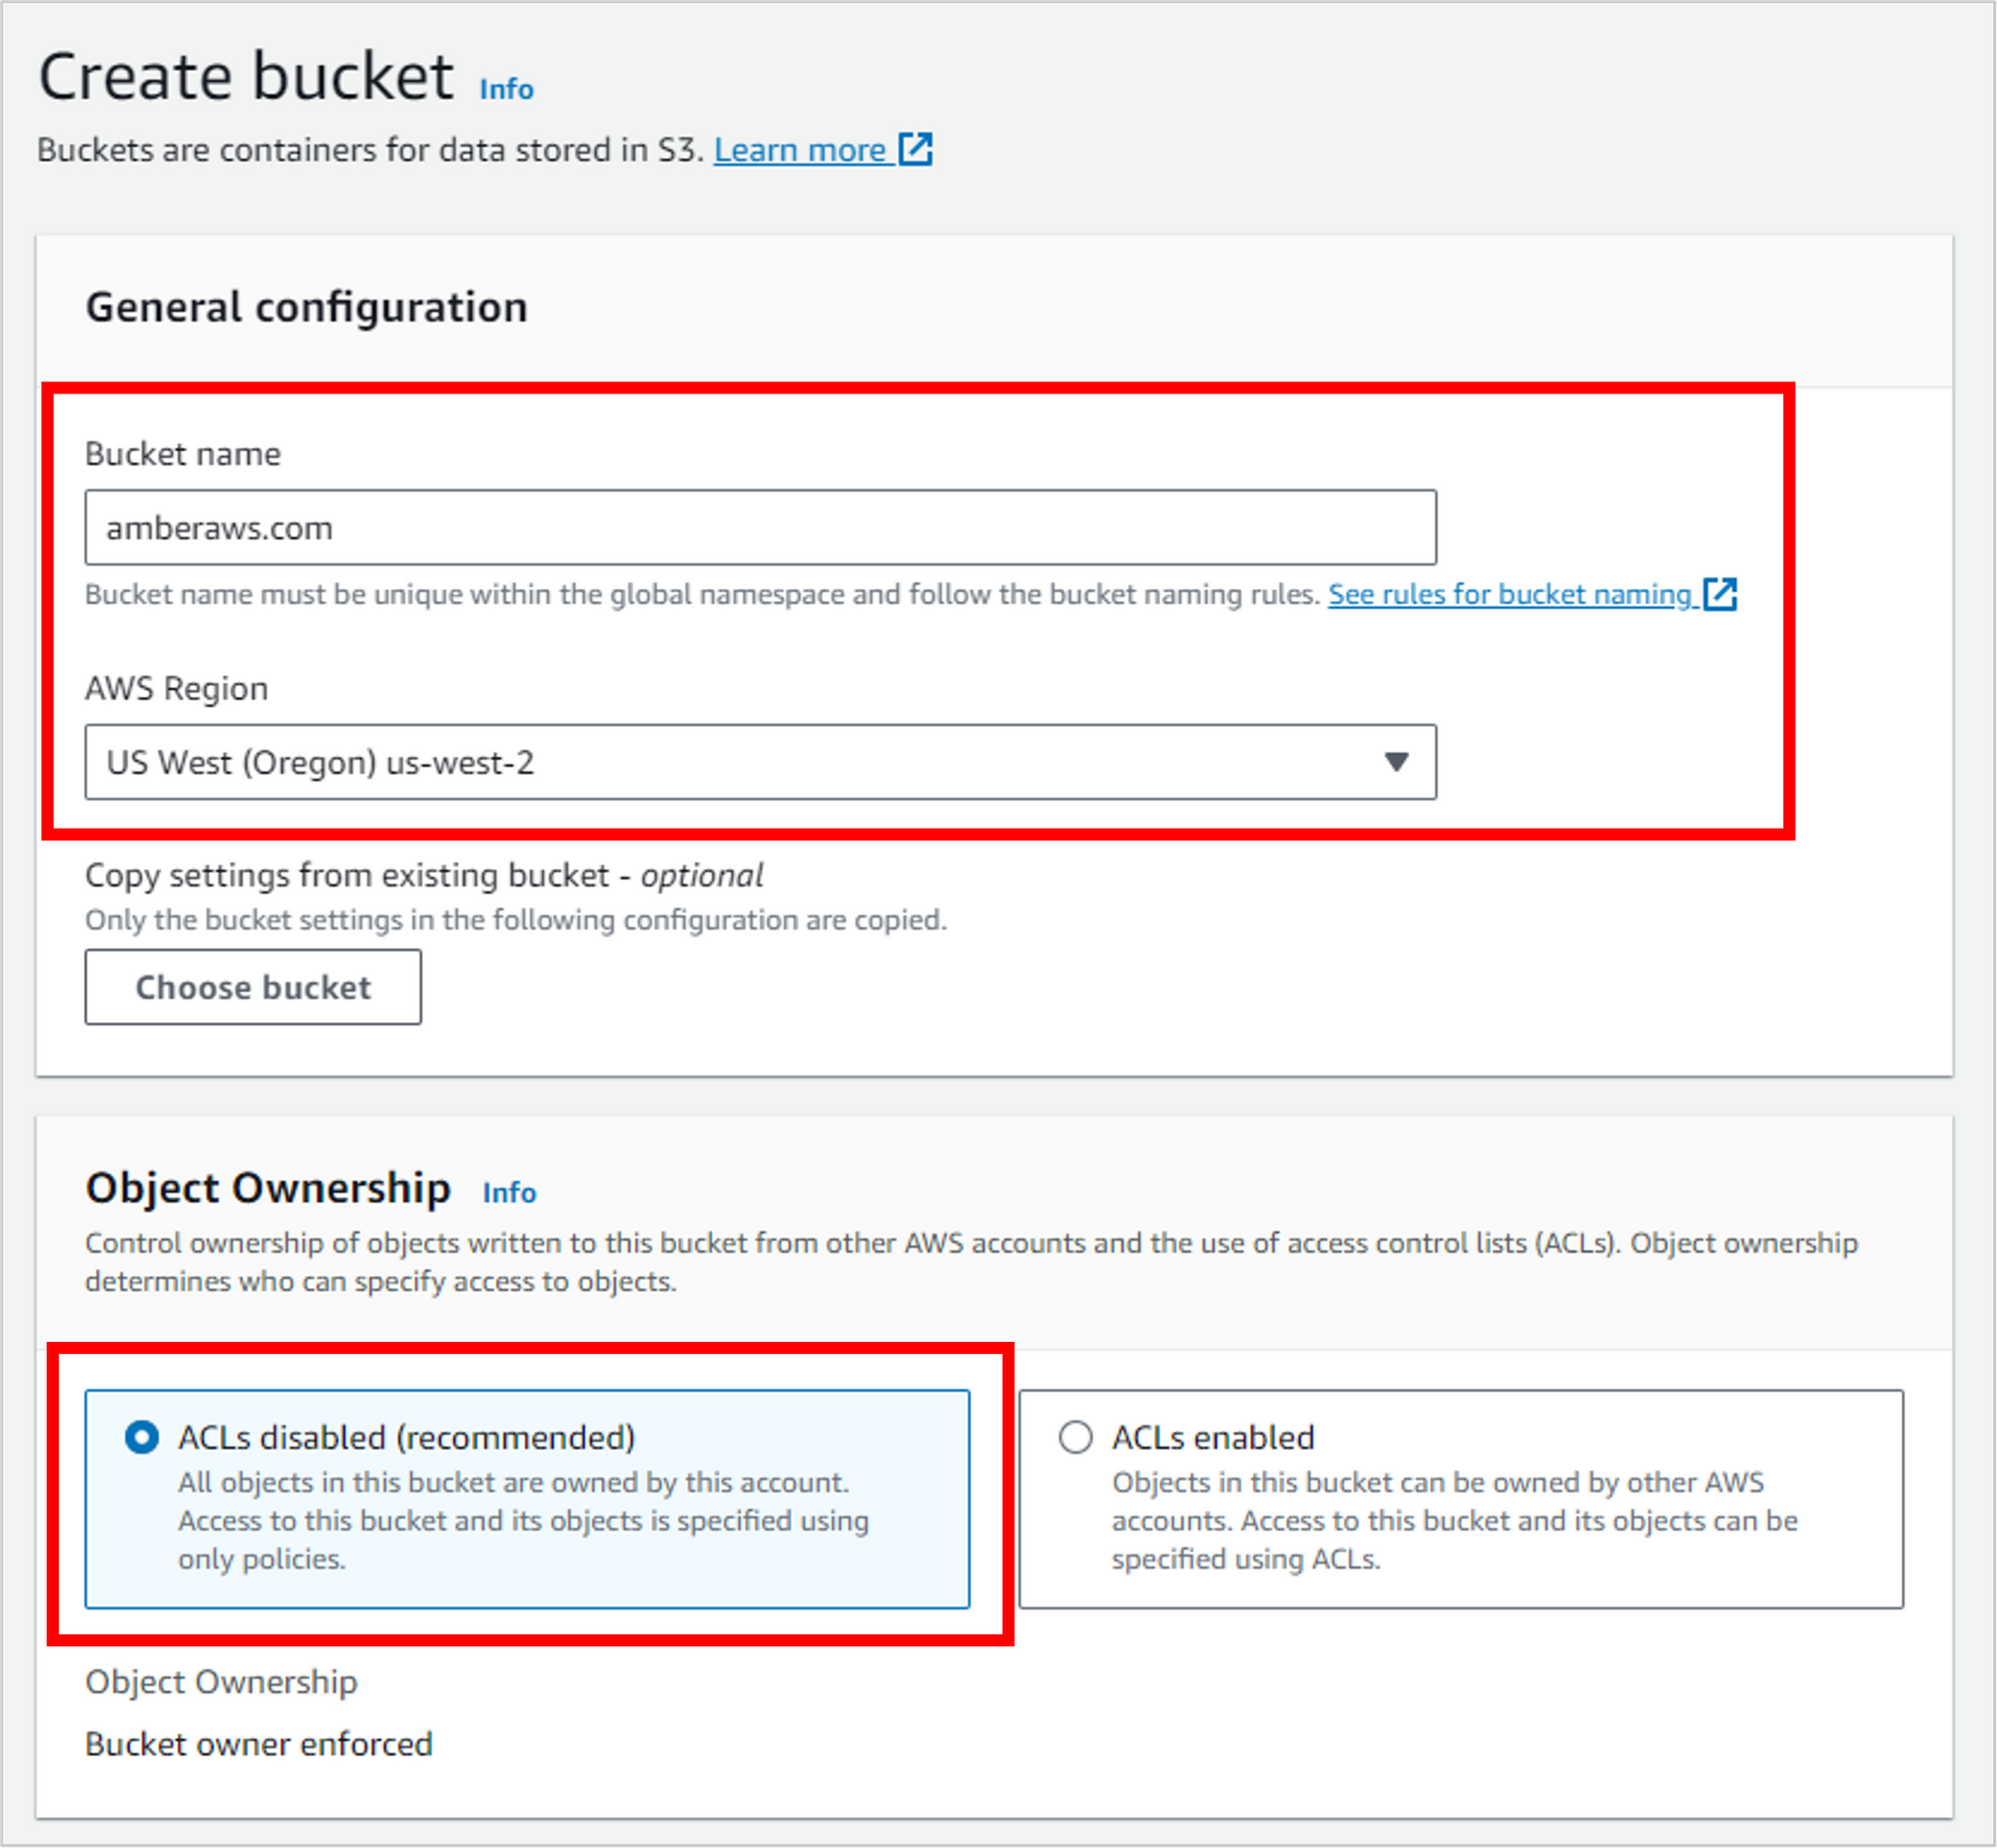
Enter the details for your bucket.
- Bucket name: IMPORTANT! If you plan to use a custom domain for your résumé, then this bucket name should match the domain name exactly. For example, I’ll be using “amberaws.com” so my bucket name needs to be “amberaws.com”. If you use a different name, you’ll run into trouble when you get to the Route 53 part of the tutorial.
- AWS Region: You can choose any region you’d like, but I’d recommend going with the one closest to you.
- Object Ownership: Leave the default of ACLs disabled (recommended).
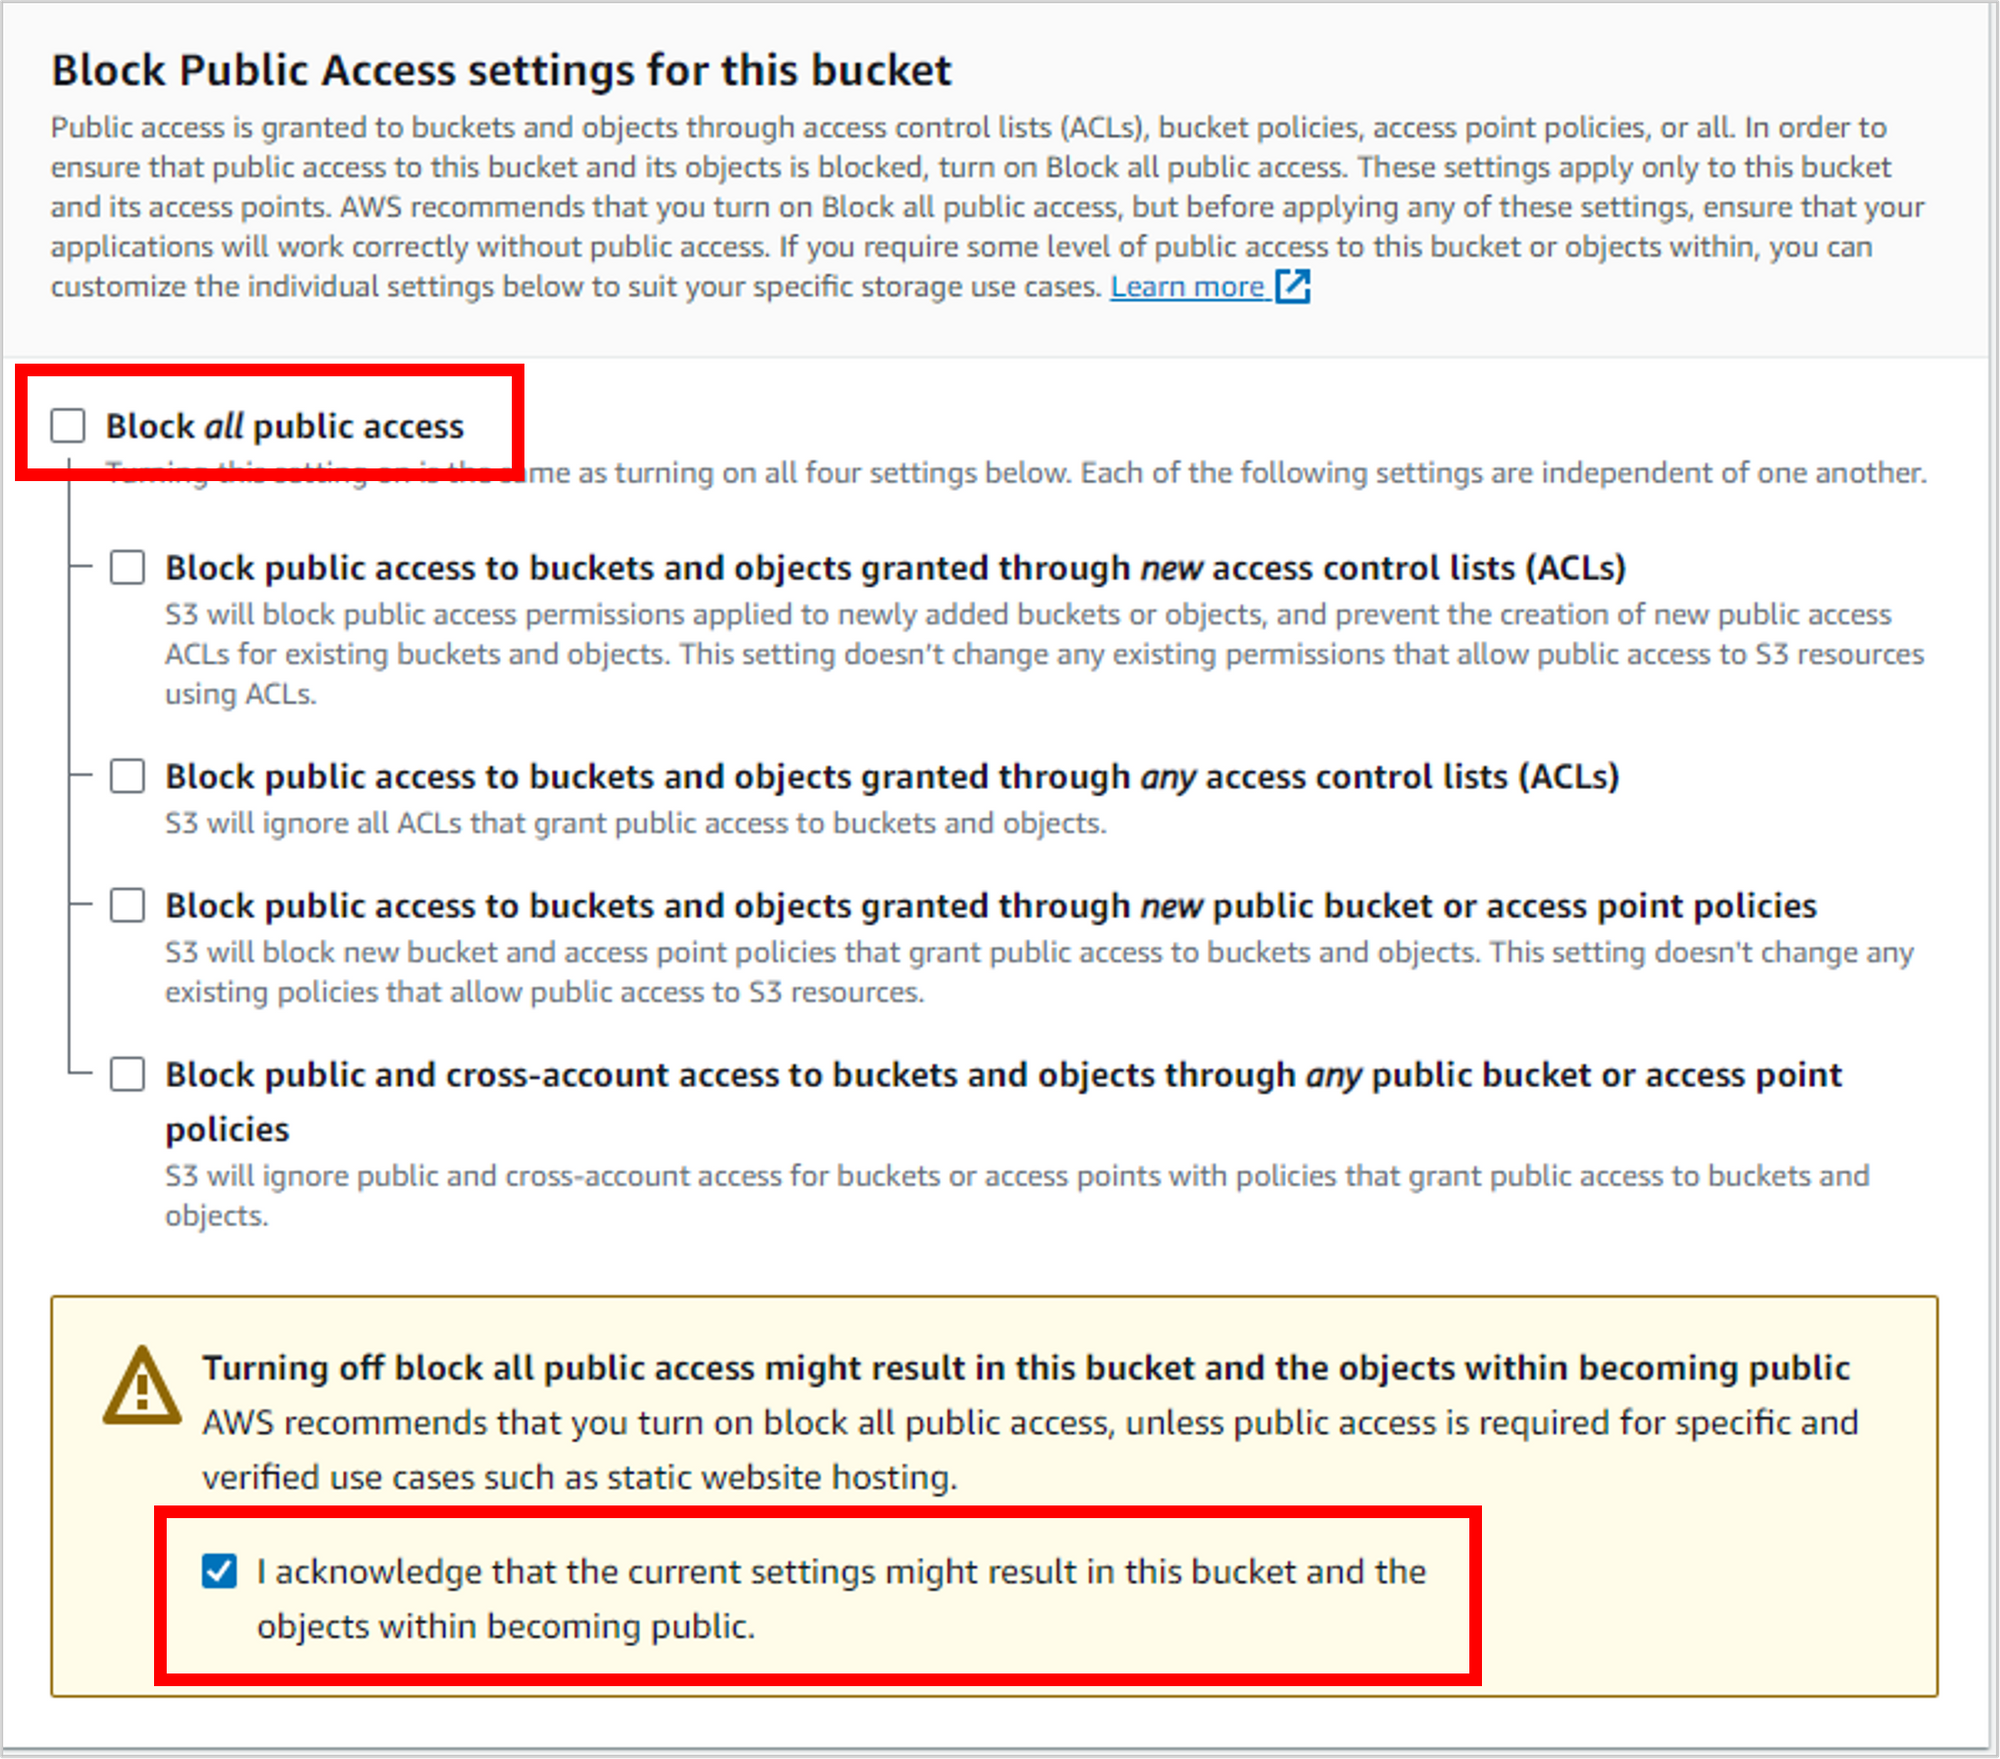
Scrolling down, deselect the setting for Block all public access. NOTE: In most scenarios, this is not recommended, as you’ll see from the warning you receive when you disable it. But because you’re creating a public résumé that you DO want to be open to the world, then disabling this is appropriate.
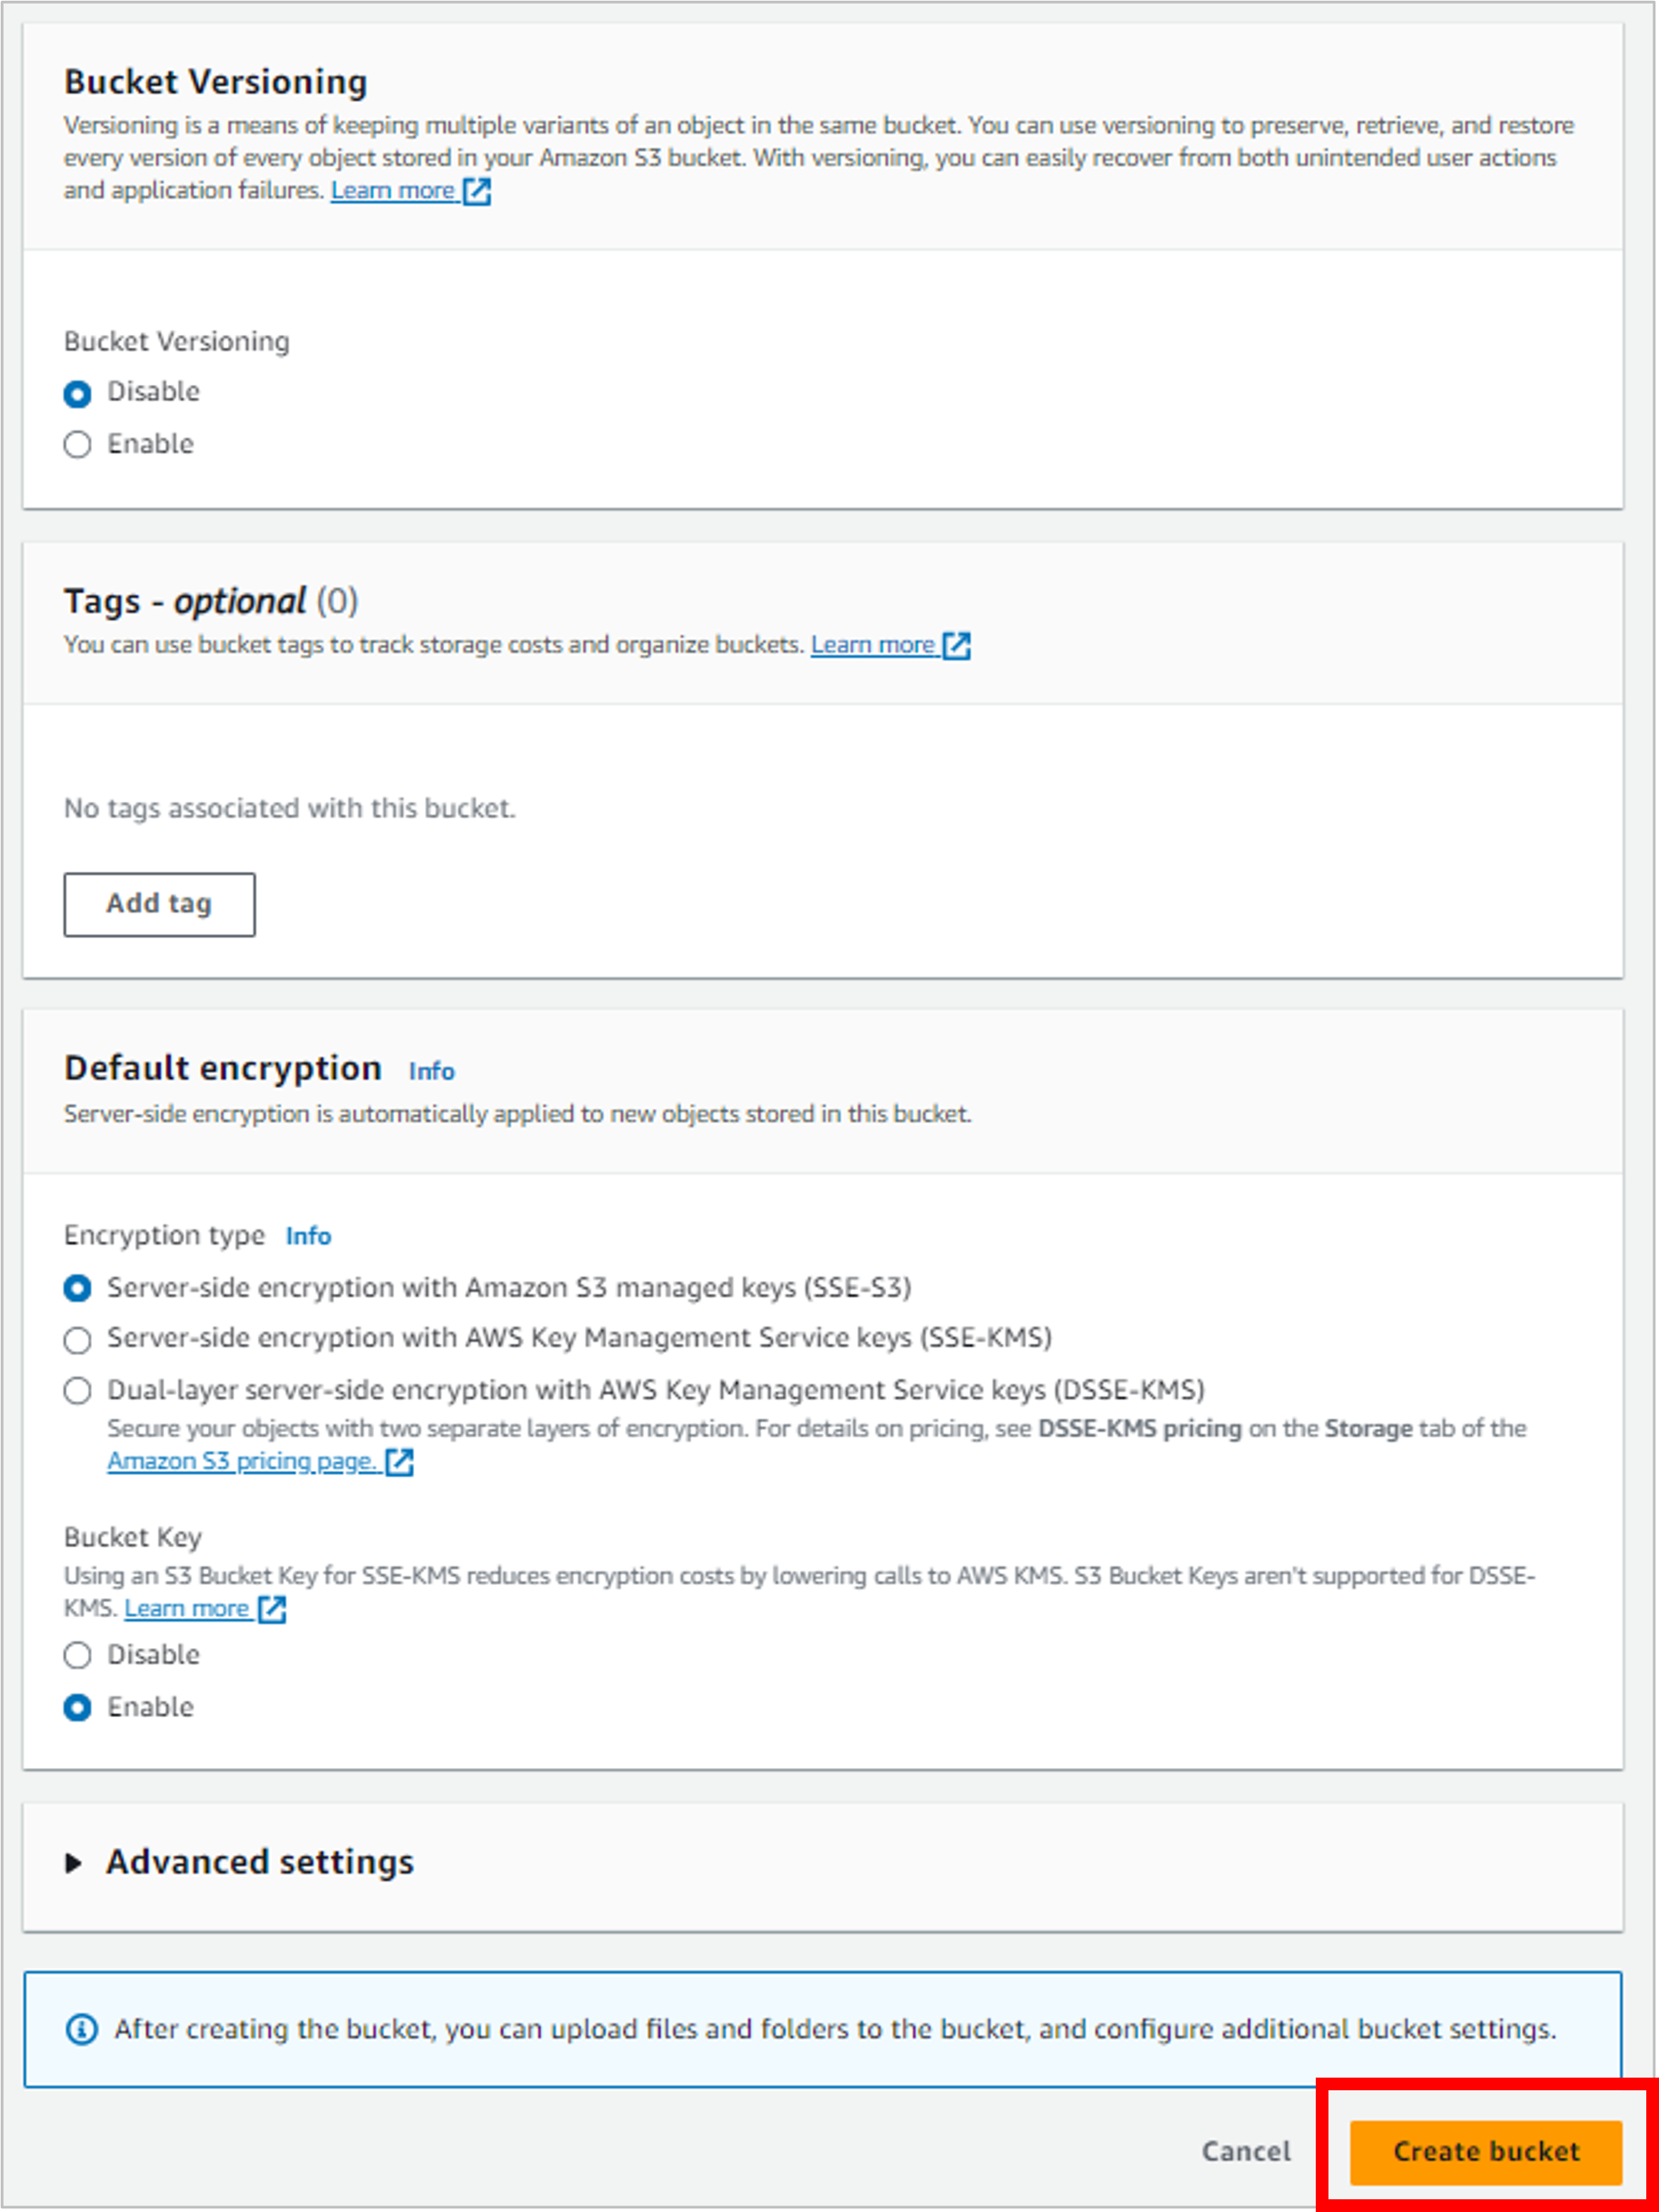
Use the defaults for the rest of the bucket settings and then click Create bucket.
Now you have an empty bucket, but it’s not quite ready for primetime in terms of website hosting. You’ll need to make a couple more updates.
Enable static website hosting
For S3 to be able to serve your files up as a website, you’ll need to enable that on the bucket.
Click into the bucket you just created and go to the Properties tab.
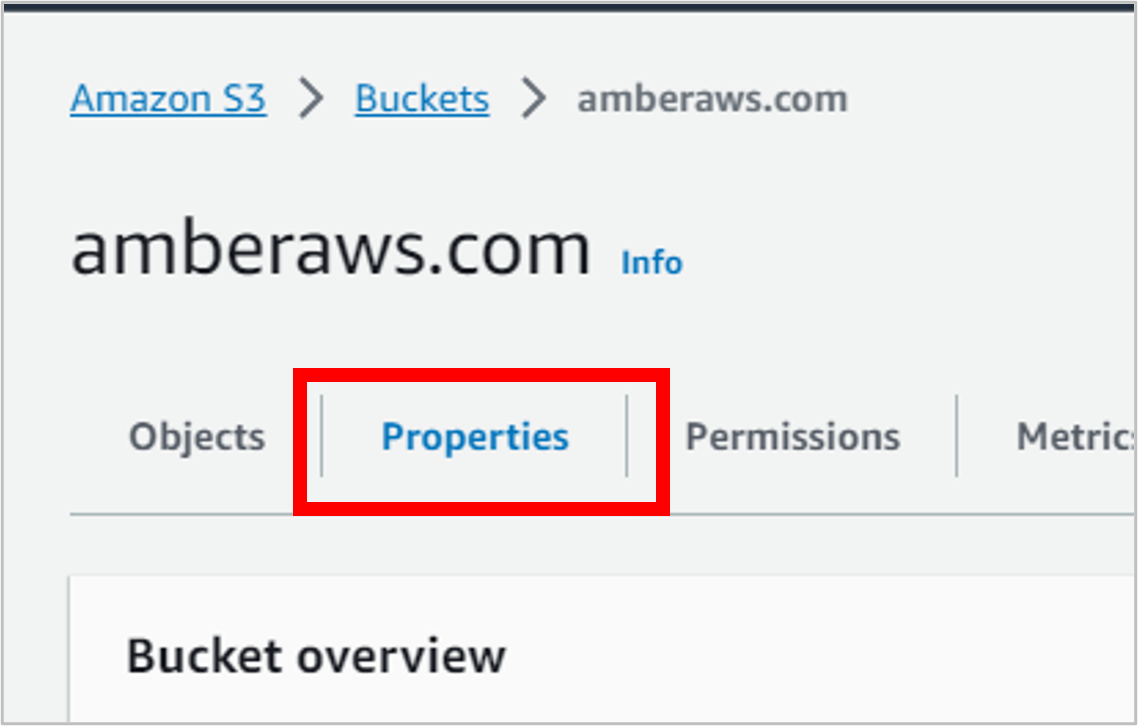
Scroll all the way down to the bottom of the page, and in the Static website hosting section, click Edit.

Select Enable. This will open additional options.
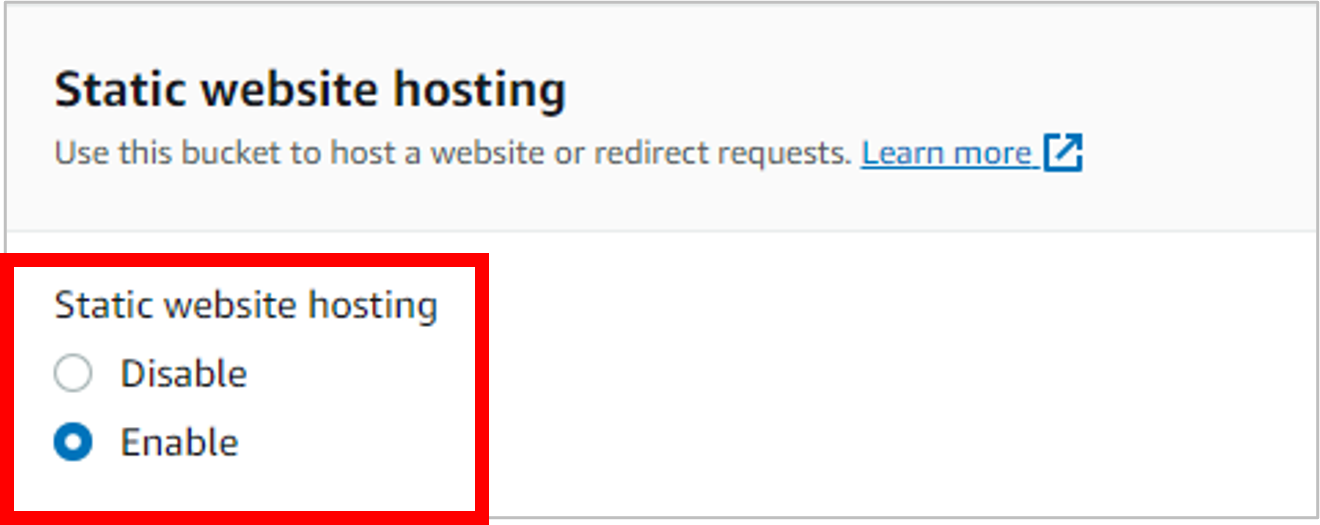
For the Index document, enter index.html. This specifies the default home page for the site (your HTML code for your résumé). Then click Save changes.
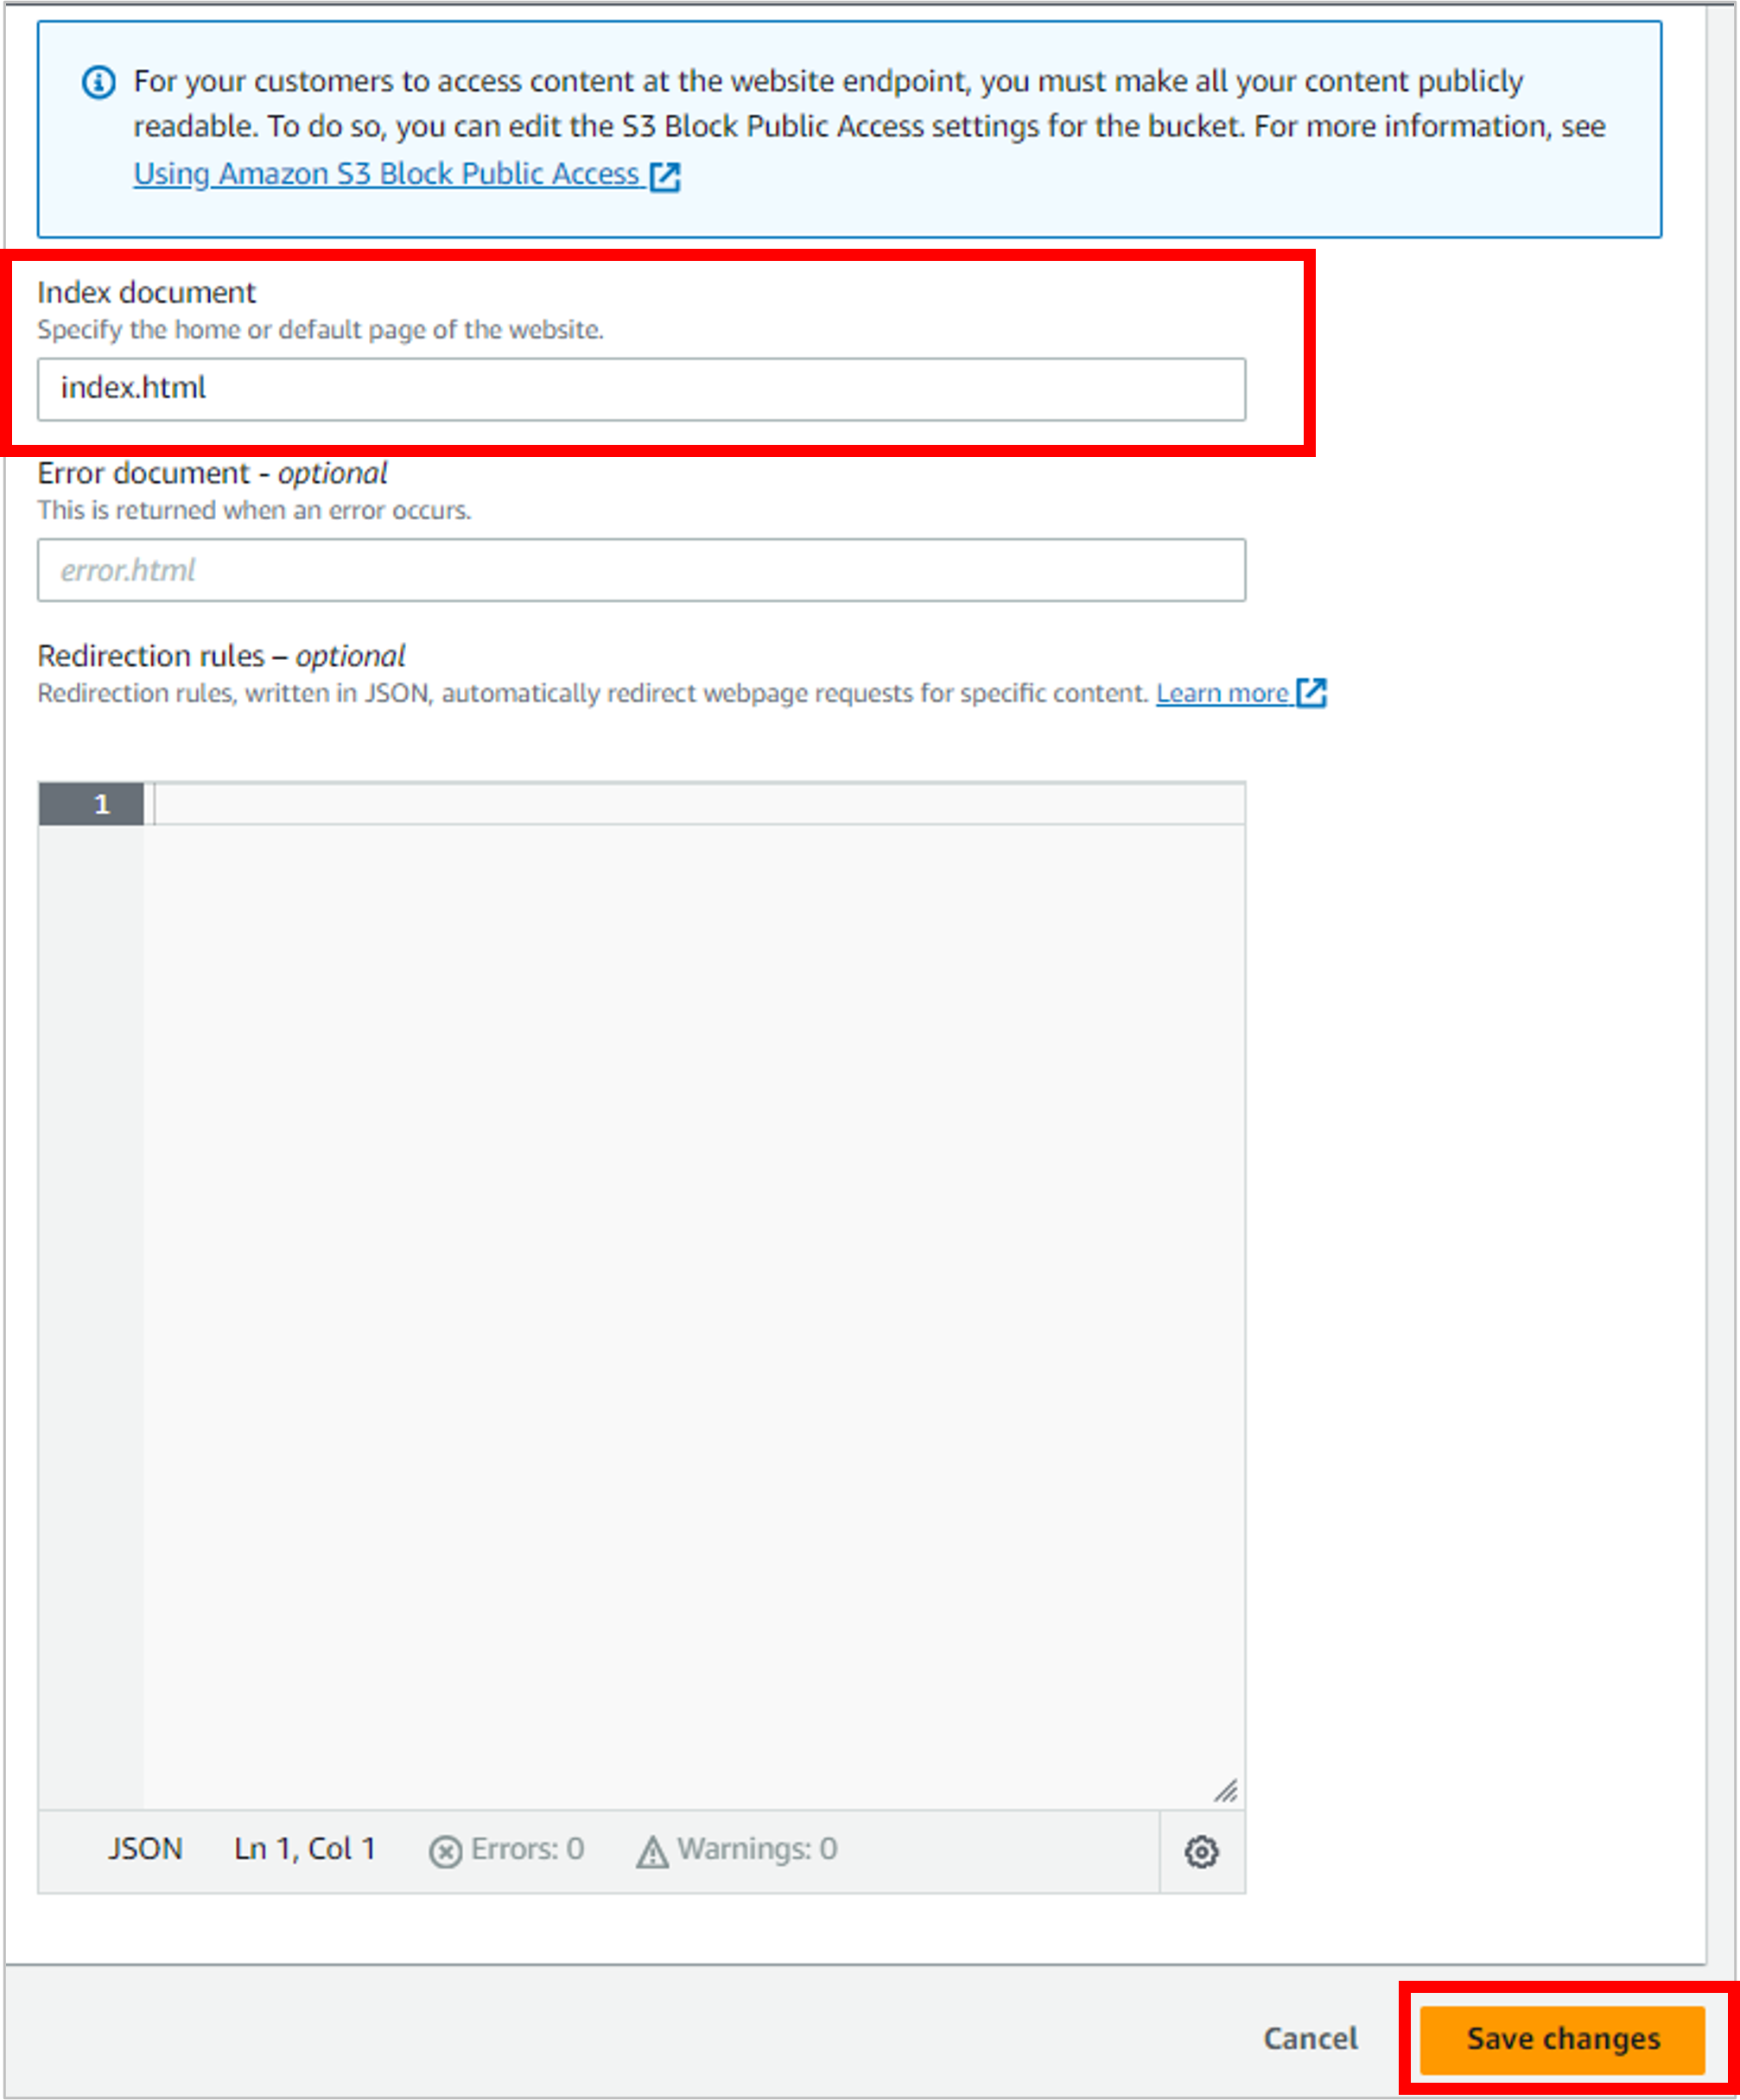
Add a bucket policy to allow the contents of the bucket to be publicly accessible
When you created the bucket, you said you didn’t want to block all public access. But even with that setting, the default behavior of S3 is to “deny” everything. So if you don’t explicitly say that people can access the files in your bucket, they won’t be able to. You’ll grant read permissions with a bucket policy.
At the top of the page, click the Permissions tab.
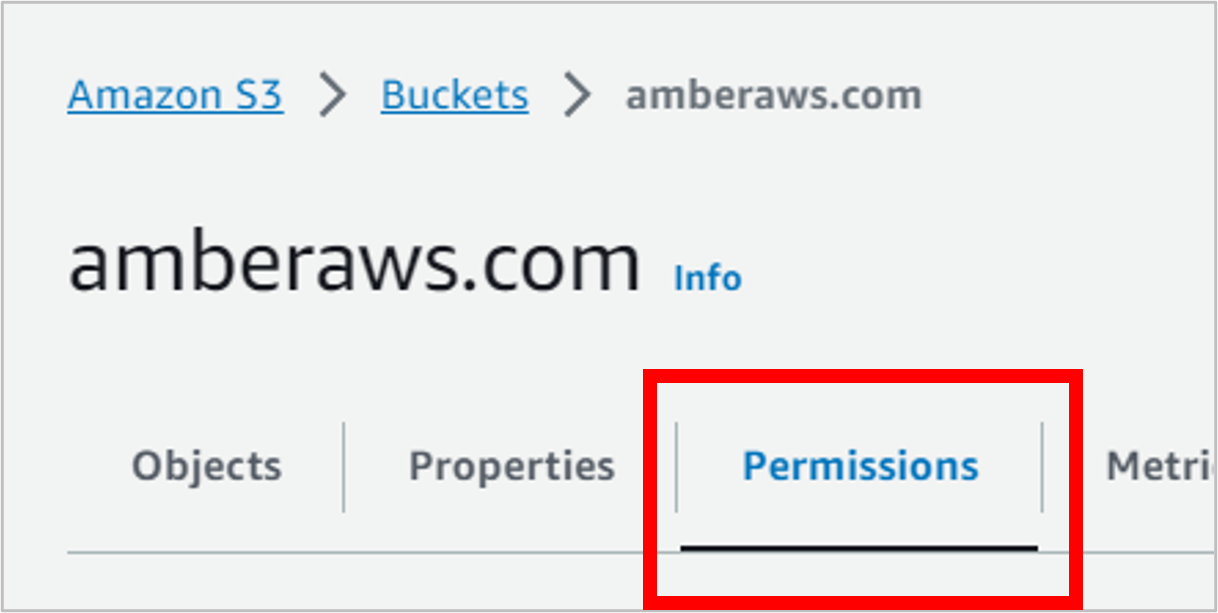
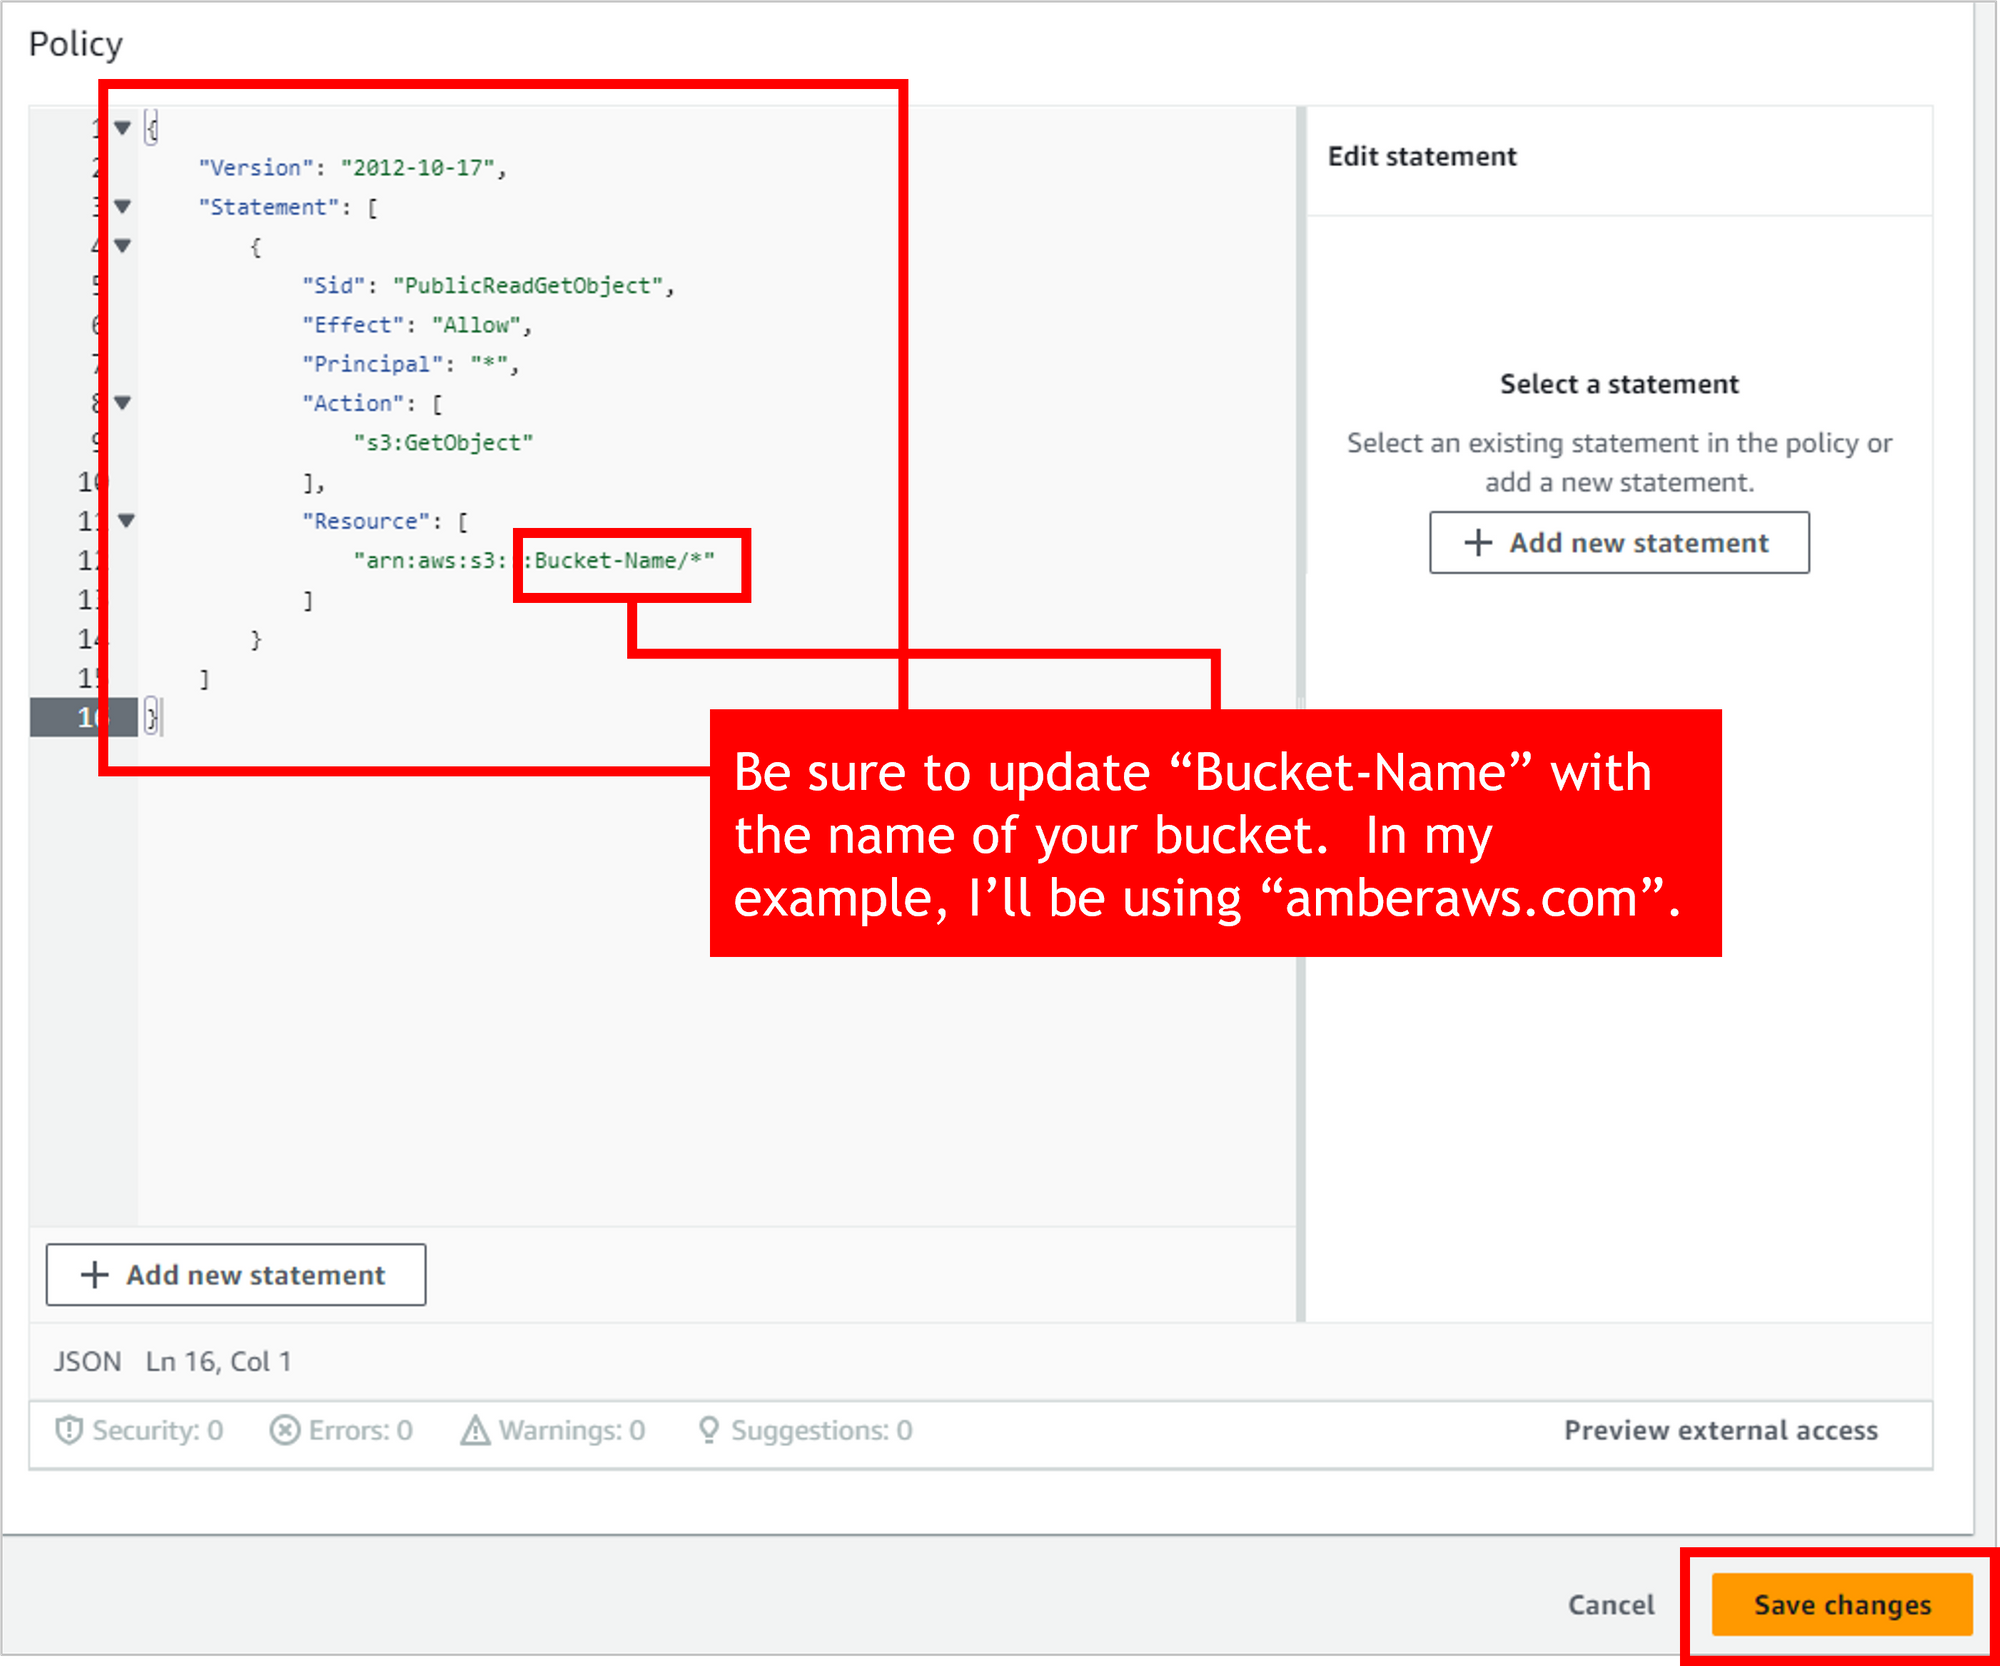
Scroll down to the Bucket policy section, and click Edit.

Copy the following bucket policy (JSON code).
{
    "Version": "2012-10-17",
    "Statement": [
        {
            "Sid": "PublicReadGetObject",
            "Effect": "Allow",
            "Principal": "*",
            "Action": [
                "s3:GetObject"
            ],
            "Resource": [
                "arn:aws:s3:::Bucket-Name/*"
            ]
        }
    ]
}
Paste the code into the Policy section in the AWS console. This policy says to “Allow” everyone (the Principal of “*”) to take the action of “GetObject” (basically “read”) on all files in your bucket (“Bucket-Name/*”).
IMPORTANT: Update “Bucket-Name” with the name of your bucket. Then click Save changes.
You’ve now got a bucket that’s configured for static website hosting, and you’ve applied a policy that will let people access the site. Now it’s time to add your impressive code files that you created earlier.
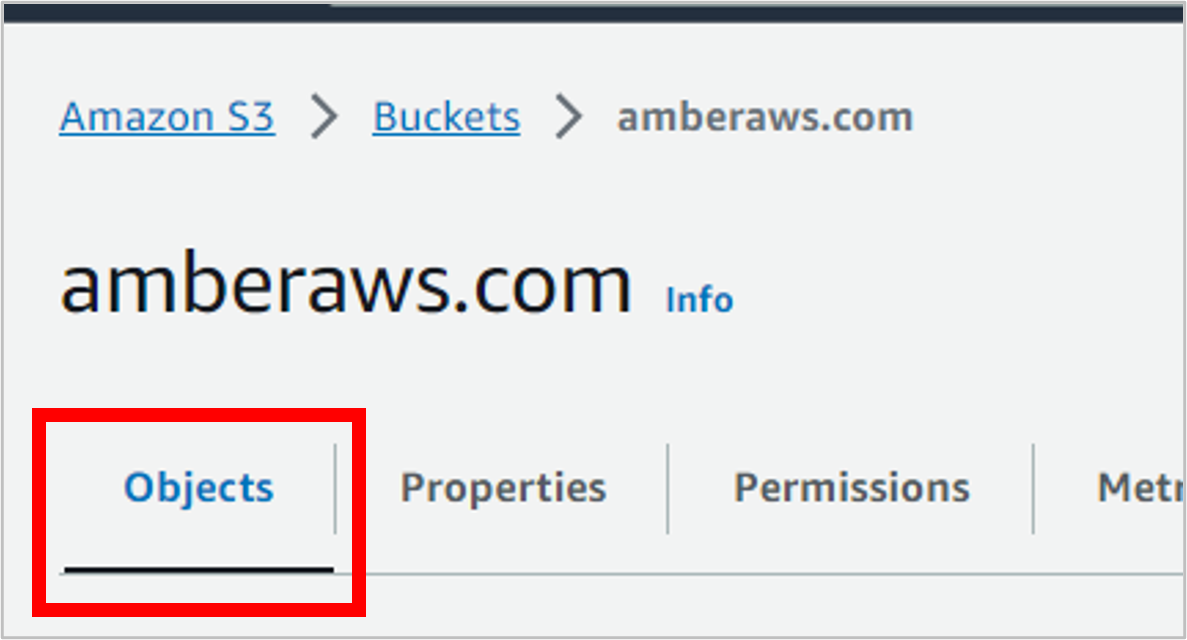
On the top of the page, click the Objects tab.
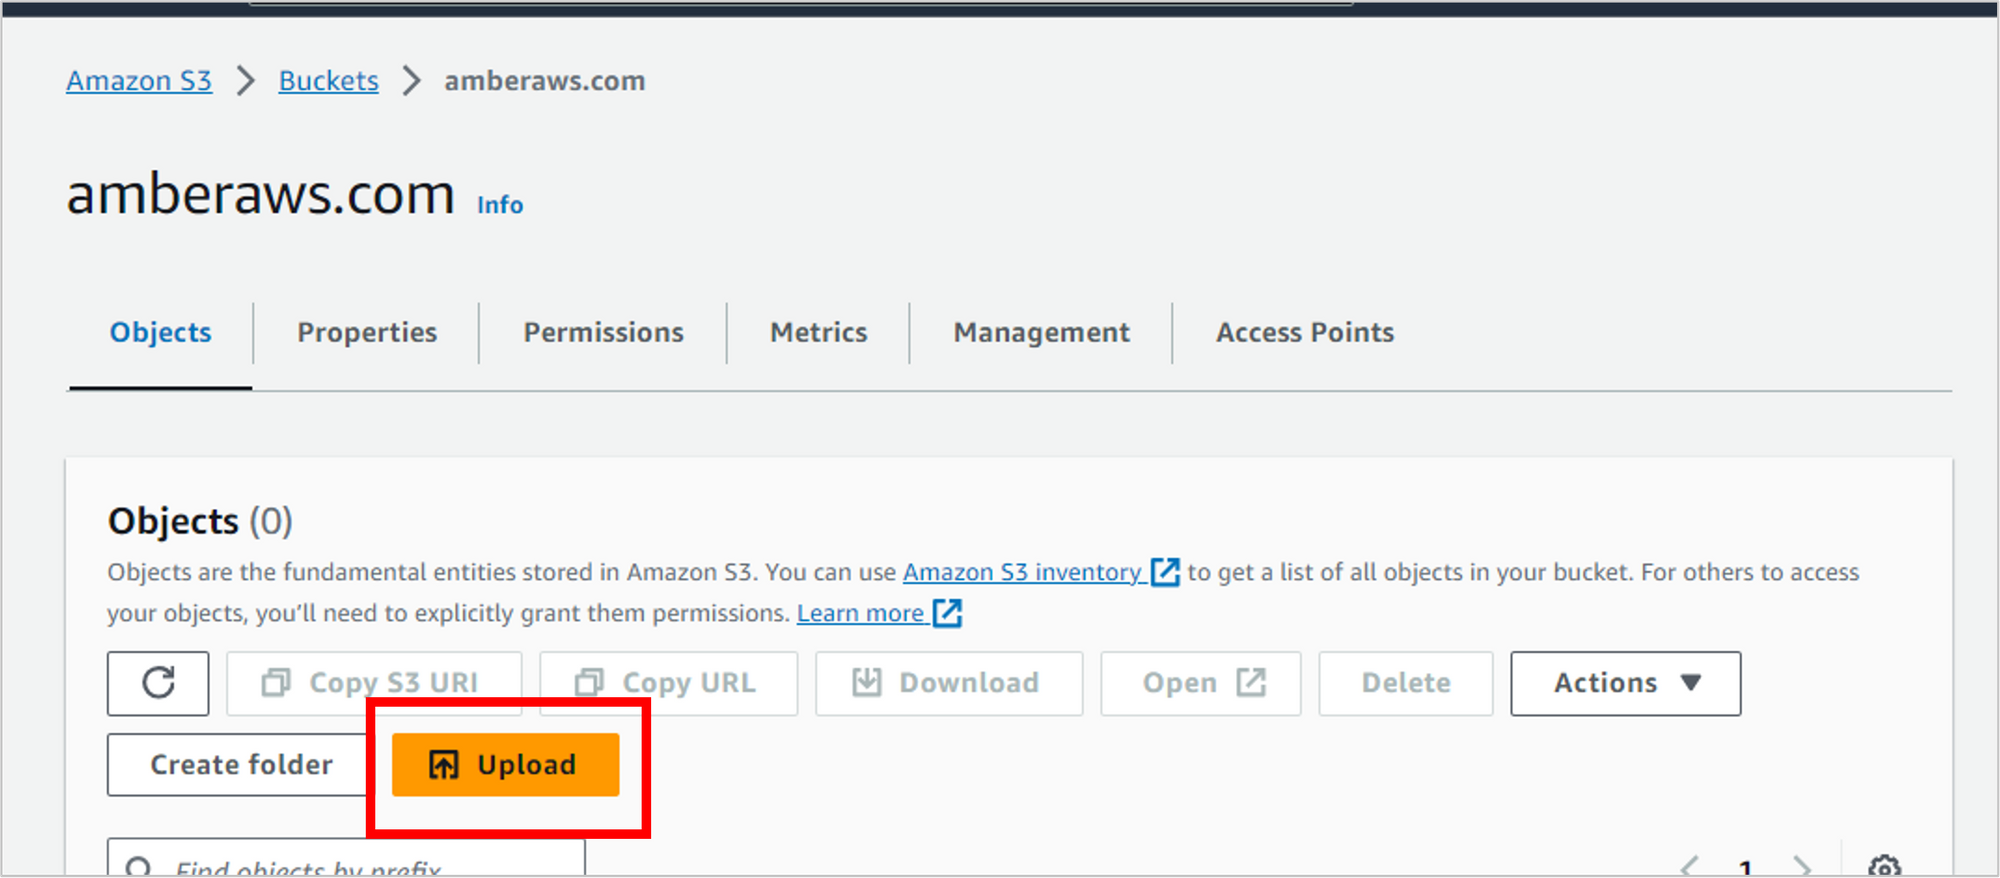
Click the Upload button.
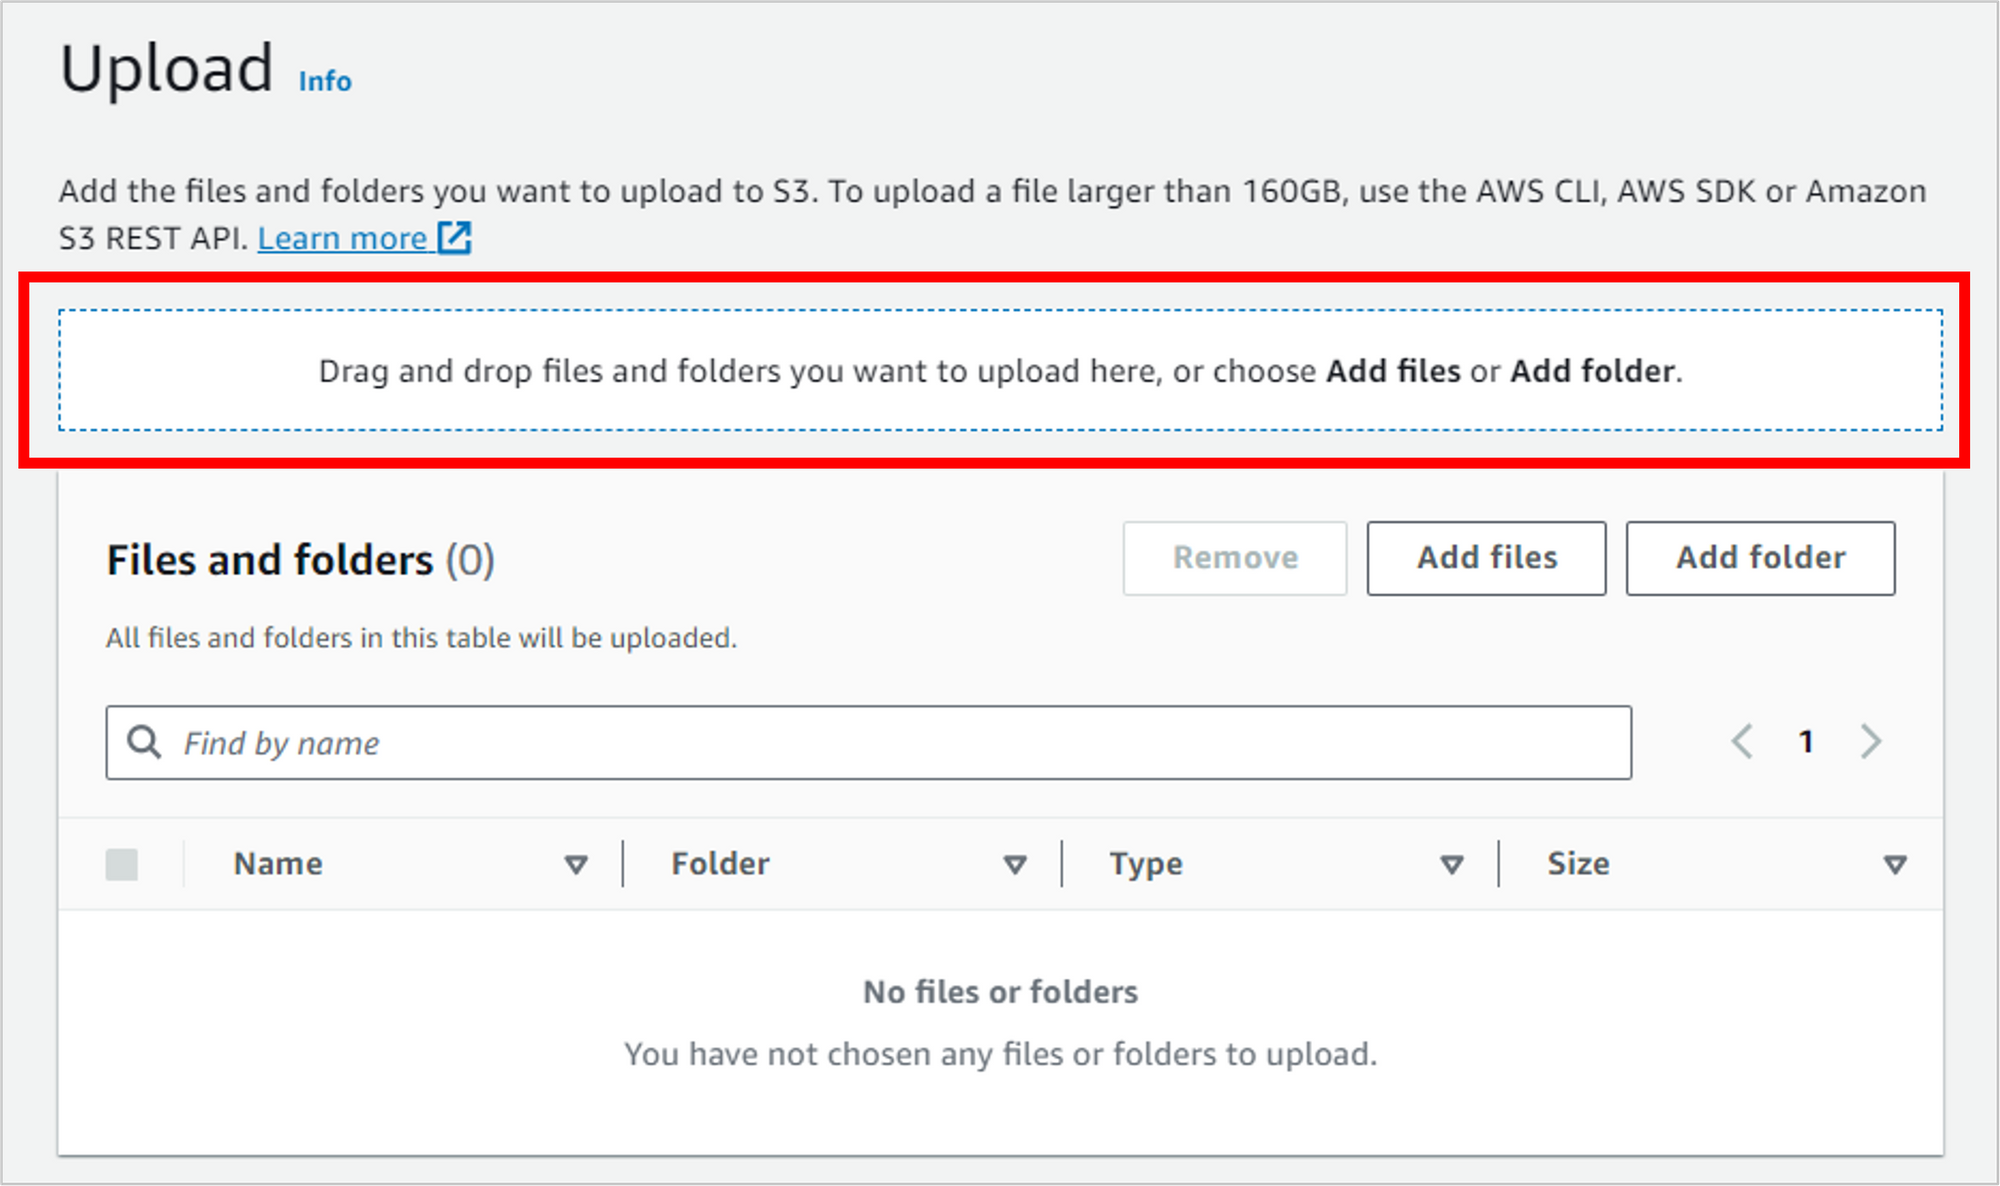
Drag and drop your four files to the browser. This should include index.html, styles.css, script.js and headshot.jpg.
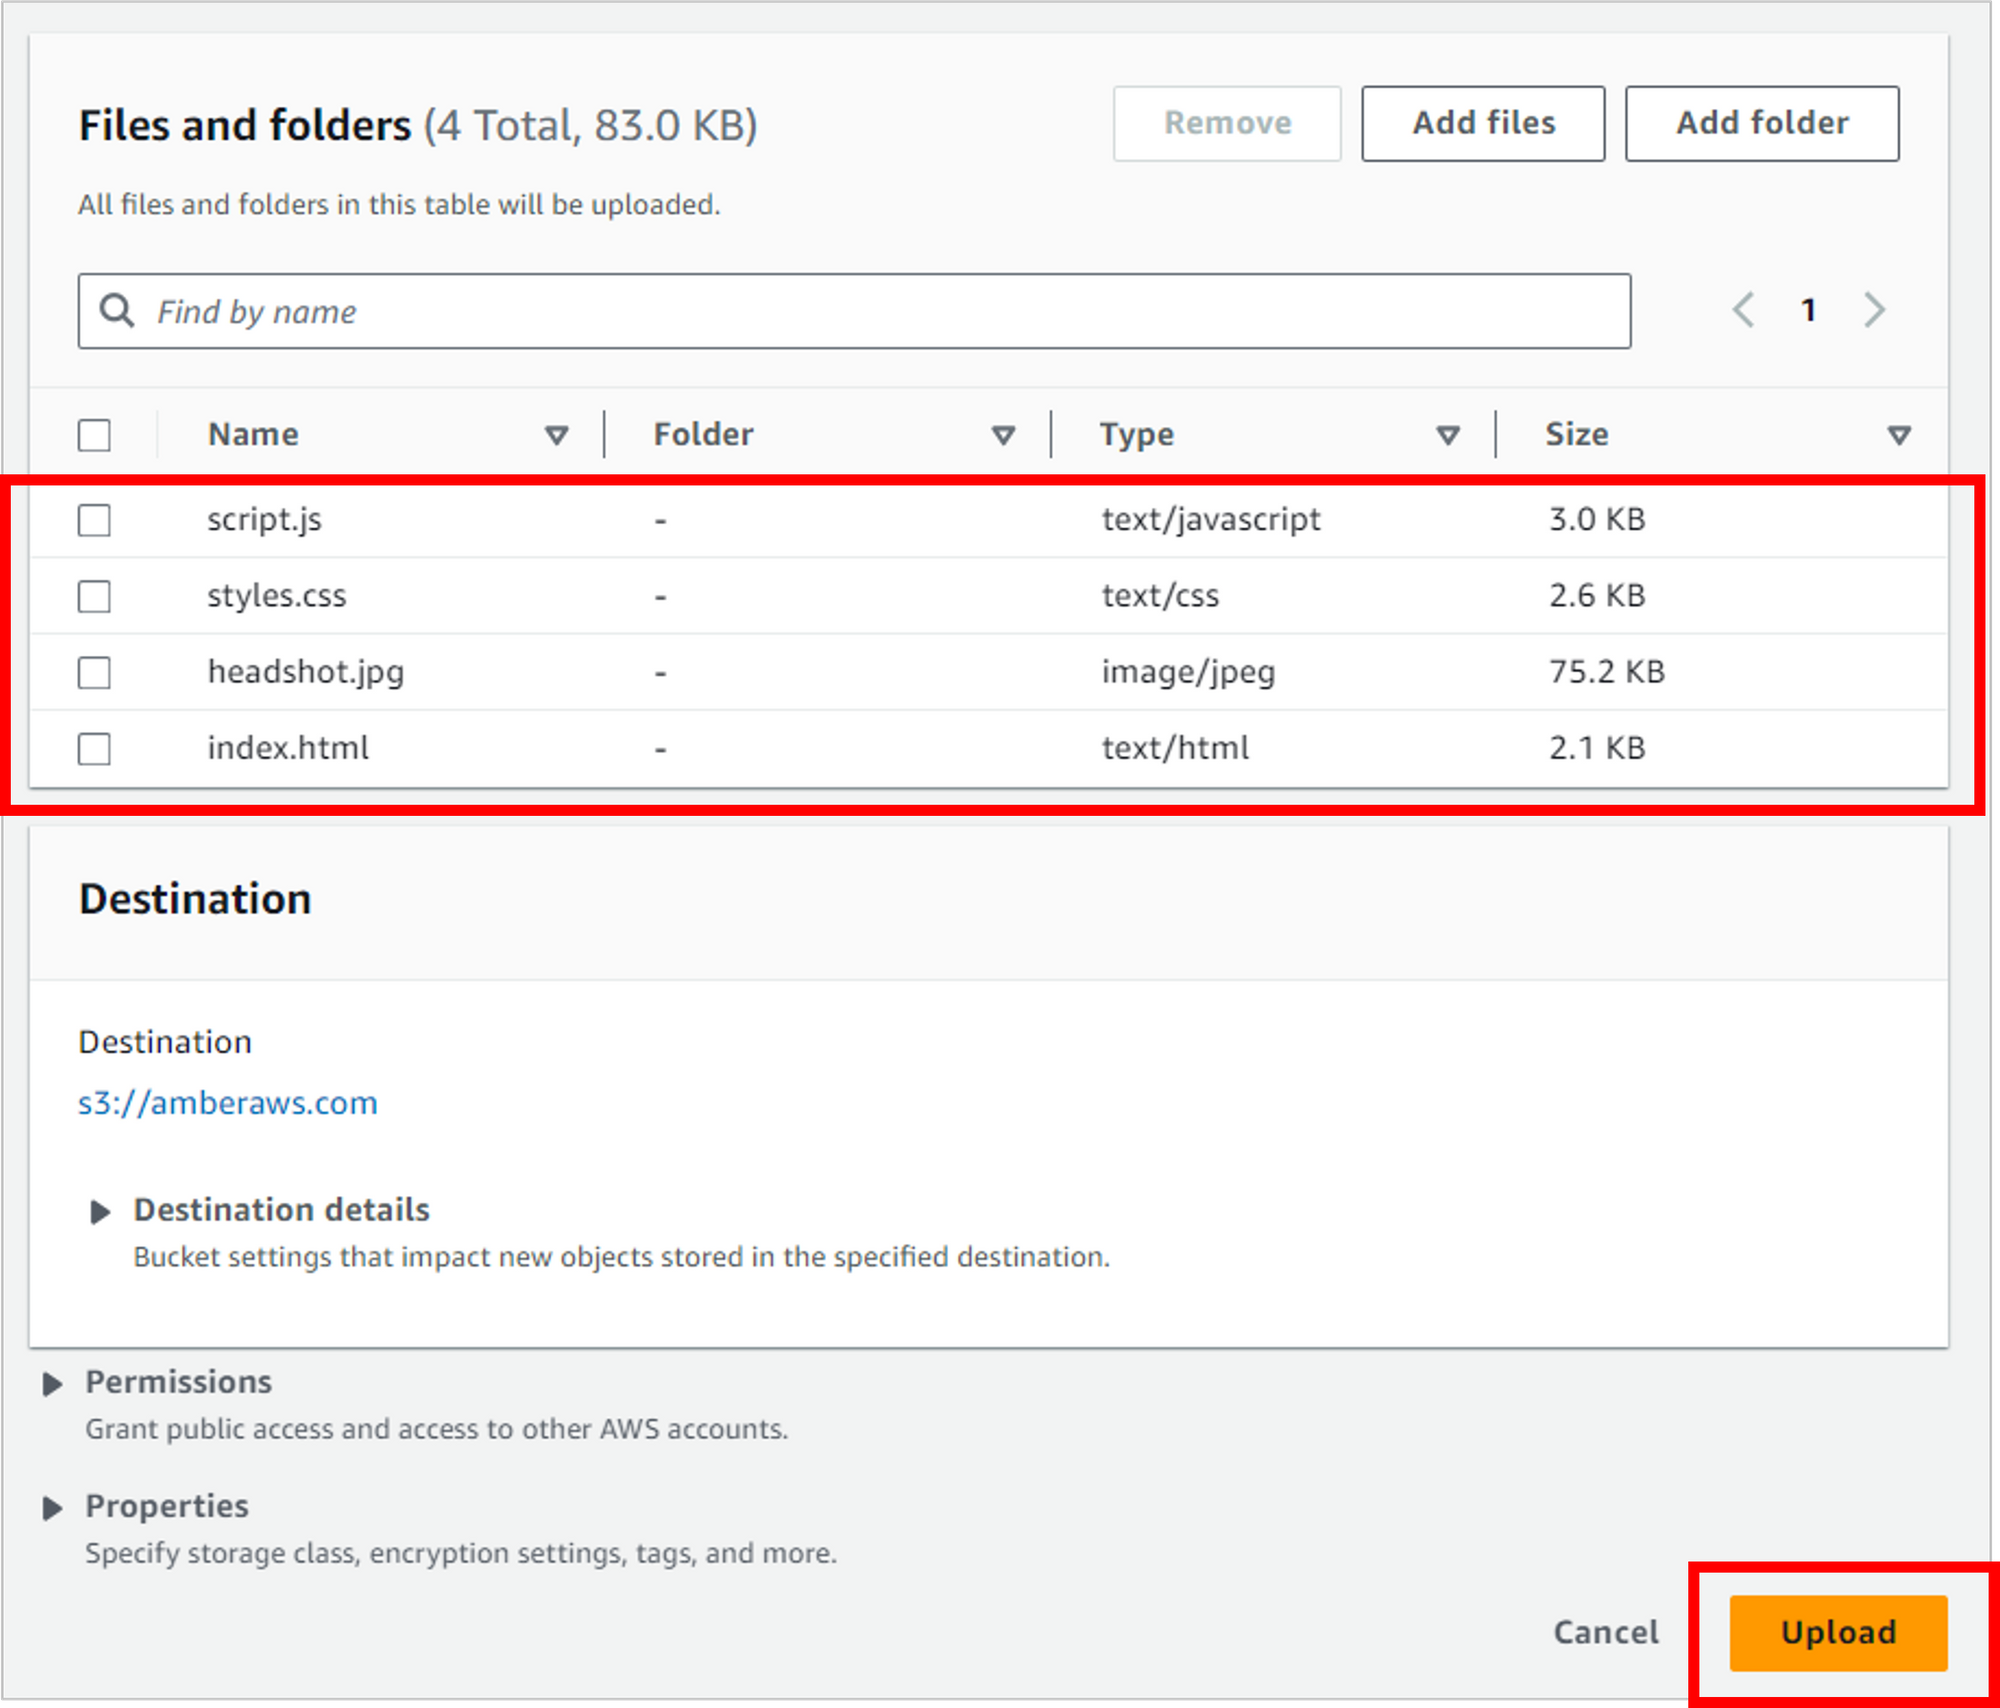
After the files have uploaded and all four display in the Files and folders section, click the Upload button.
Now it’s time to test that your résumé loads. To do this, you’ll need to get the S3 bucket website endpoint.
Navigate to the Properties tab of the bucket.
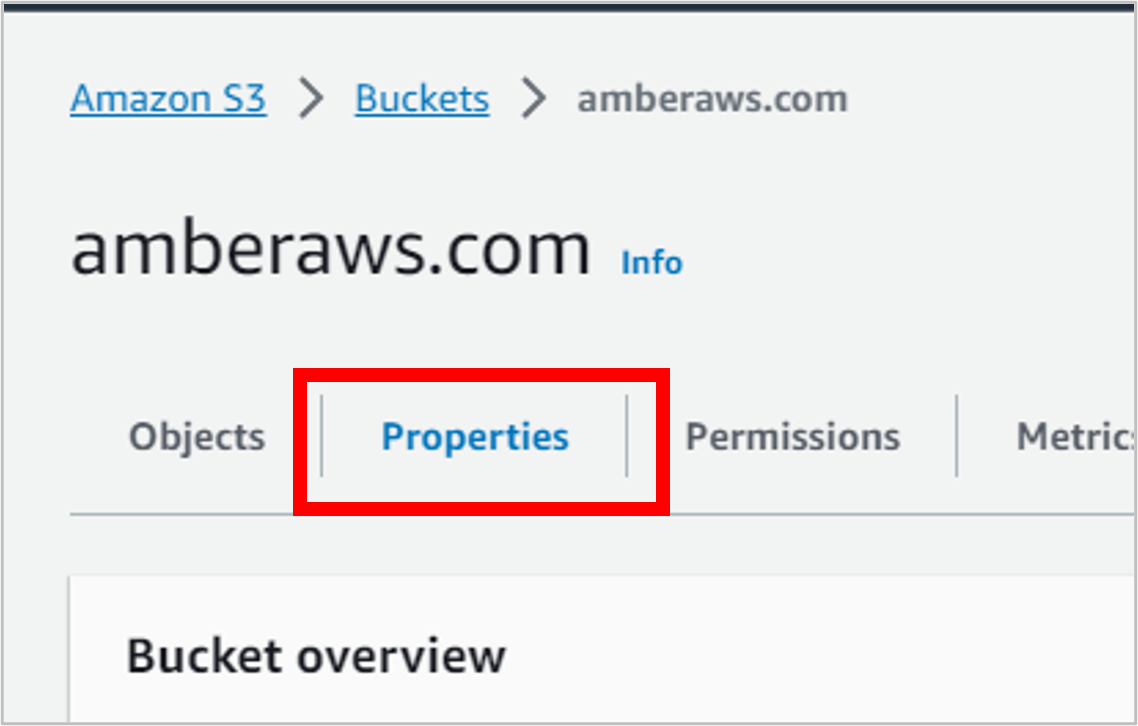
Scroll all the way down to the bottom of the page, to the Static website hosting section. Click on the Bucket website endpoint link (it will open in a new tab).
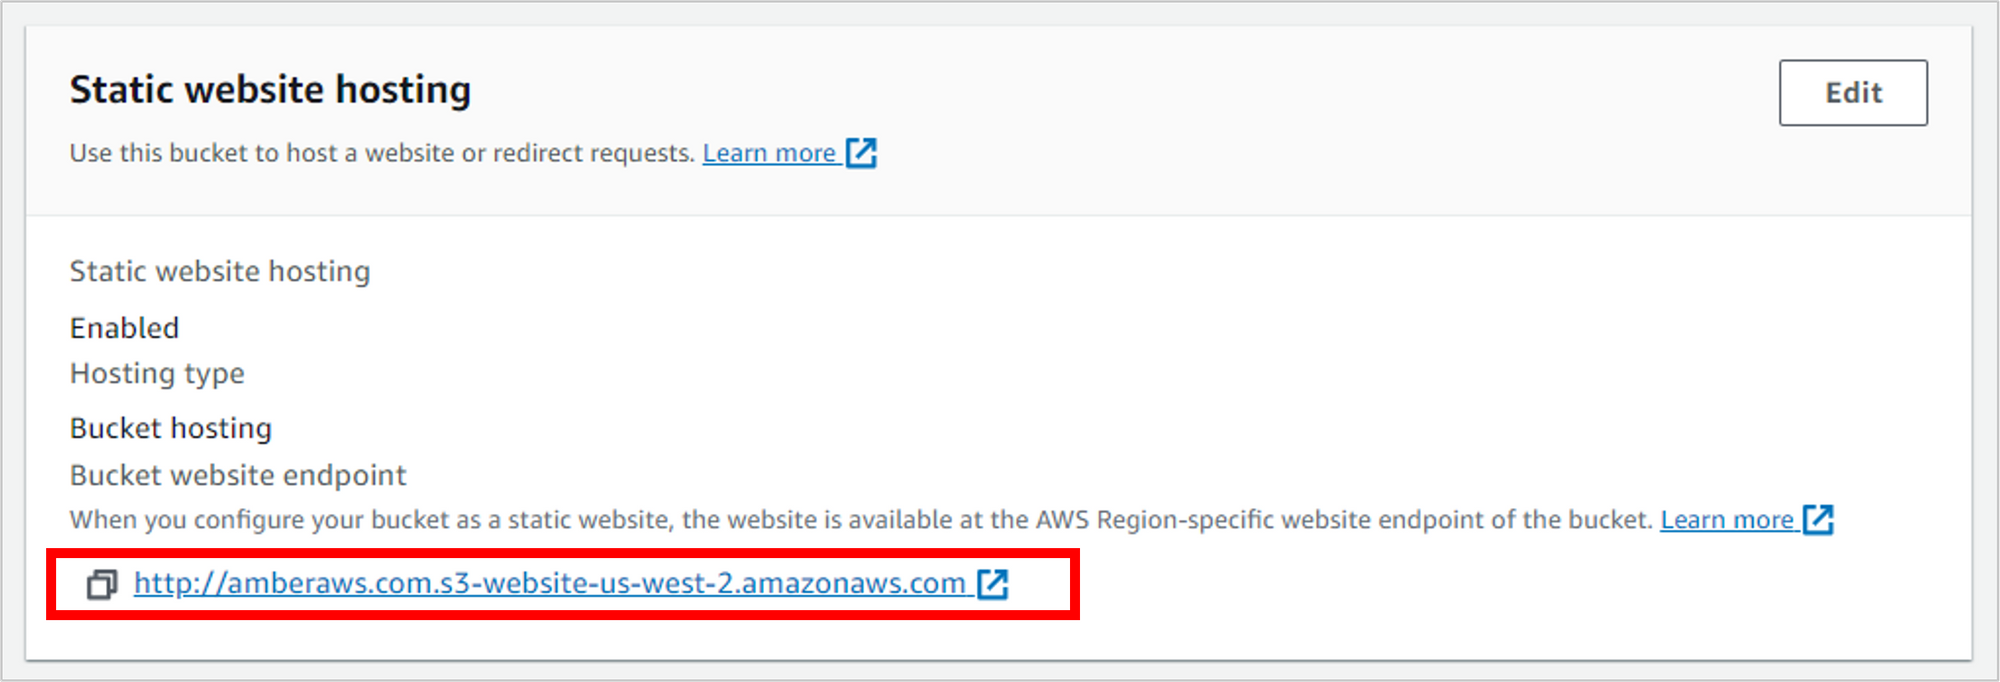
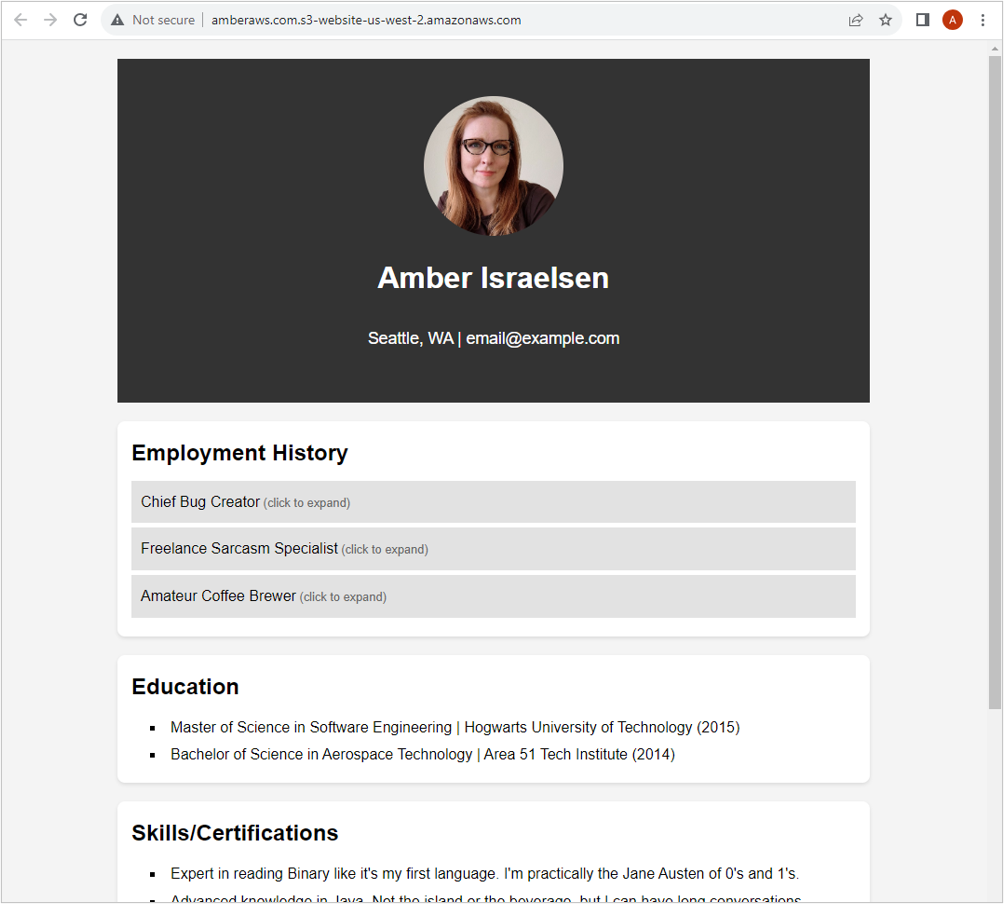
If everything worked, you should see your handiwork displayed in the browser. Yay!
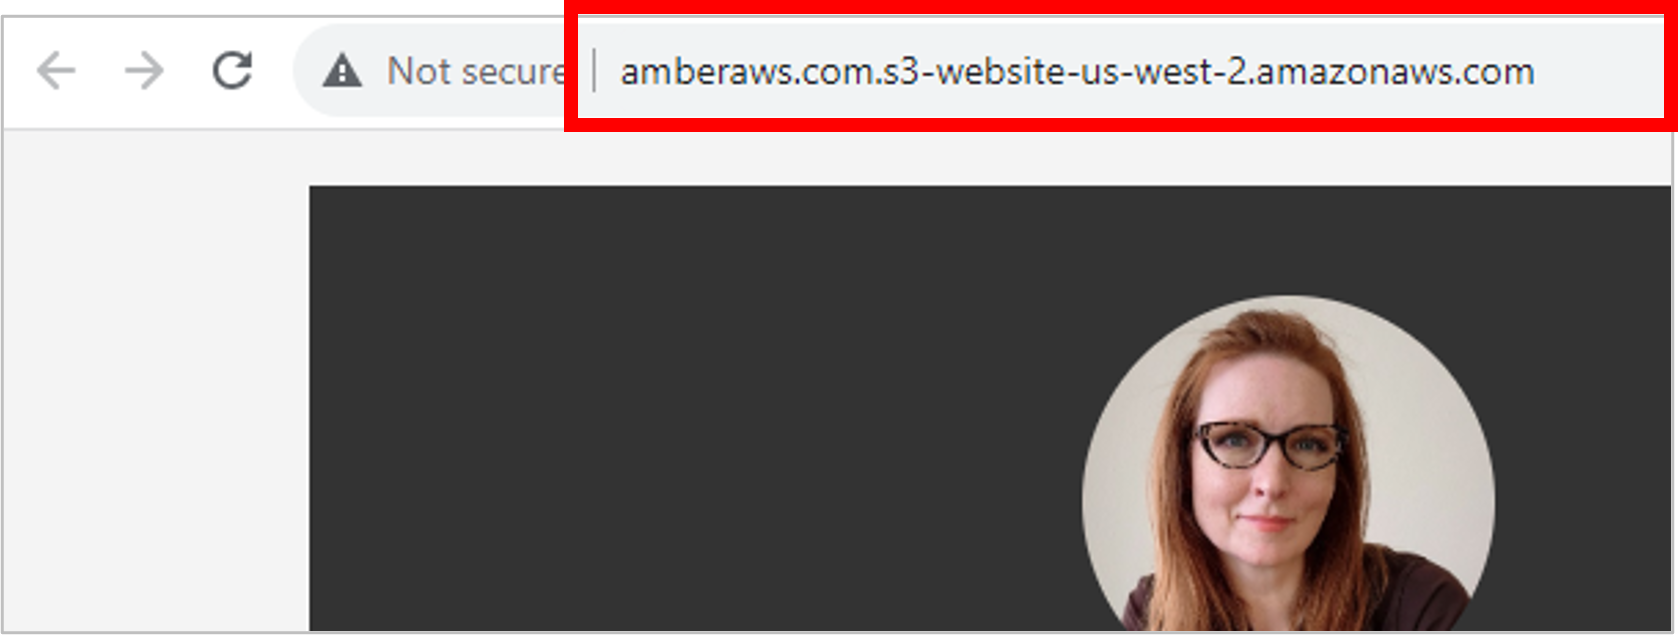
Congrats on getting your résumé hosted in S3 with public access! But as impressive as it is, it would be even more impressive if it were using a custom domain. Currently, it’s using the S3 website URL, formatted as [bucketname].s3-website-[regionname].amazonaws.com.
Let’s work on the domain name next, using Route 53, which is Amazon’s domain name and DNS service.
Domain Name Option 1: Register a New Domain Name with Route 53
If you don’t already have a domain name, then you can register one with AWS, using Route 53. (If you already have a domain name with another provider, I’ll give you some general guidance on using that in the next section.)
Navigate to Route 53.

On the Route 53 Dashboard, simply enter the domain name you’re interested in, then click Check.
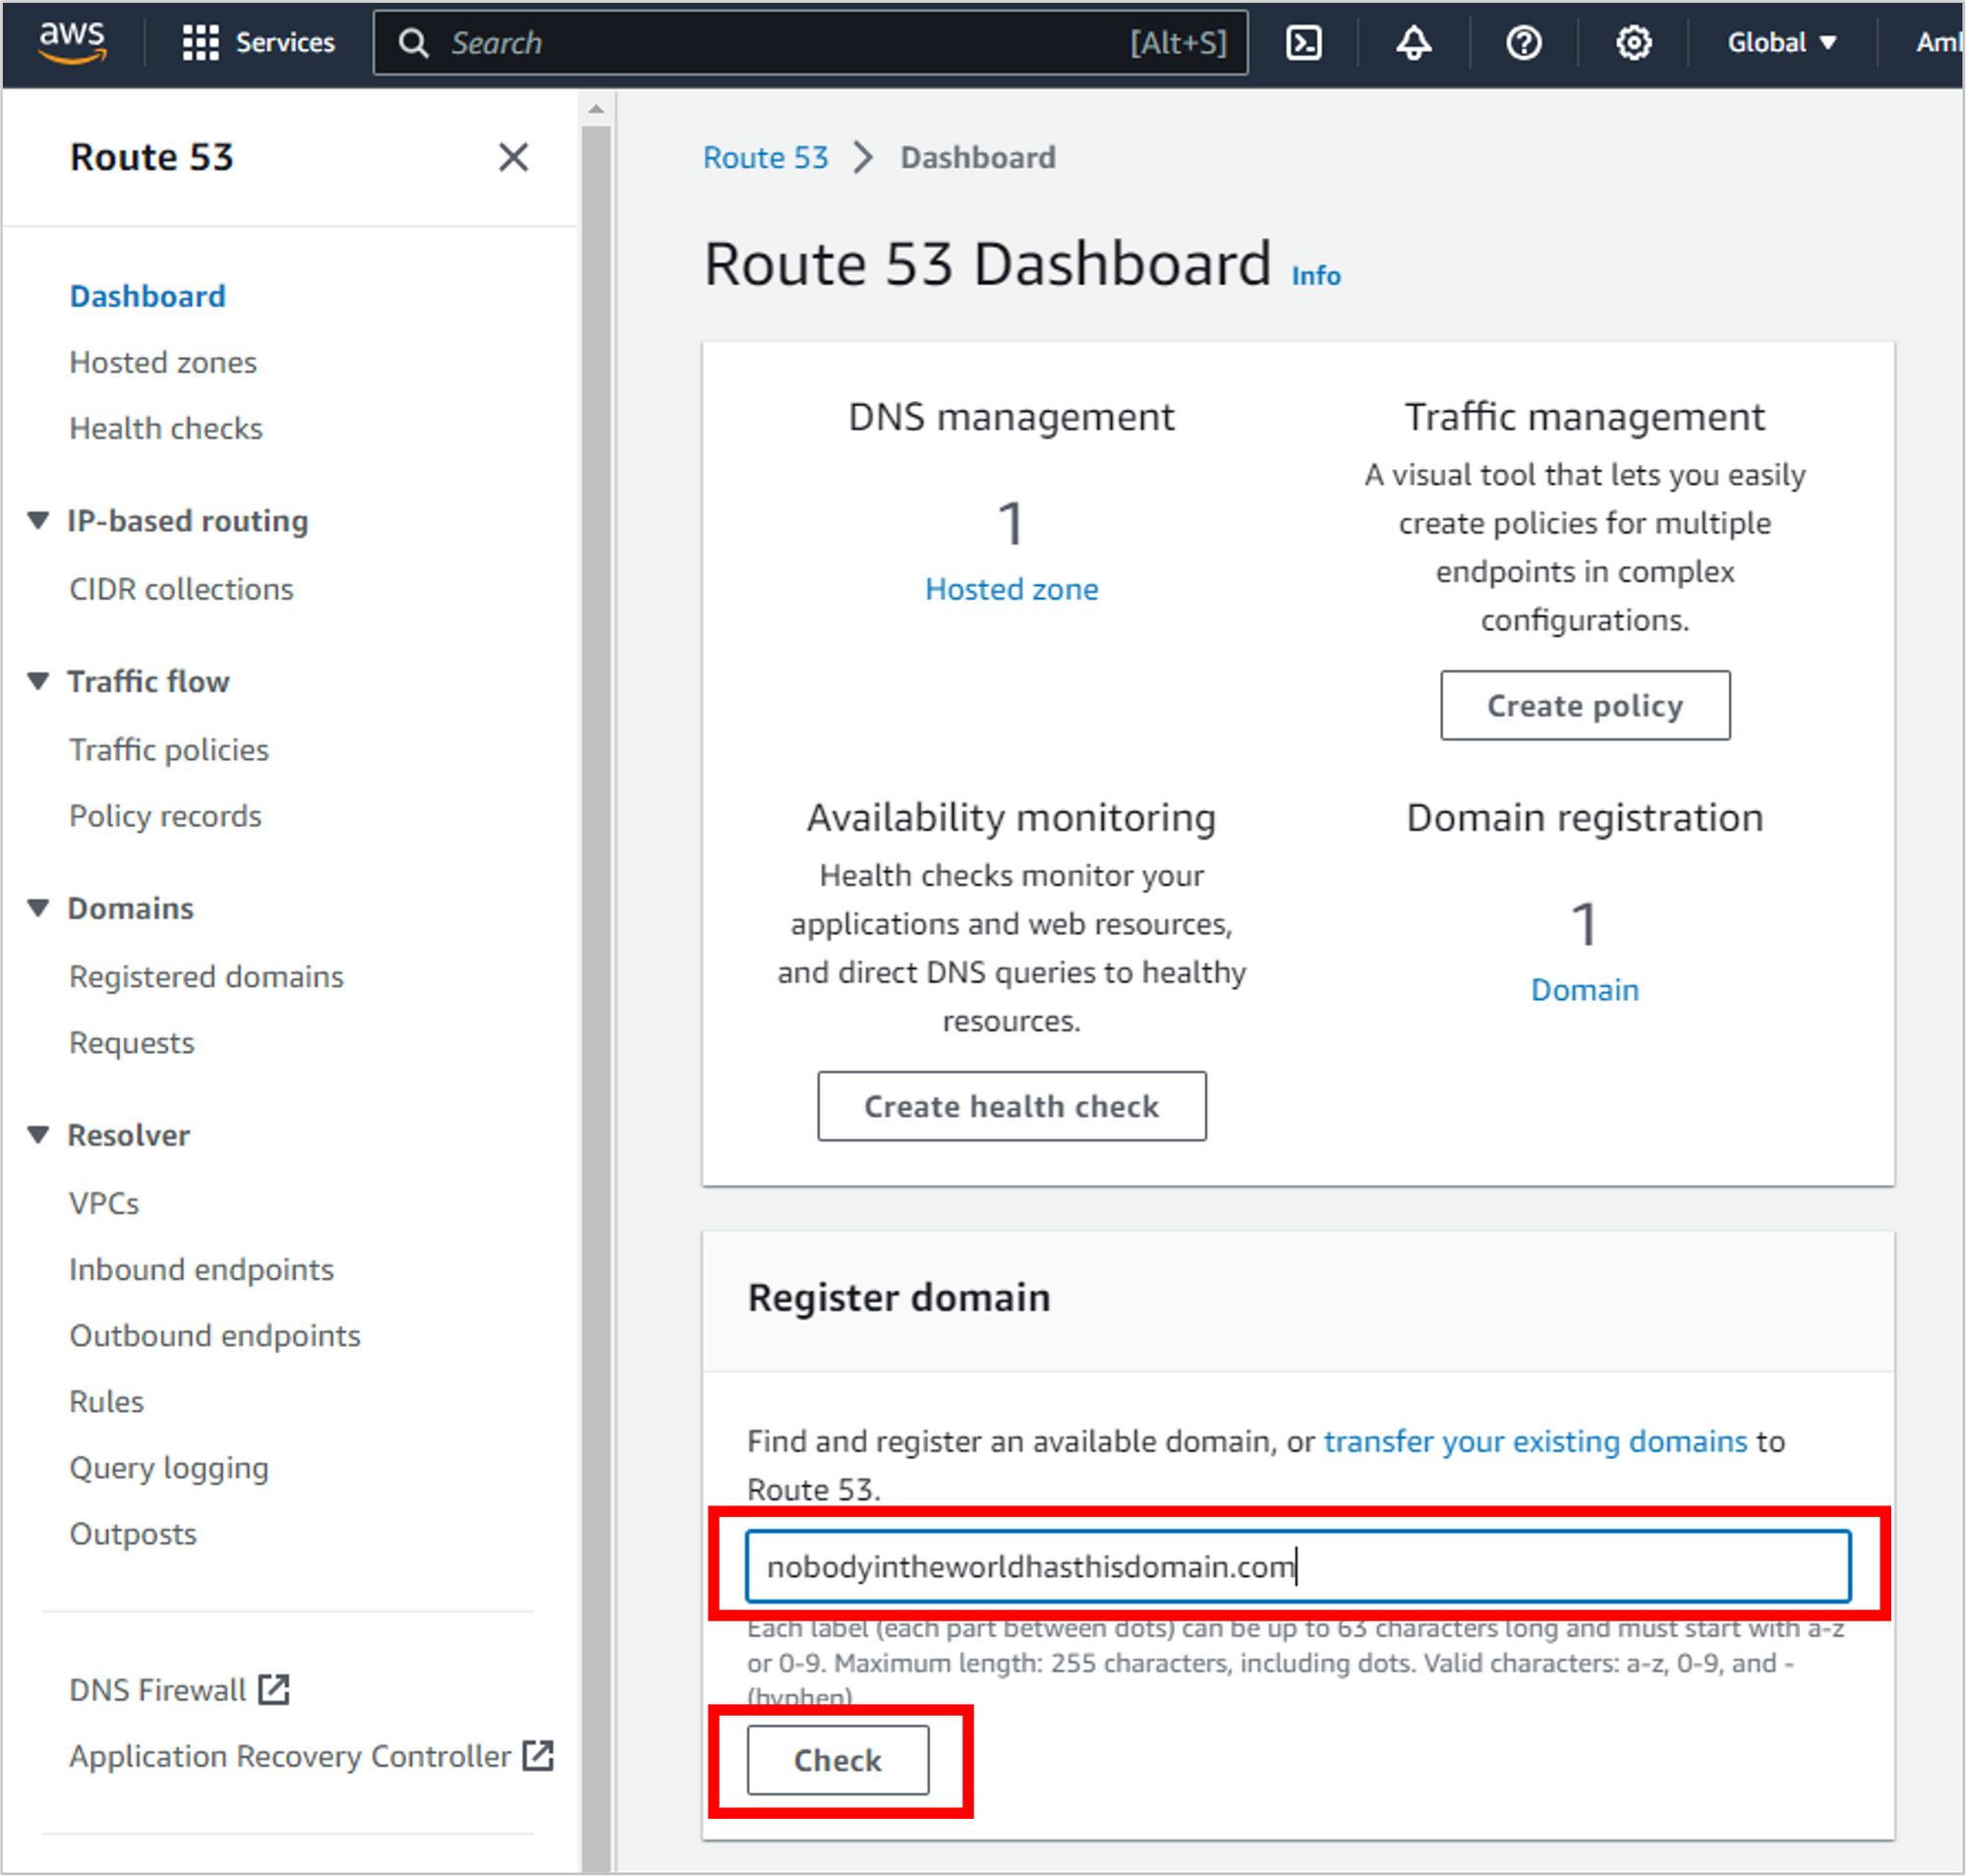
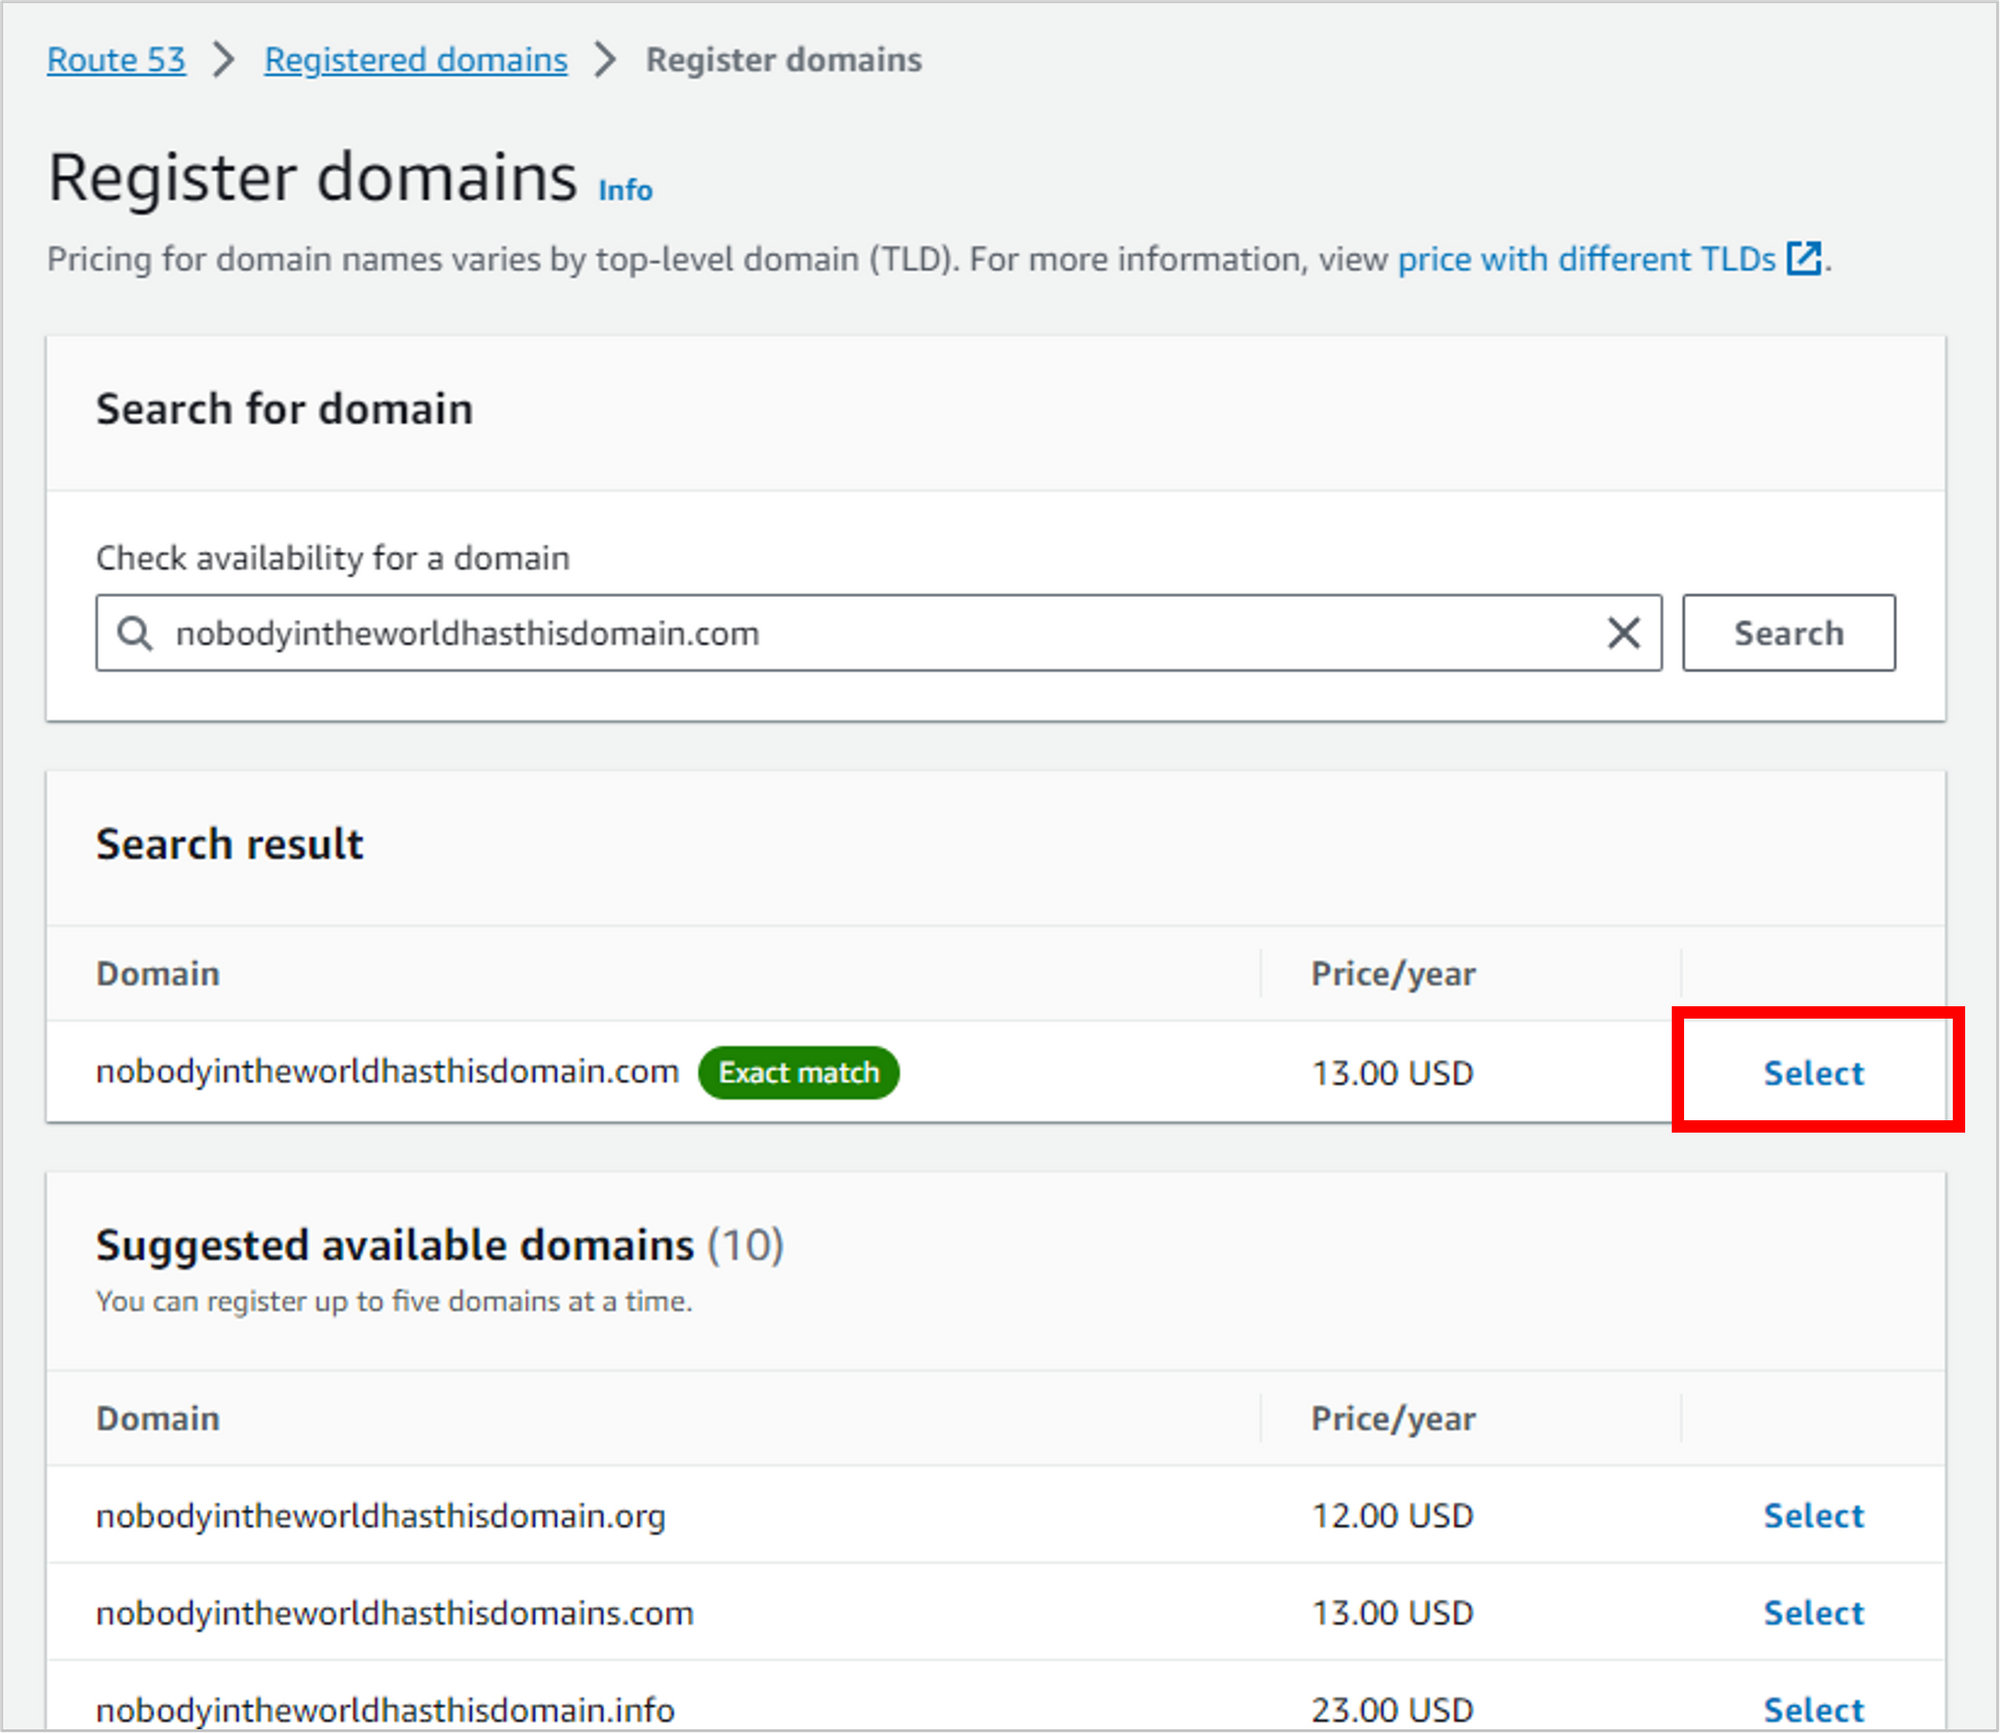
If the domain name is available, you’ll be able to Select it (and if it’s not available, you’ll see some alternate names). Selecting it will add it to your cart, take you through a checkout process, and then the charge will show up on your AWS bill.
After you purchase the domain, it will automatically create a hosted zone for you. You can think of a hosted domain as a container for records and rules that control how traffic is routed.
A public hosted zone (which you’ll be working with) controls traffic from the internet. A private hosted zone controls traffic internal to an AWS Virtual Private Cloud (VPC).
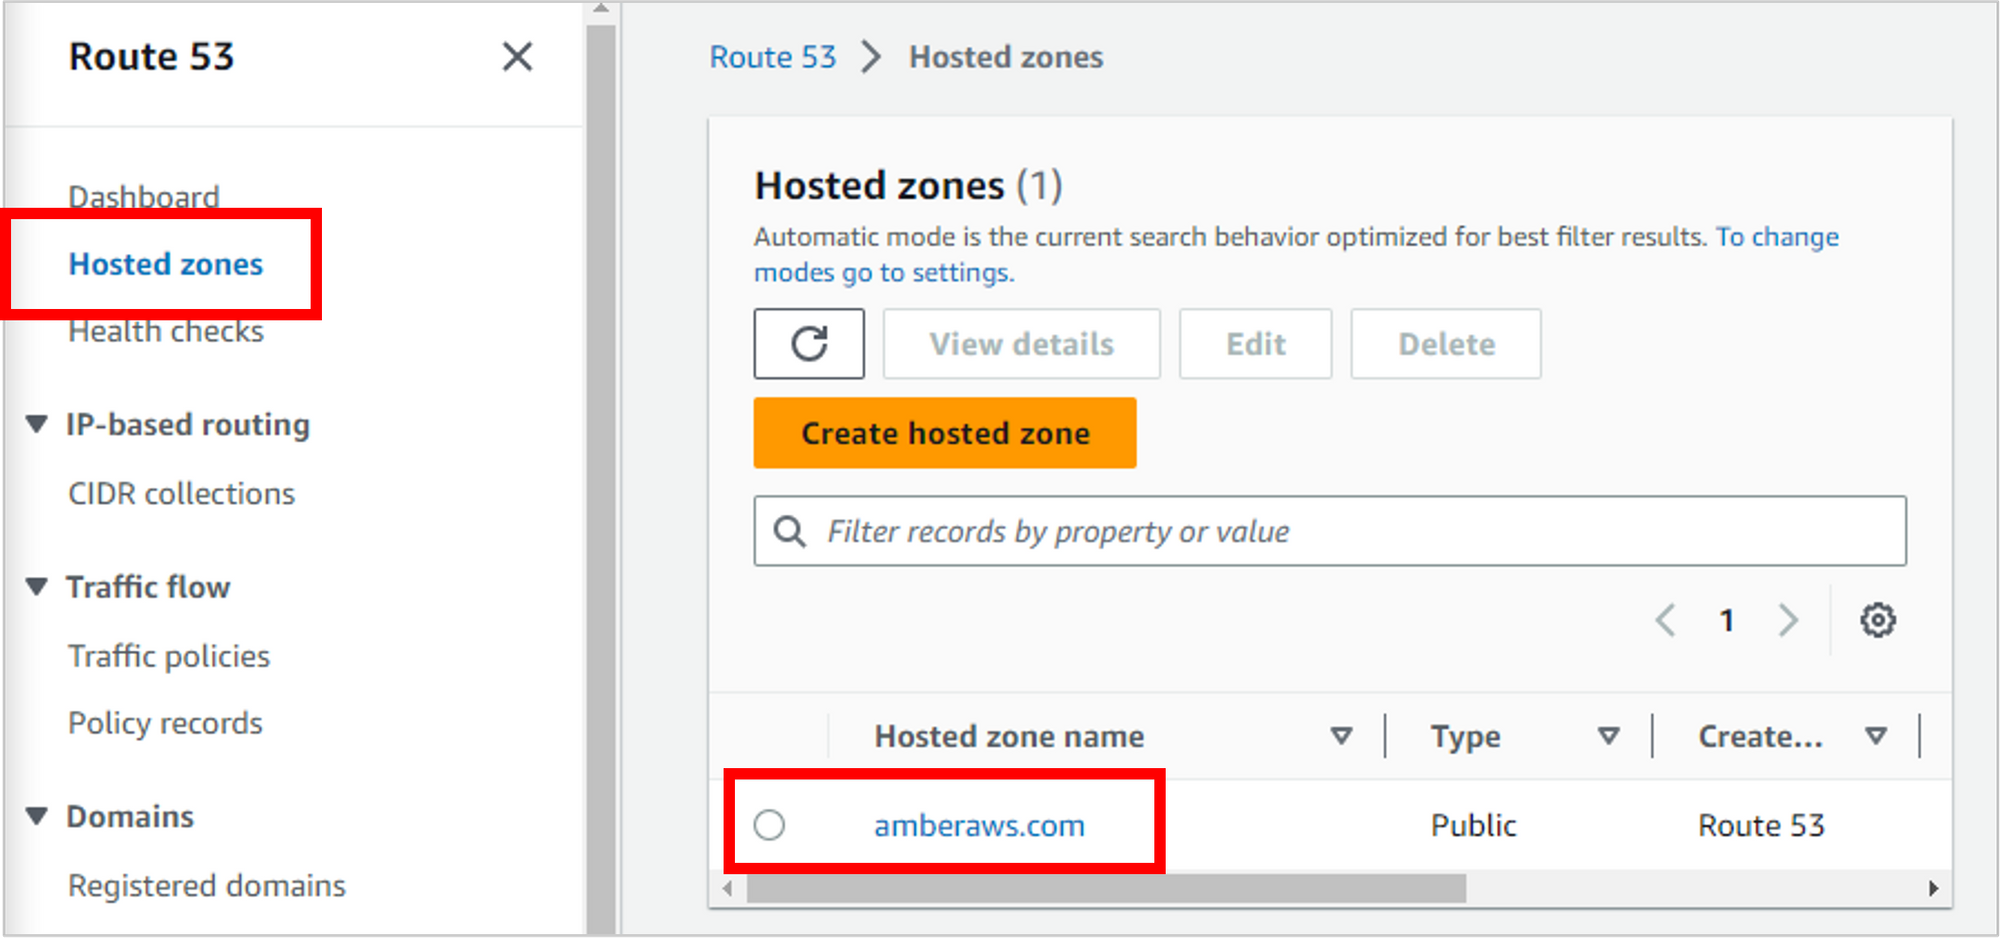
You can view your hosted zones by clicking on Hosted zones on the left navigation, then click into the zone that matches the domain name you purchased (“amberaws.com” in my case).
Domain Name Option 2: Use a Domain Name from a Third-Party Provider
So, you already have a domain name from somewhere else, like GoDaddy, Namecheap, Google Domains or the like. It’s totally possible to use Route 53 as your DNS service (which has a lot of benefits, and is easy to integrate with other AWS services), while still keeping the domain name with your other provider.
The details of each registrar are slightly different, so I’ll give some general guidance here. Also know that propagation of DNS changes will take longer with an external provider, and if things go wrong, you’ll probably need to work with them directly. But I’ll get you started!
Create a hosted zone and get your name servers
Even if you aren’t using a domain name from Route 53, you’ll still need a hosted zone (again, this holds the records and rules that control how traffic is routed).
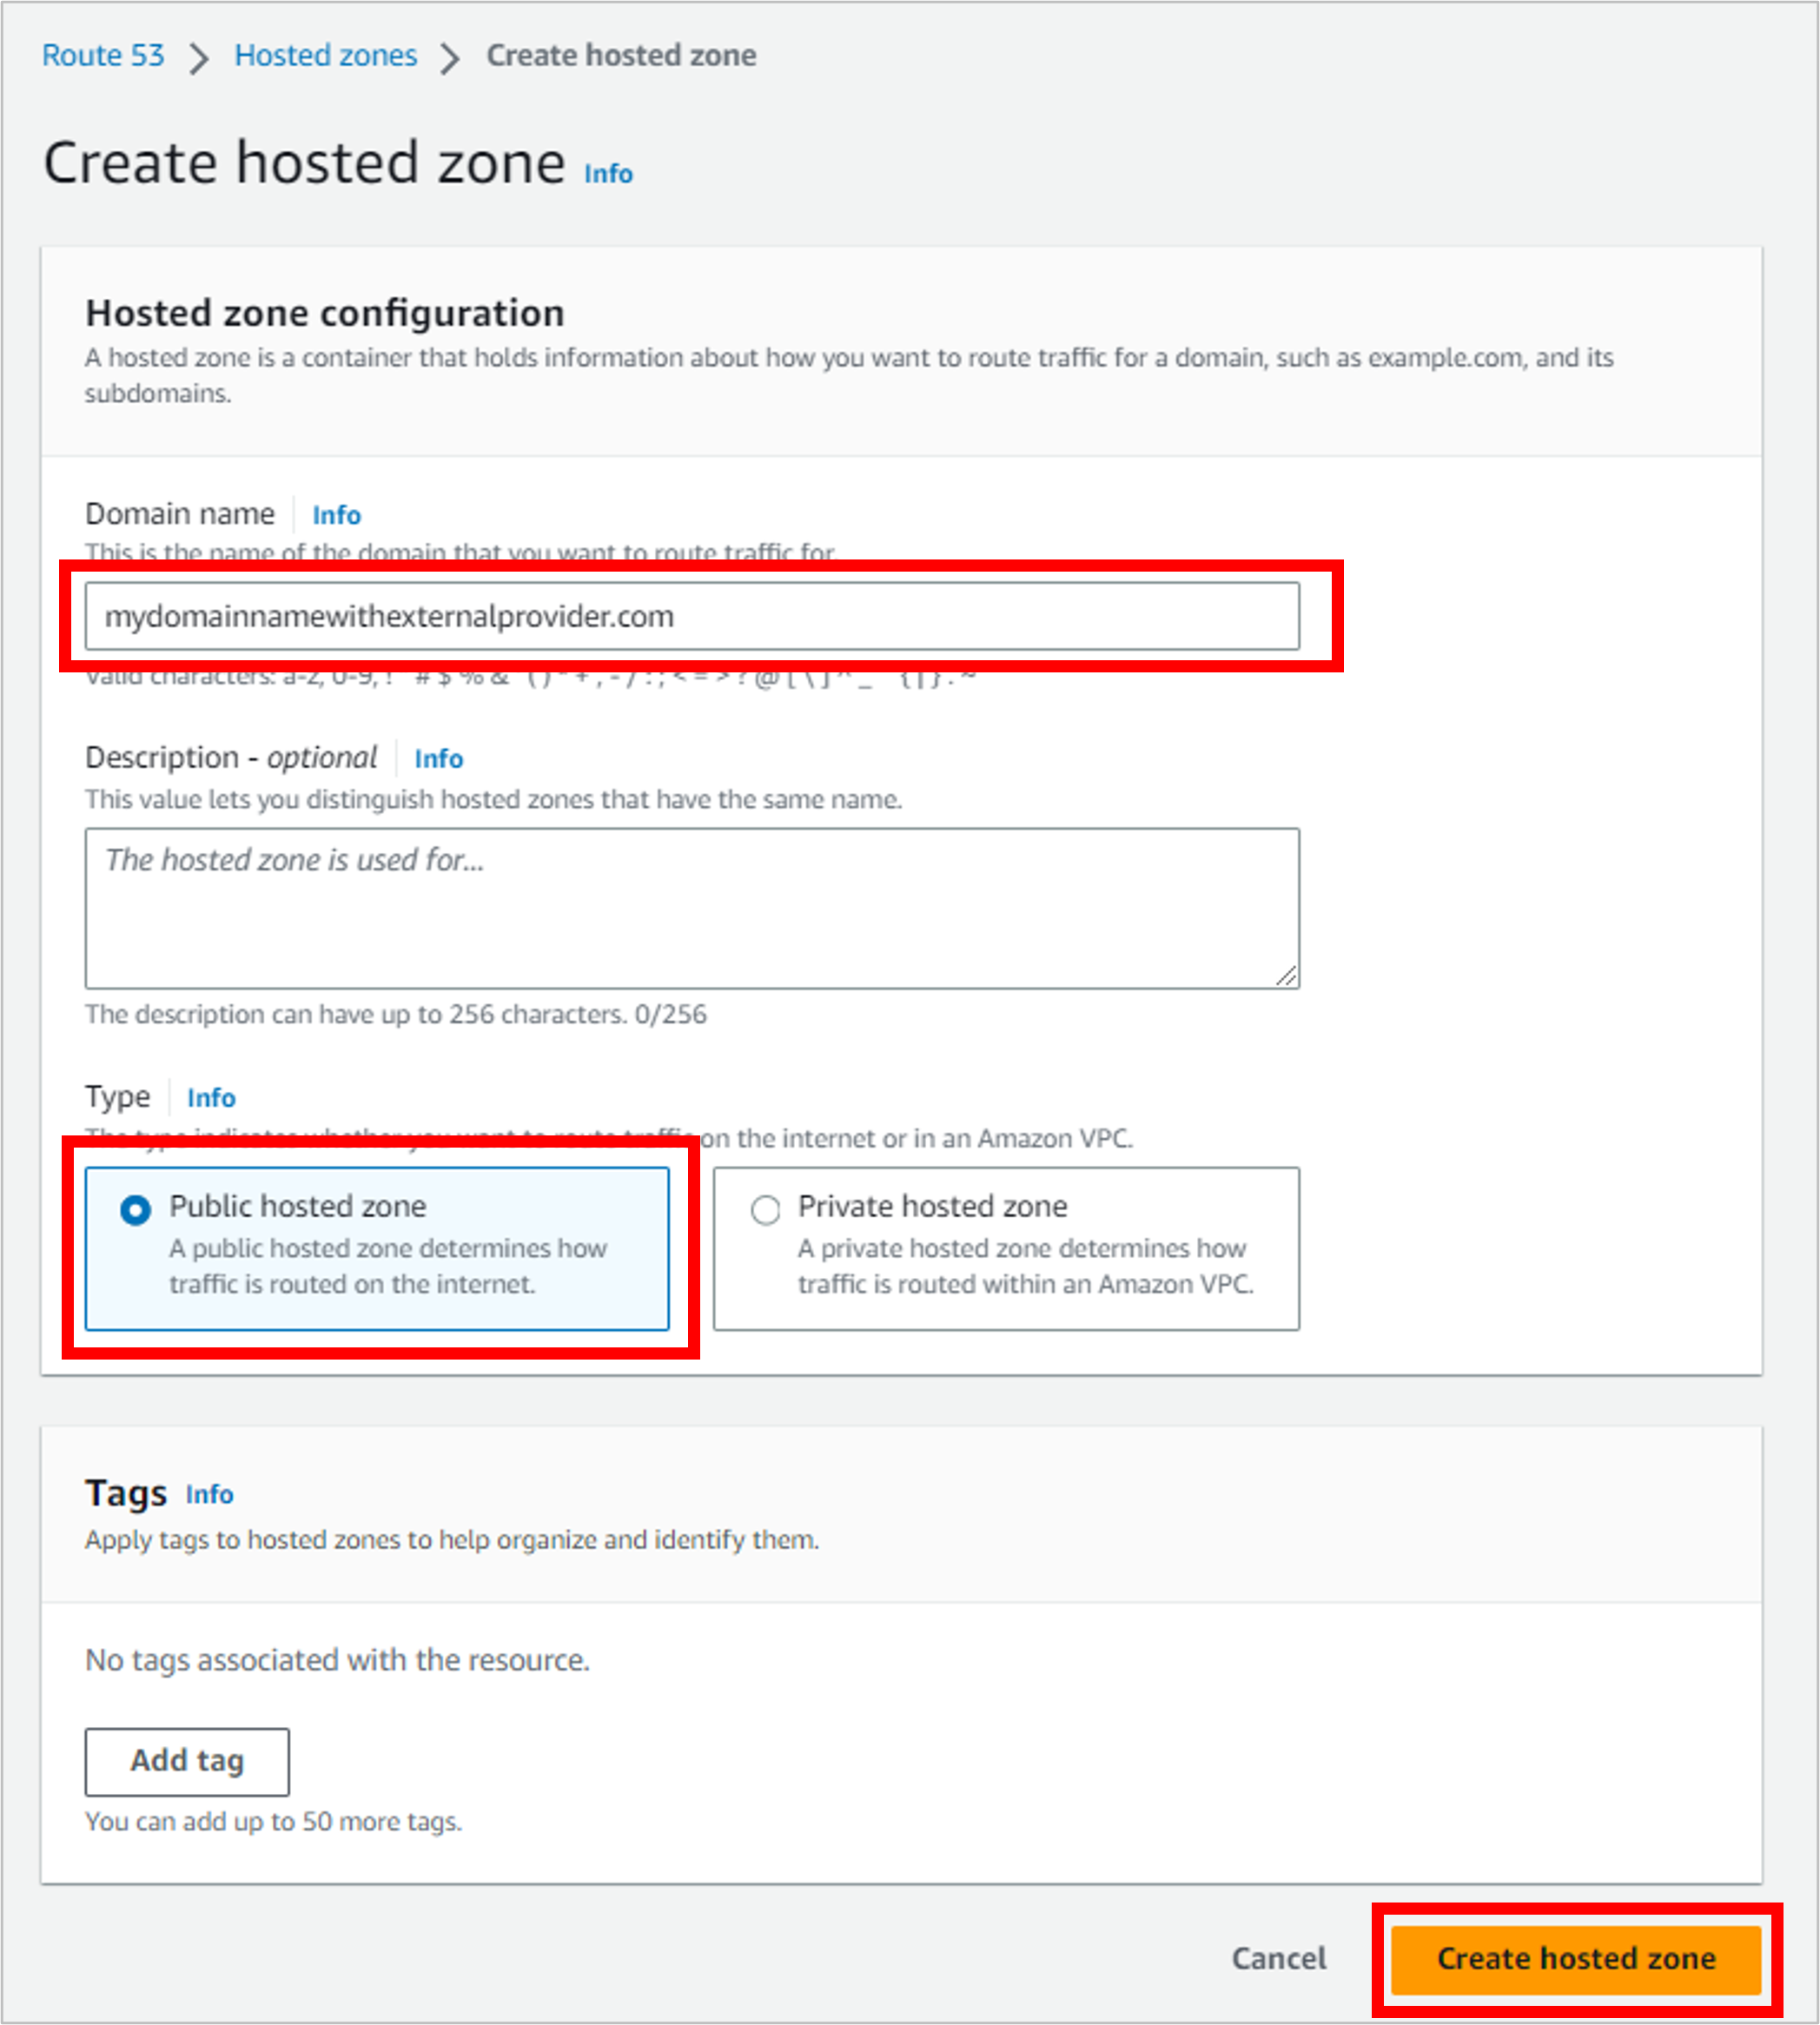
Click on Hosted zones on the left navigation, then click Create hosted zone.
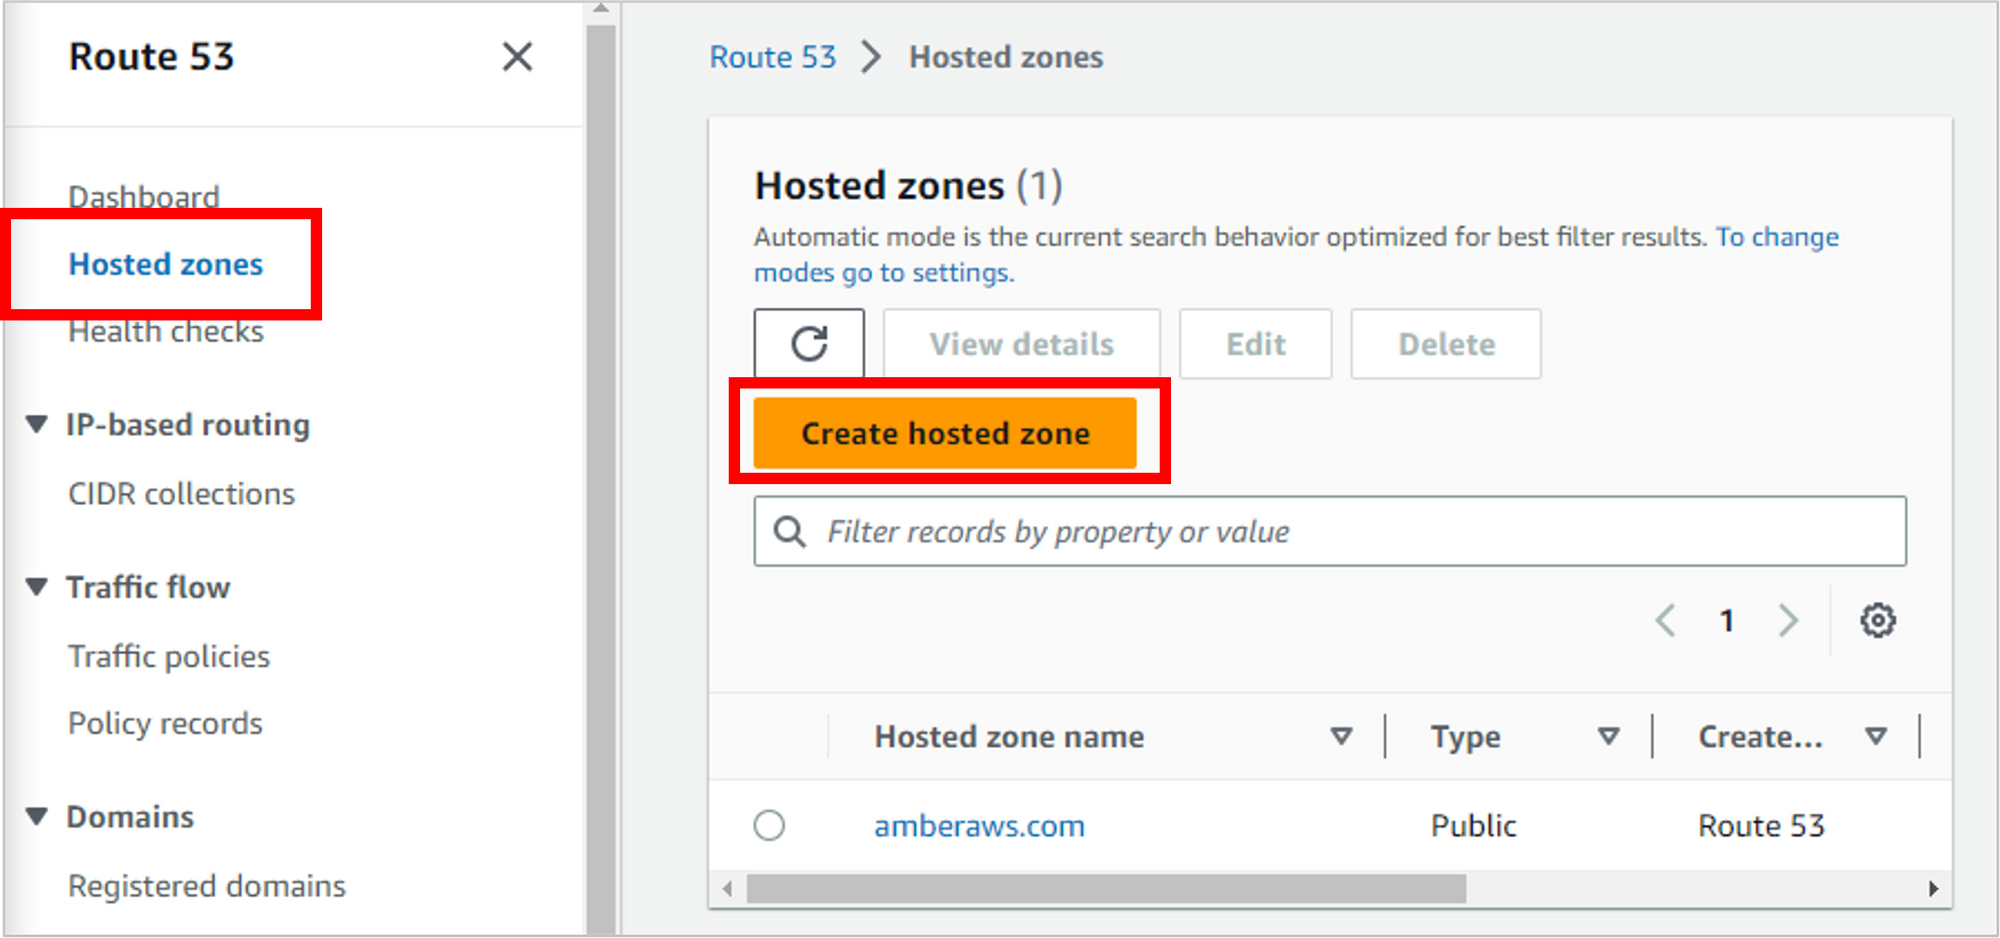
Enter the domain name from the third-party provider, select Public hosted zone, then click Create hosted zone.
Once your public hosted zone is created, you’ll see four name servers listed. Make a note of these.
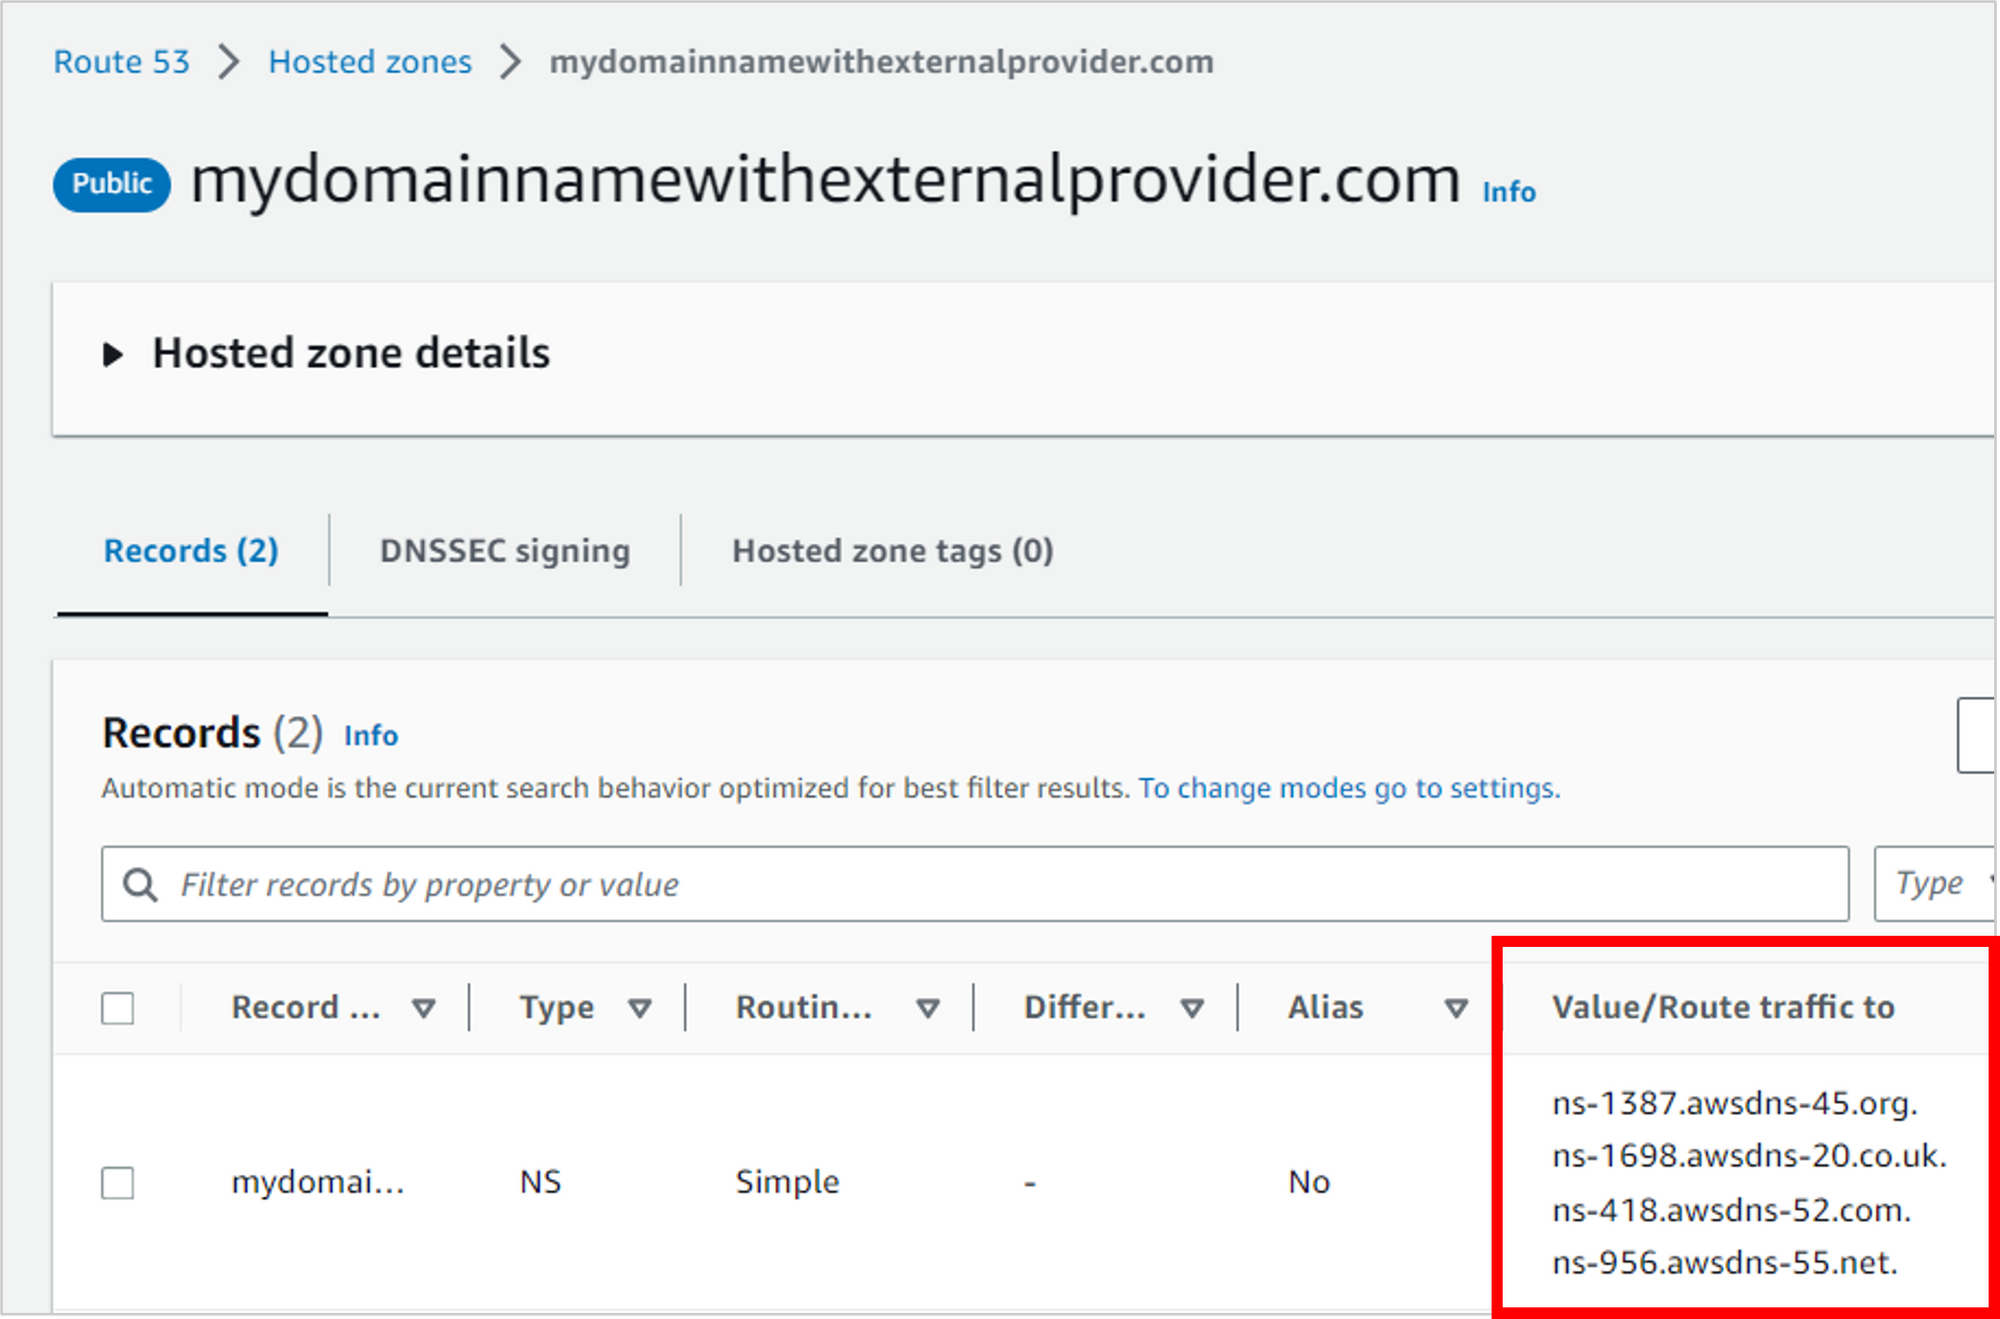
Next, go to the DNS settings for your current domain provider. Find your name server settings, and replace them with the name servers from Route 53.
For more specifics, here are guides from some of the more popular domain name providers:
After you’ve made the updates on the third-party site, and changes have propagated, you should be good to follow along with the rest of this article.
Create an A Record with an Alias to Point to the S3 Website
Now that you have a public hosted zone, you need to create a record that says how traffic should be routed when someone goes to your domain name.
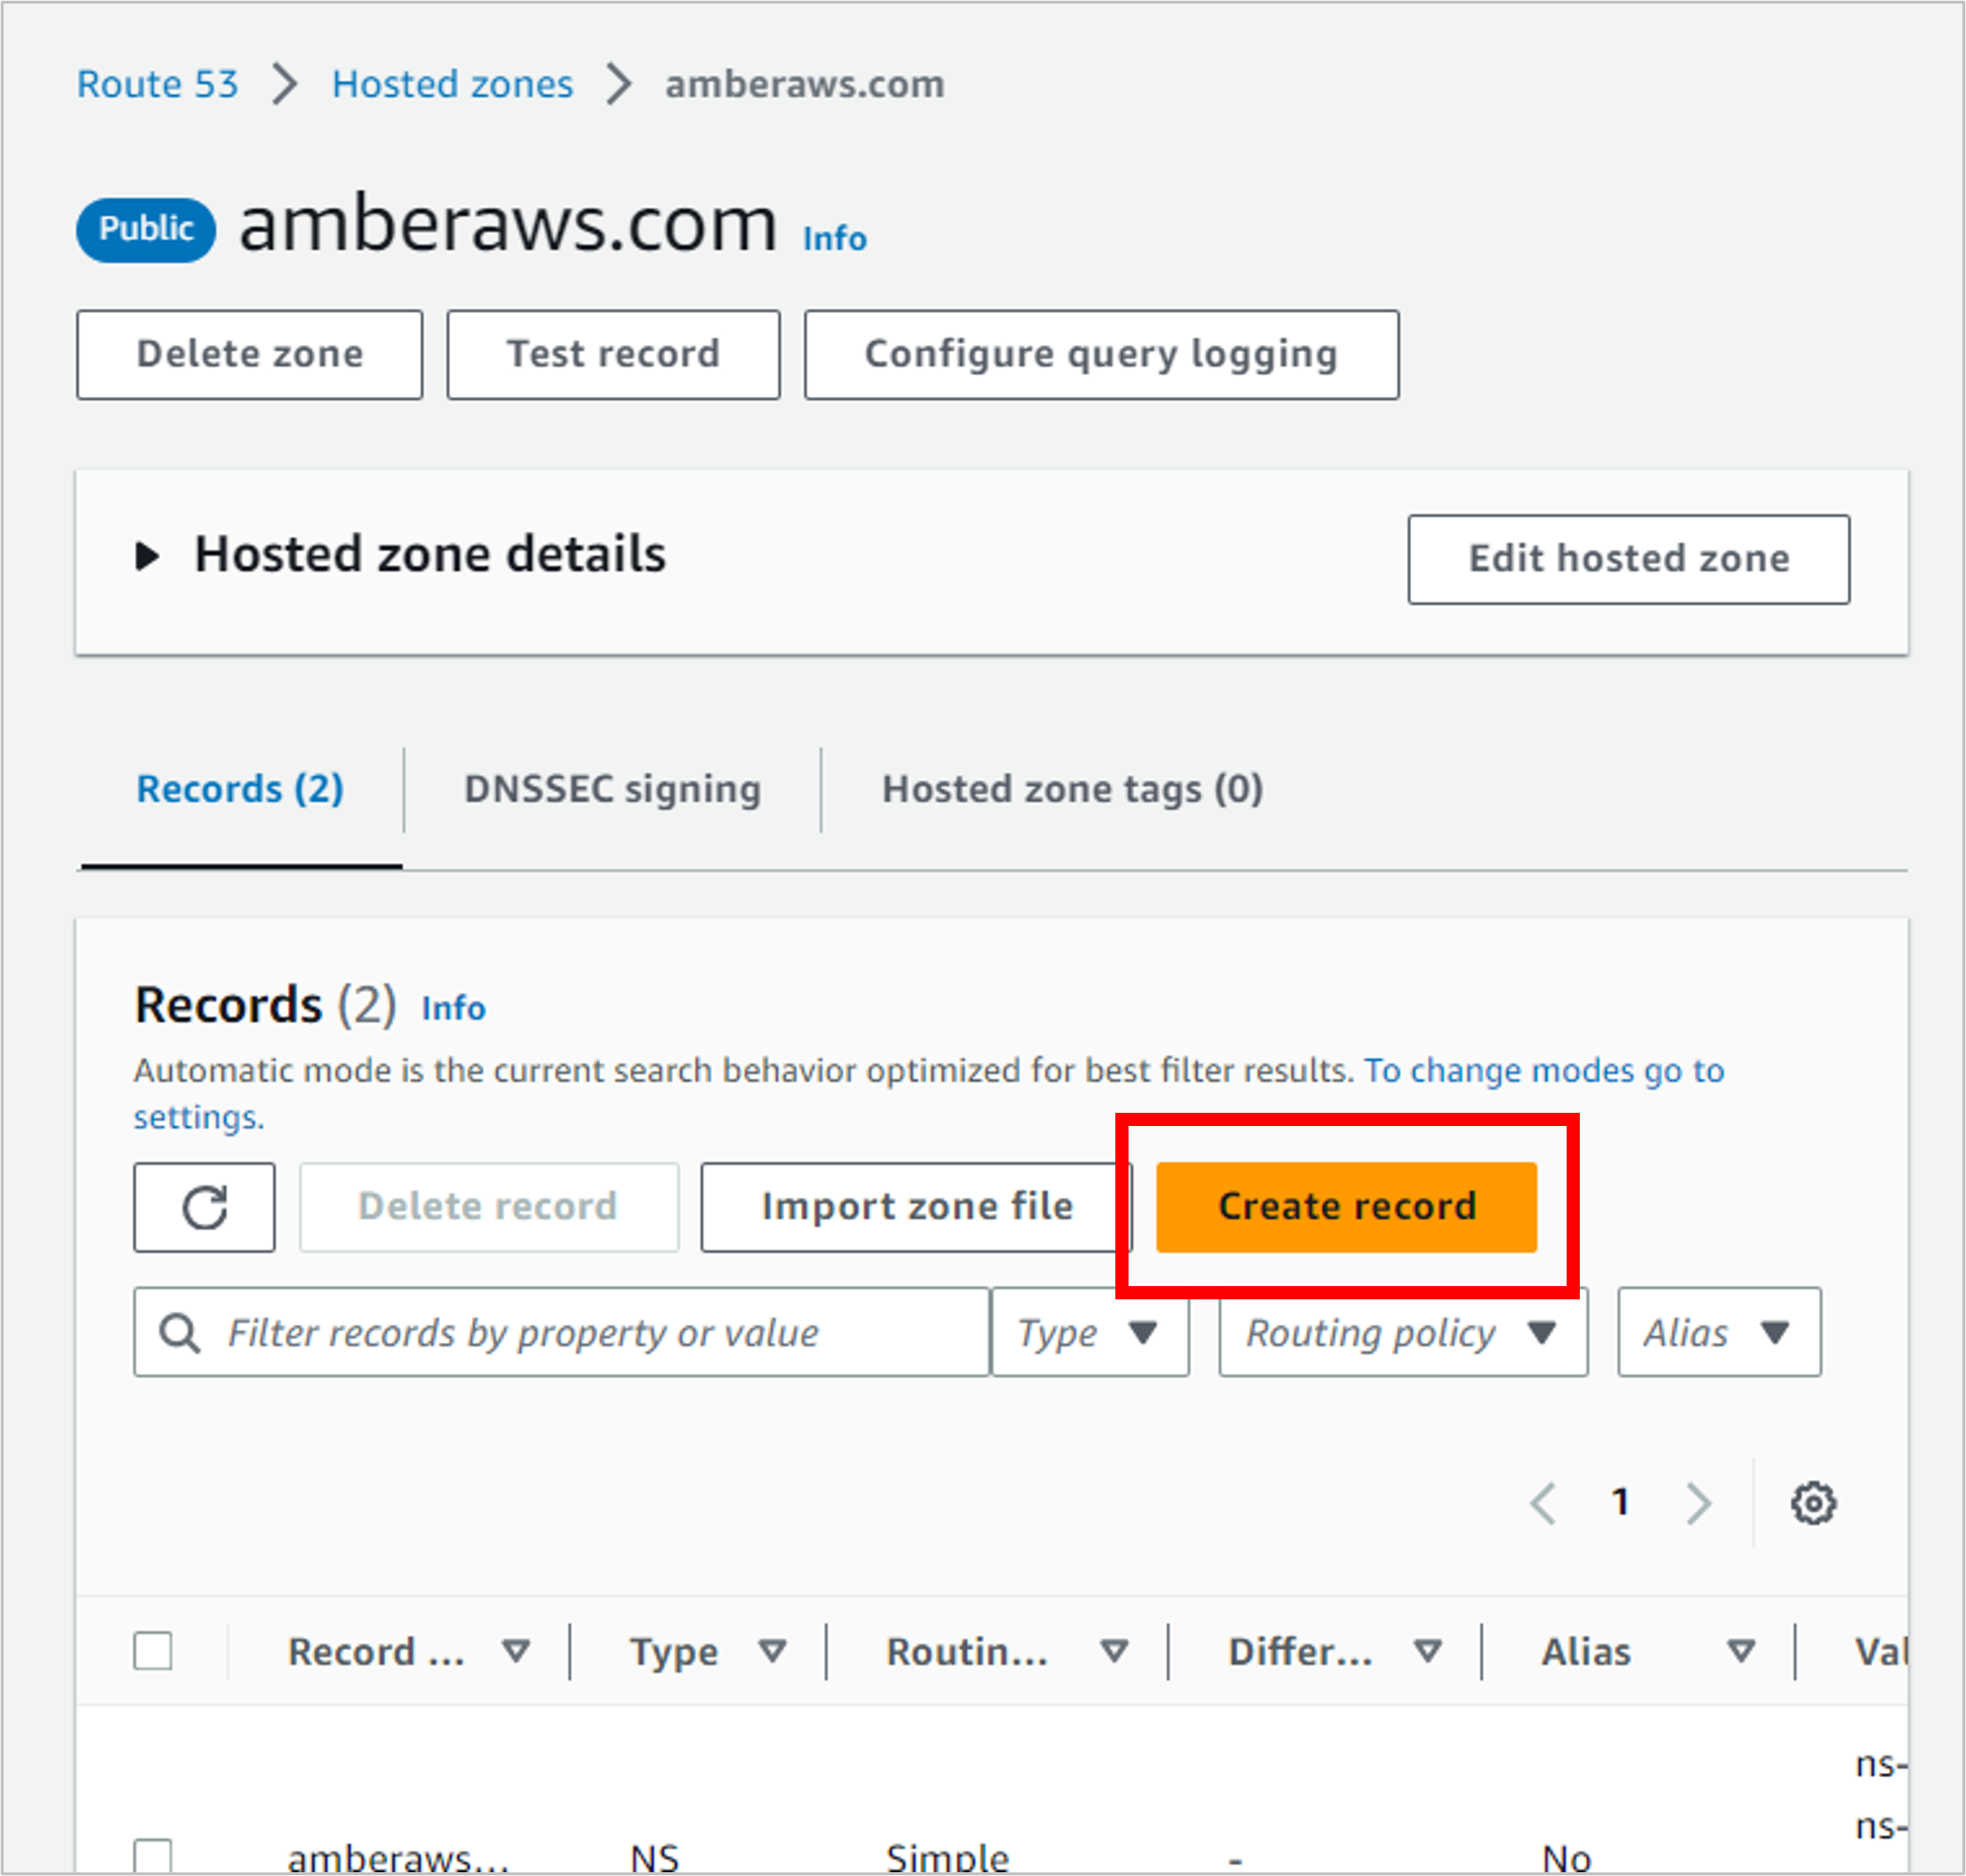
Click into your hosted zone, and then click Create record.
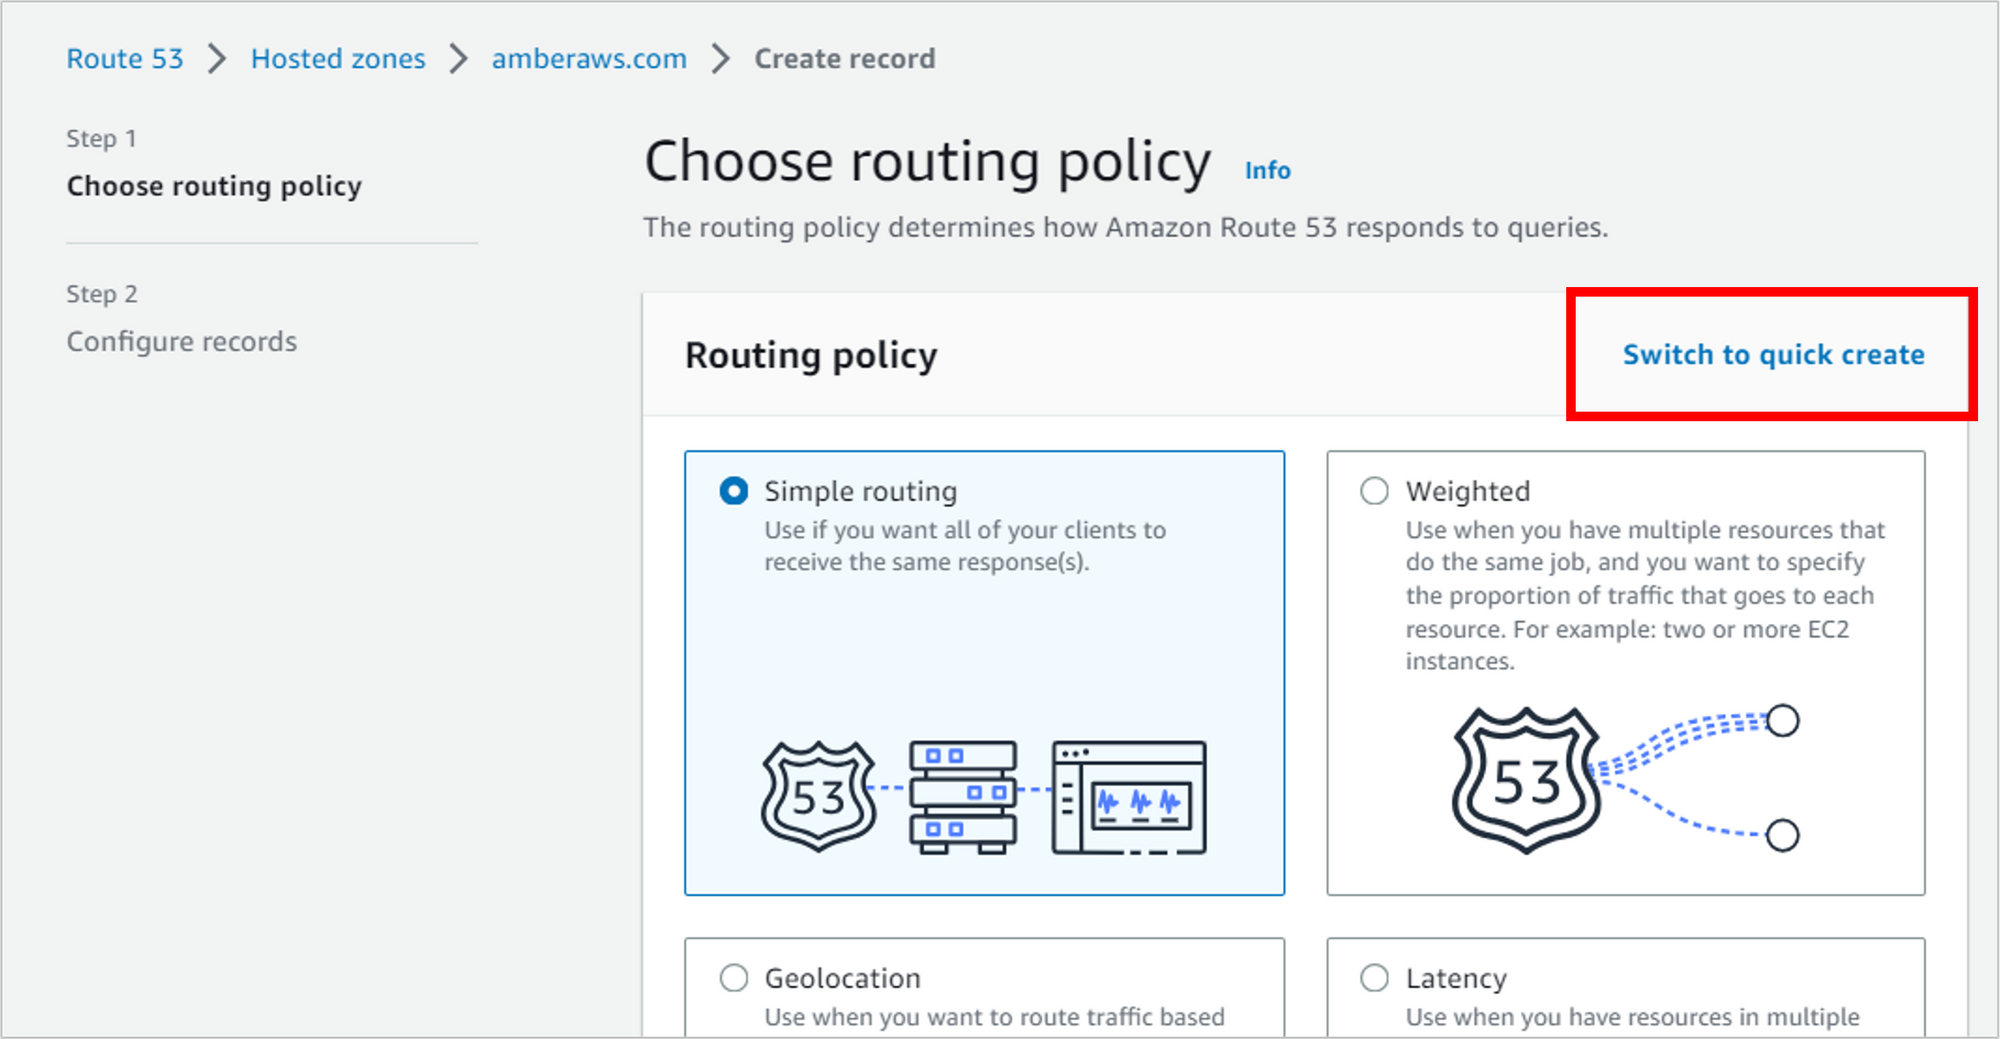
NOTE: If you get the “wizard” view below, click Switch to quick create. (If you don’t see this “tile” view, then you’re already in quick create mode.)
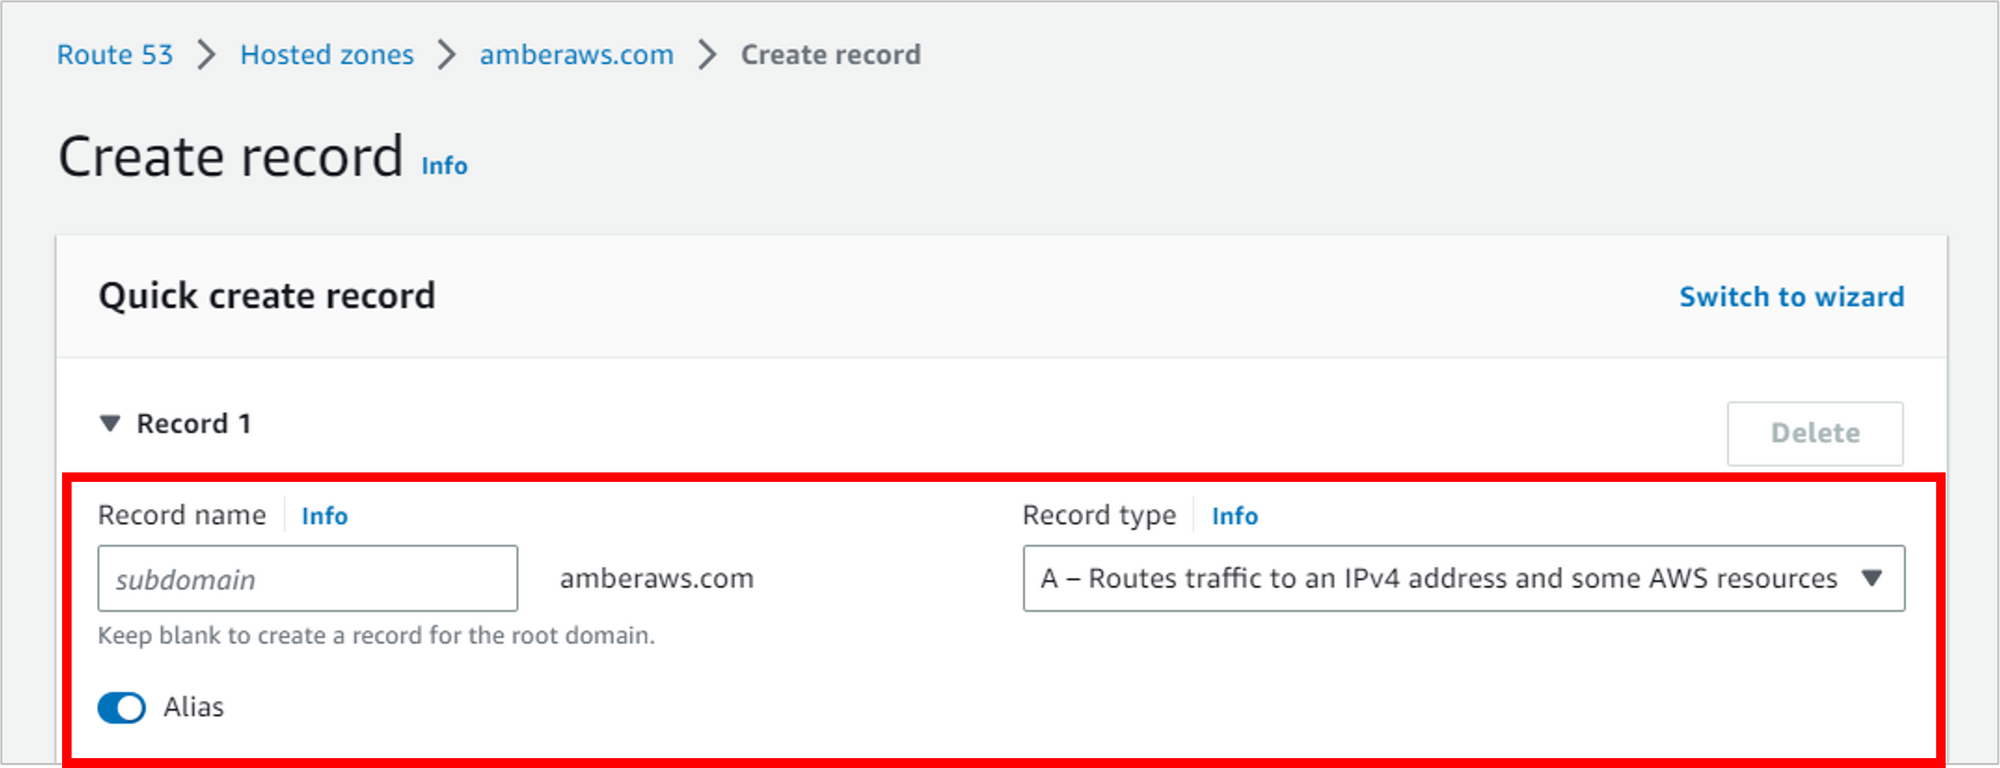
Fill out the details for the record.
- Record name: Leave the subdomain blank, and just go with the root domain (like “amberaws.com”).
- Record type: A
- Alias: Toggle this on. An alias lets you route to AWS resources like S3, CloudFront, Elastic Beanstalk and so on.
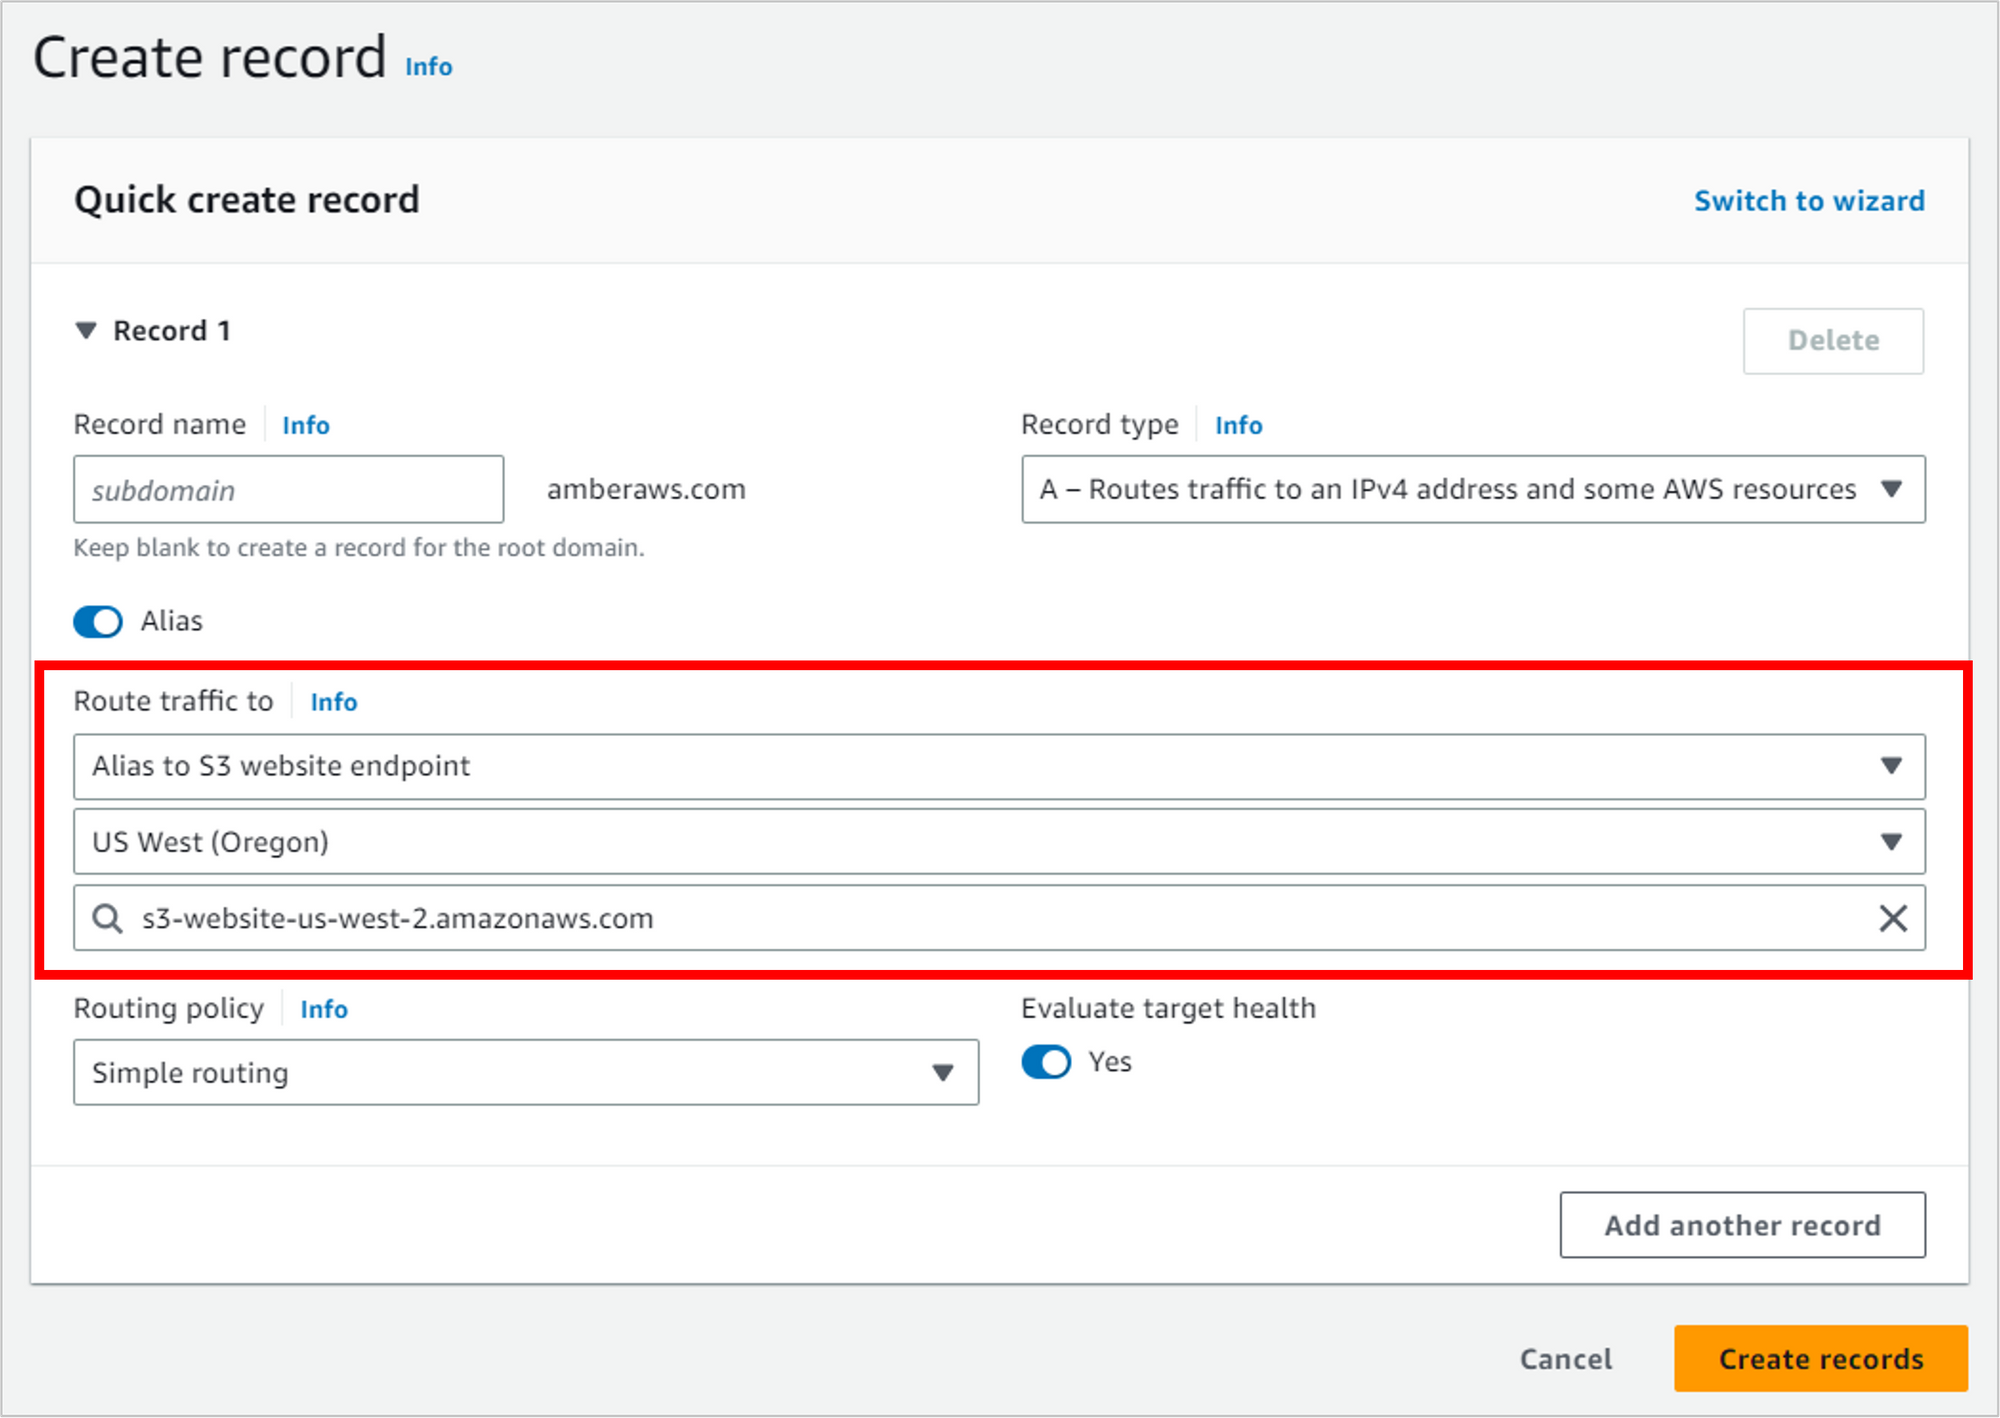
Now fill in the details of where to route traffic. You can type into these dropdowns to filter the values.
- Alias to S3 website endpoint
- Your region (I’m using US West (Oregon))
- The final dropdown should automatically populate with your S3 website. NOTE: If nothing shows up here, it’s likely because you didn’t name your bucket the same as your domain name. D’oh! You’ll need to recreate the bucket with the exact name of your domain.
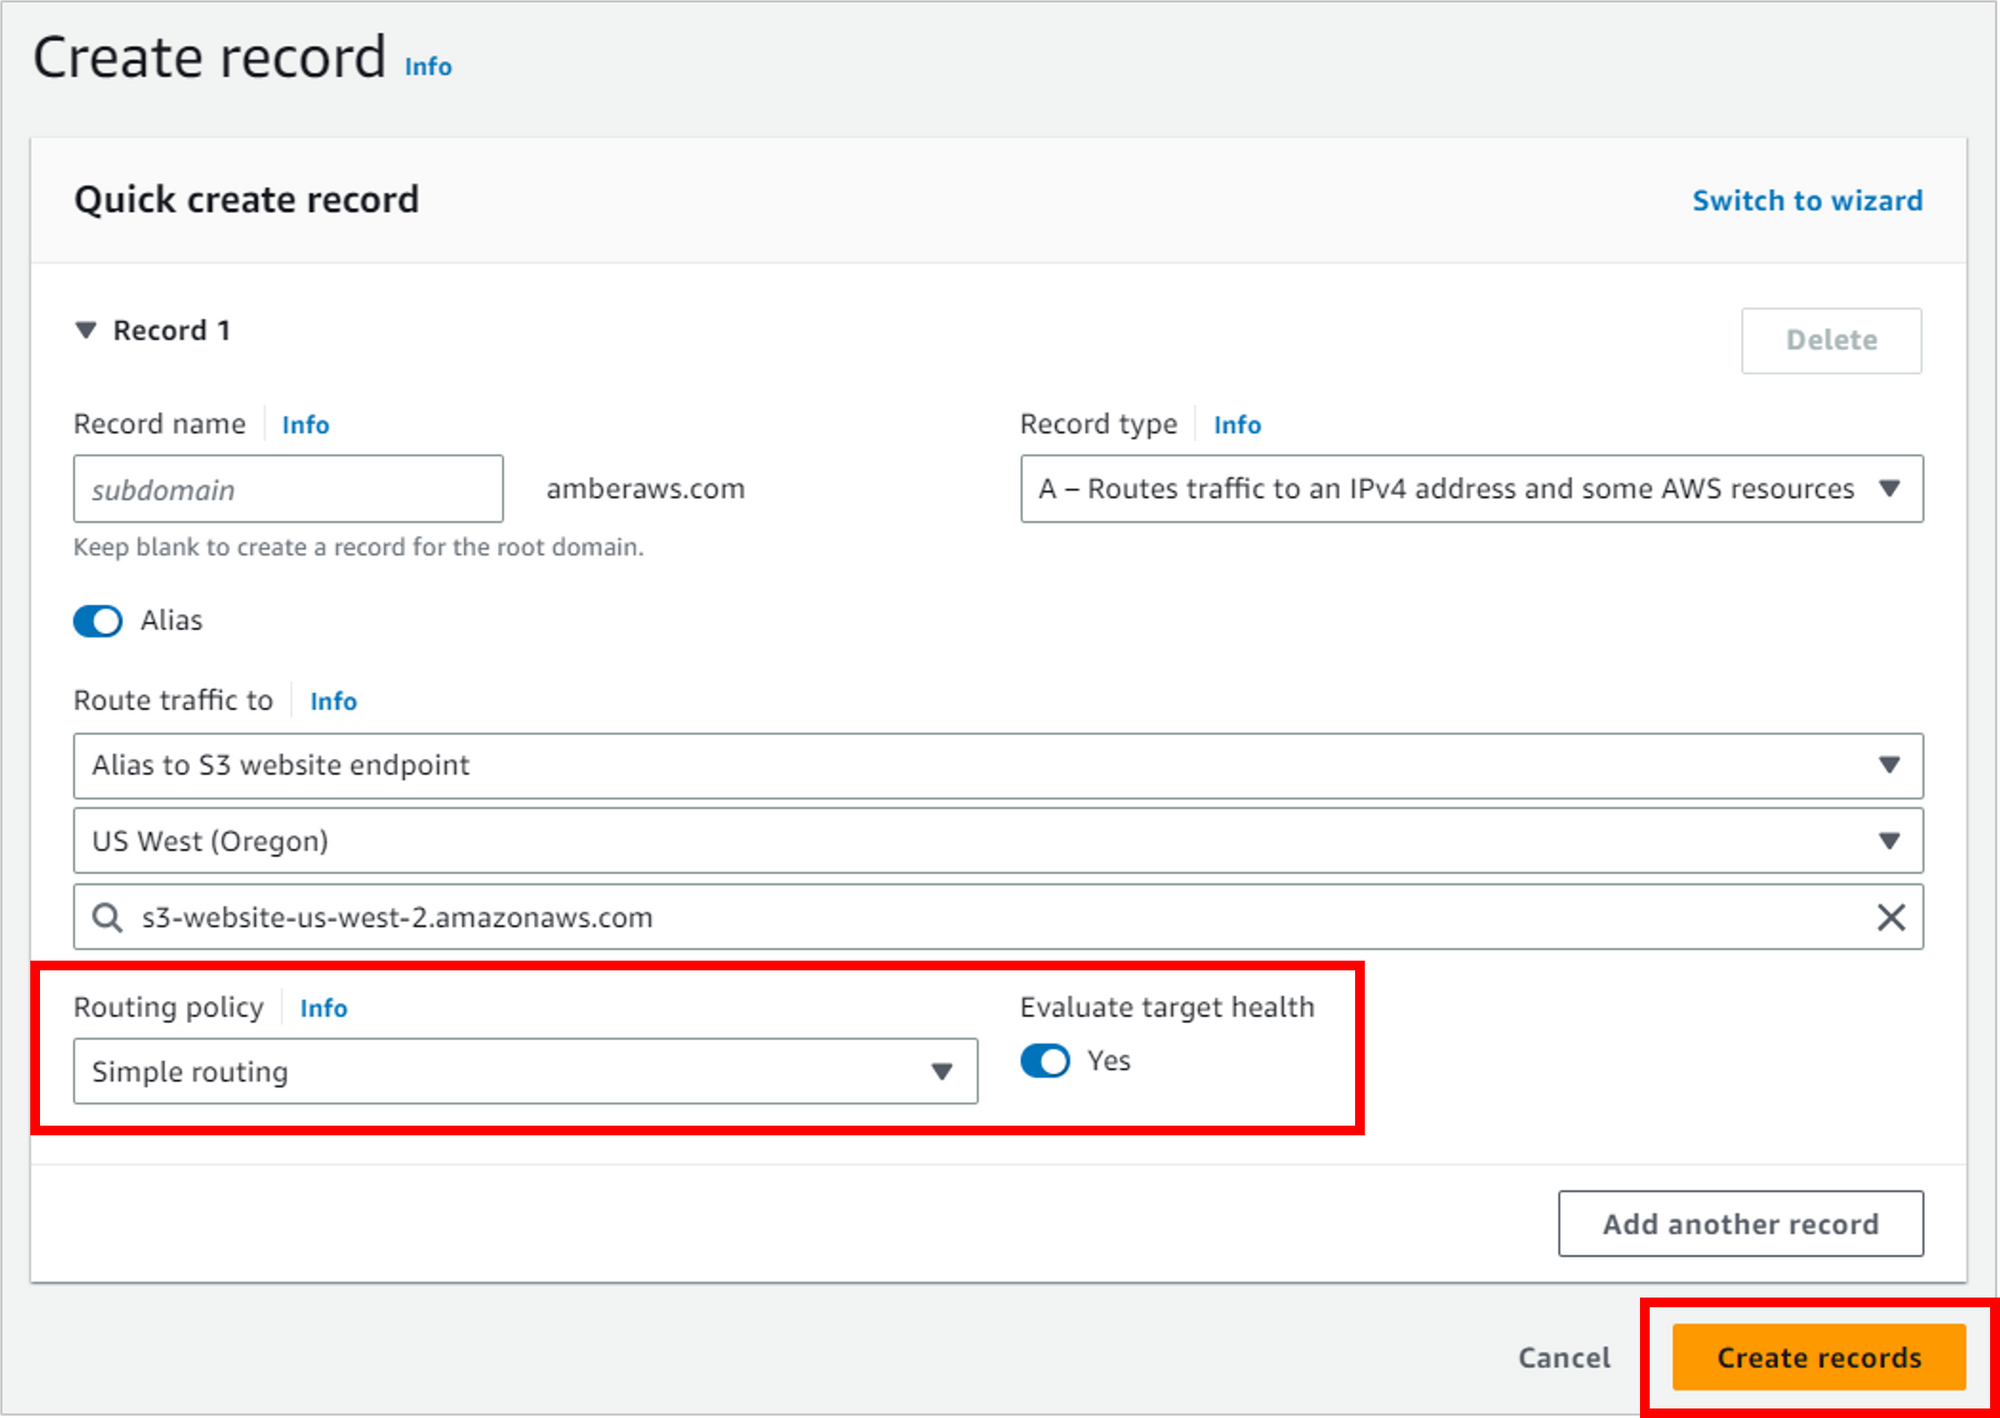
For Routing policy, select Simple routing. For Evaluate target health, leave the default of Yes, then click Create records.
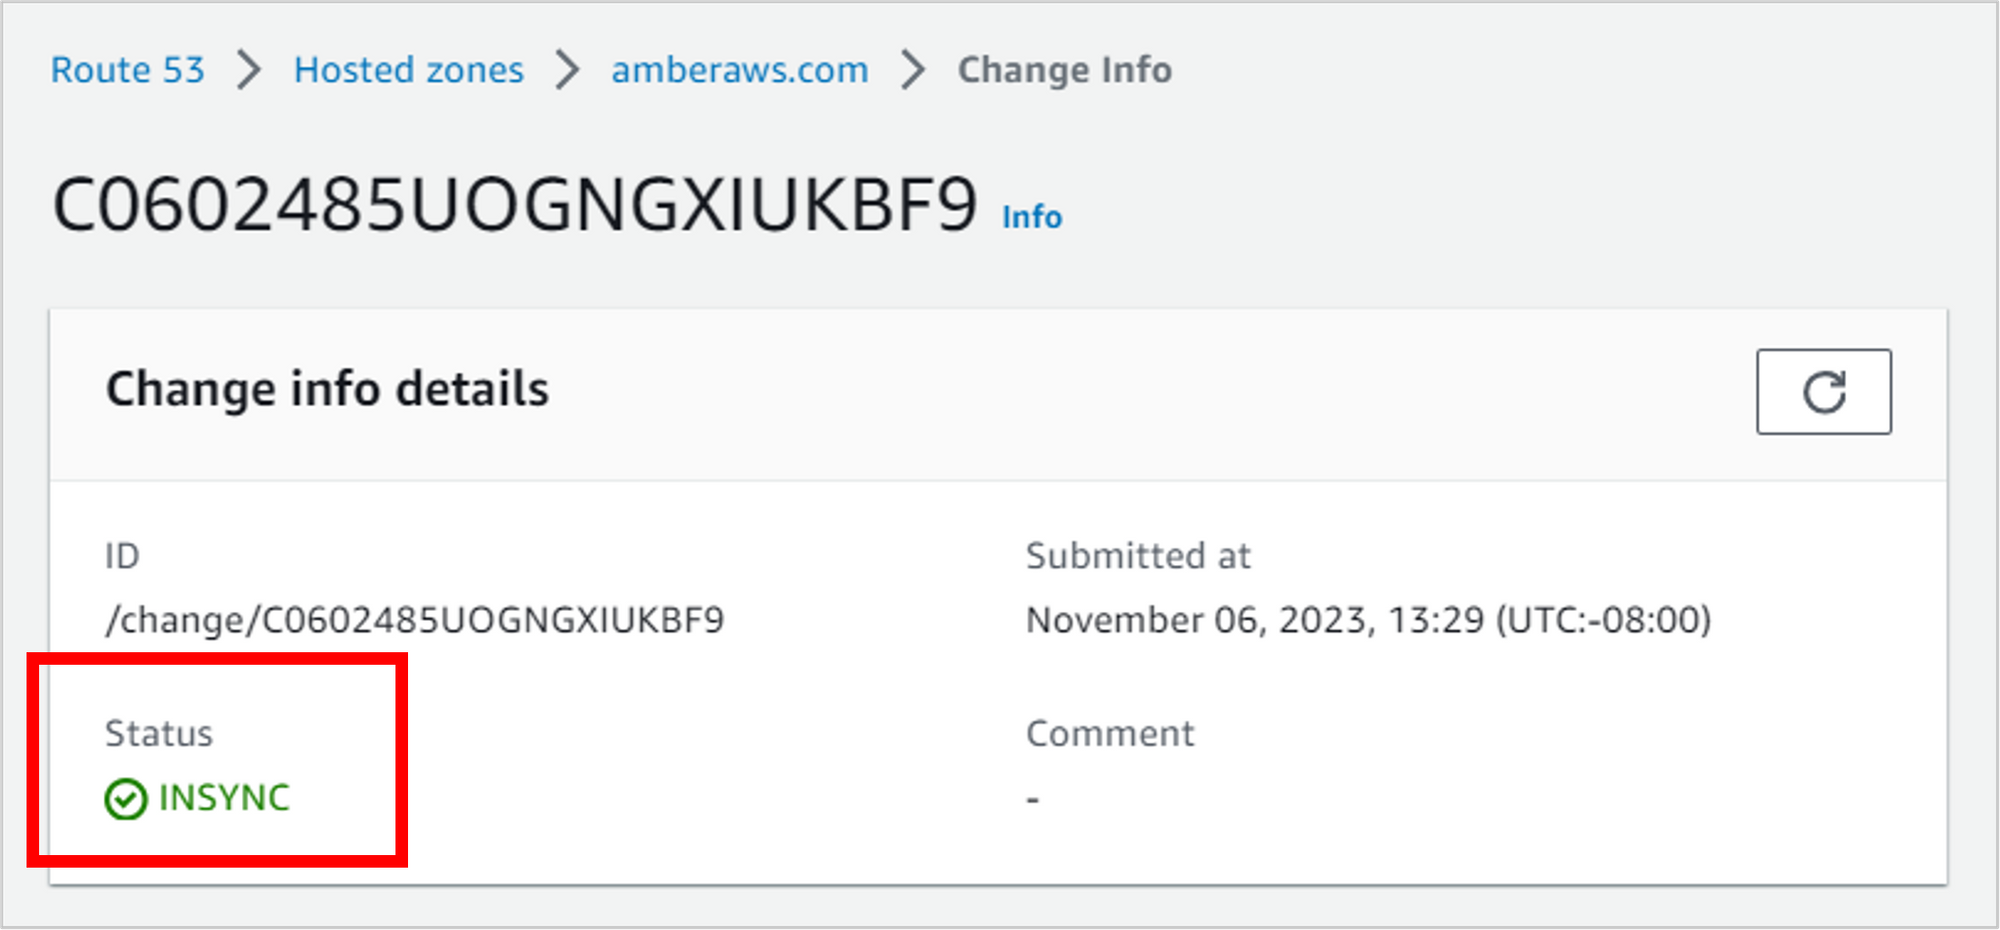
It can take up to 60 seconds for your changes to take effect. You can view the status of propagation by clicking on the handy View status on top of the page.

After the Status changes from PENDING to INSYNC, then you should be good to test out your changes.
Now let’s test! If everything worked, then when you type your domain name into a browser (like amberaws.com), Route 53 should direct you to the S3 website, which means you should see your (awesome) résumé.
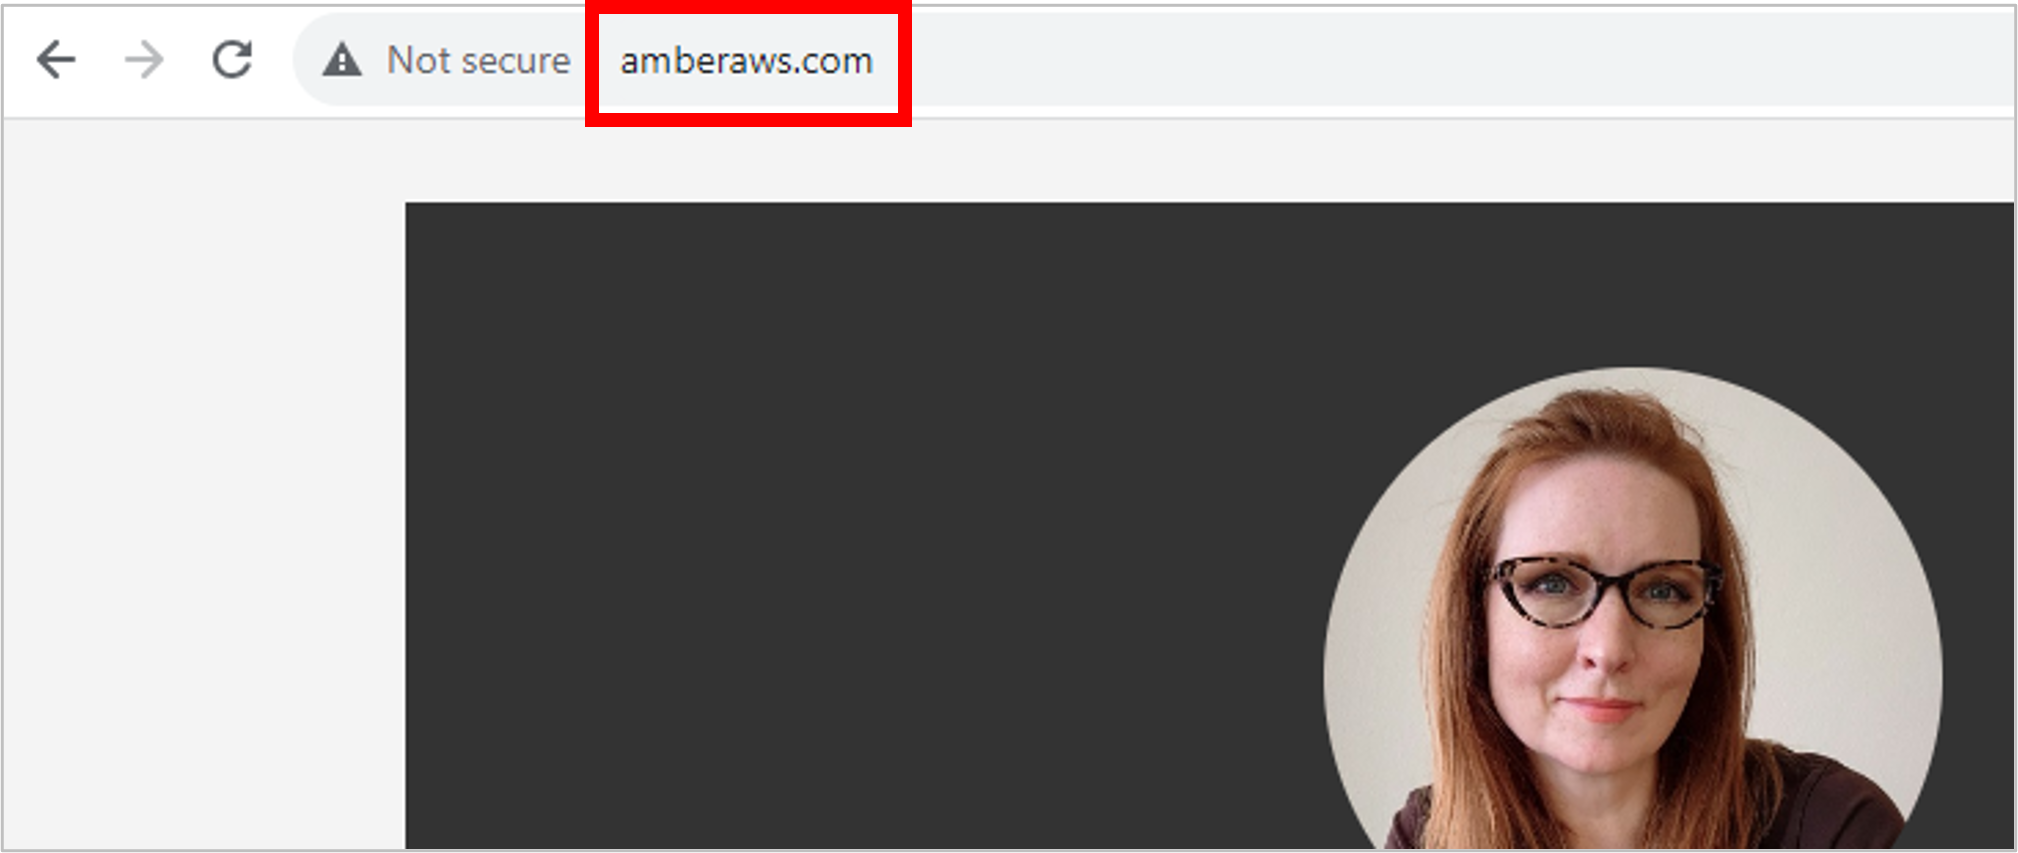
Congratulations! You’ve made a ton of progress. The last piece is to get a secure connection (HTTPS, with a TLS/SSL certificate) working so you can get rid of that pesky “Not secure” message from your browser.
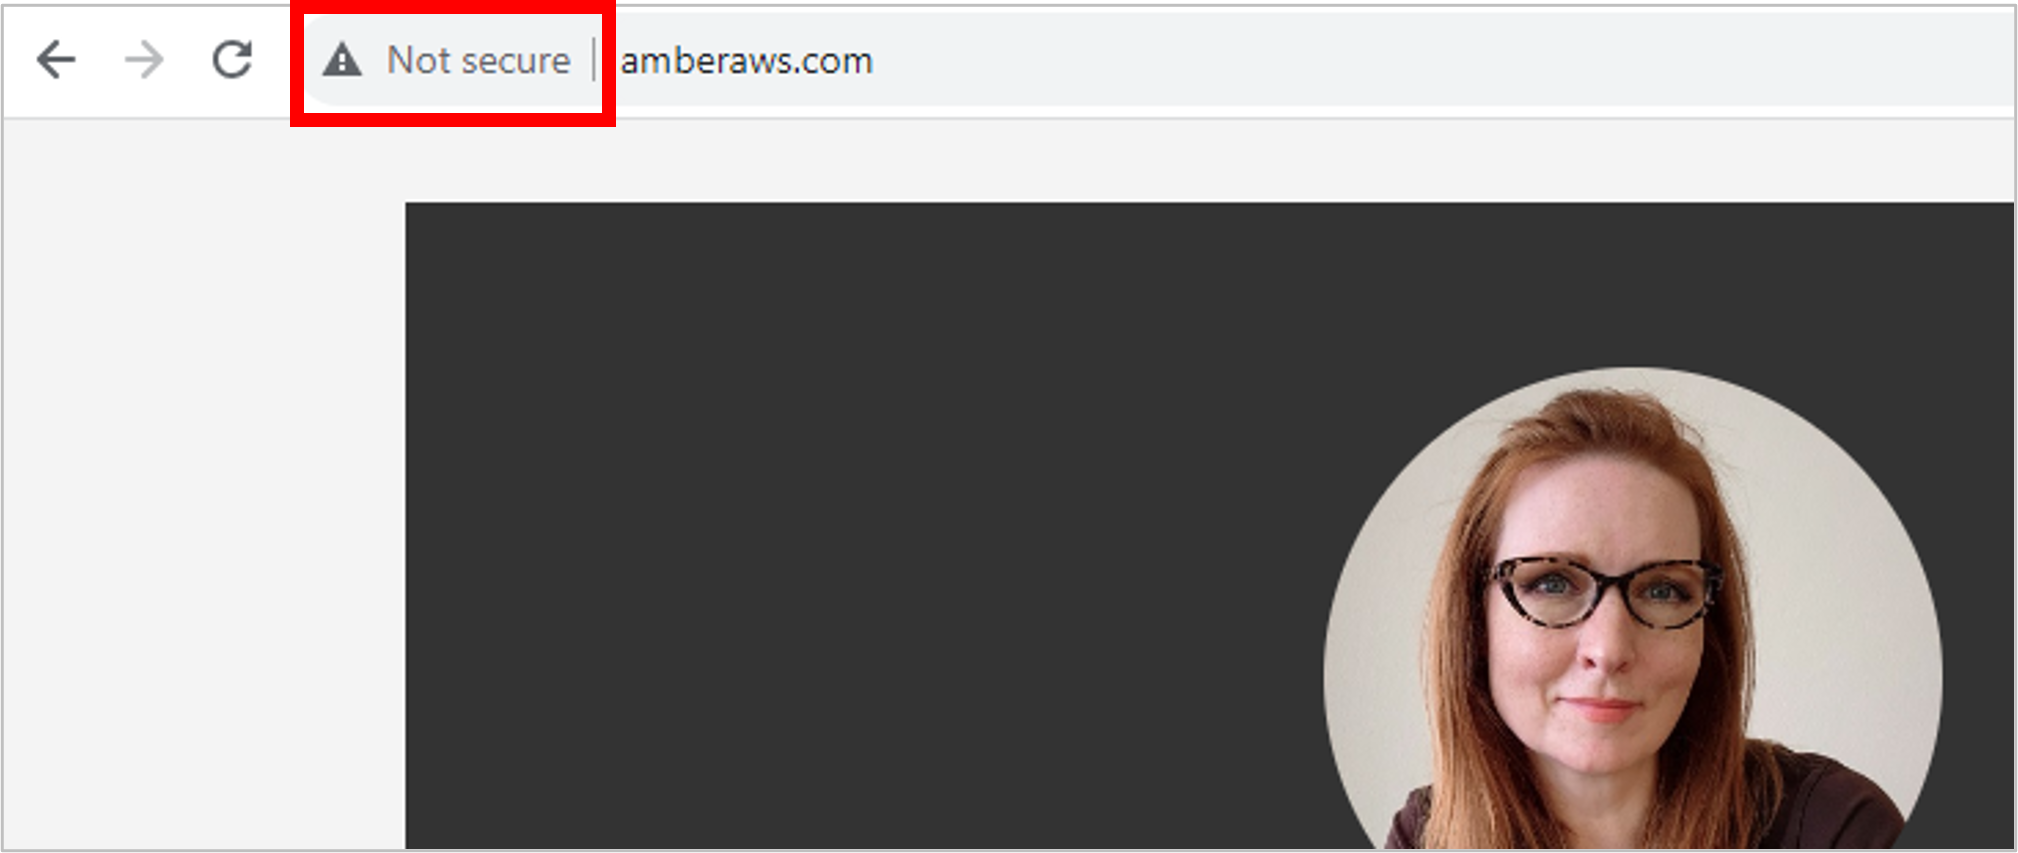
Let’s tackle that piece next, using AWS Certificate Manager.
Create a Public TLS/SSL Certificate using AWS Certificate Manager
If you need a refresher on certificates, these help ensure a secure connection between users and the server they’re making a request to.
If I’m sending bank information across the internet, for example, I want to know that it’s going to a server that’s reputable, and that the connection is encrypted. And even for something as “simple” as a résumé, a secure connection will give viewers confidence that they haven’t ended up on a sketchy website.

In AWS land, certificates are created and managed in AWS Certificate Manager (ACM). (You can also import existing certificates from another authority if you have them.)
Navigate to Certificate Manager.

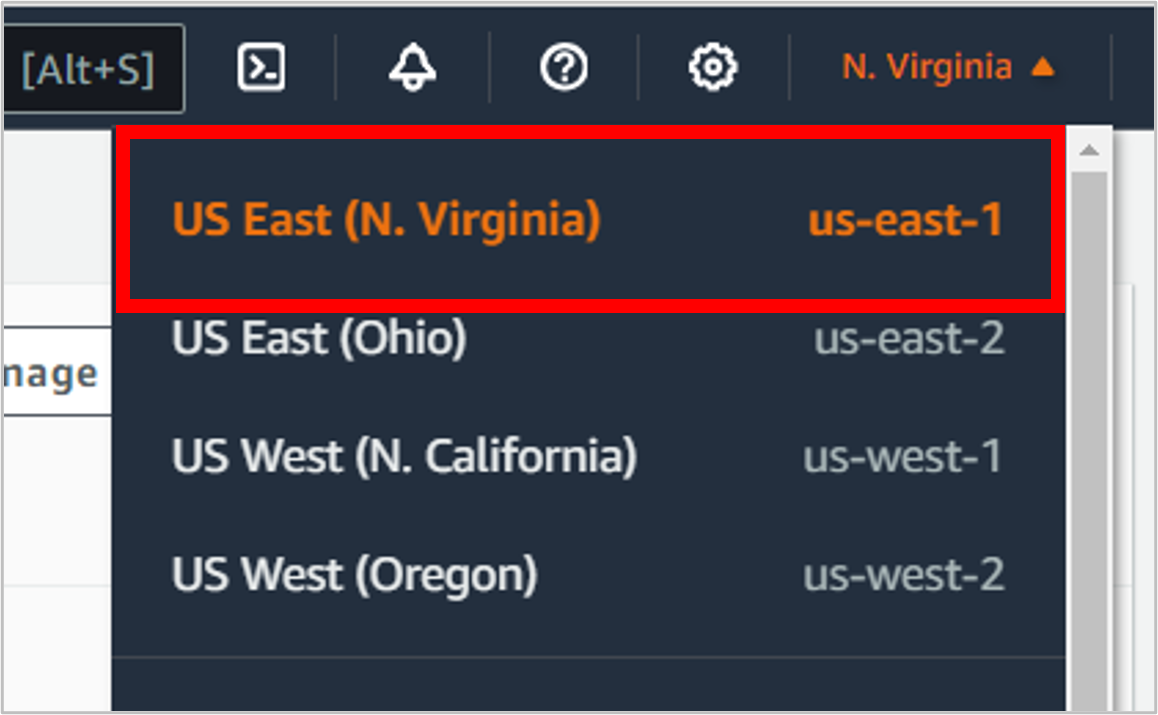
IMPORTANT! For this section, you need to switch your region to us-east-1 (N. Virginia). If you create a certificate in another region, you won’t be able to use it with CloudFront (where you’ll eventually end up).
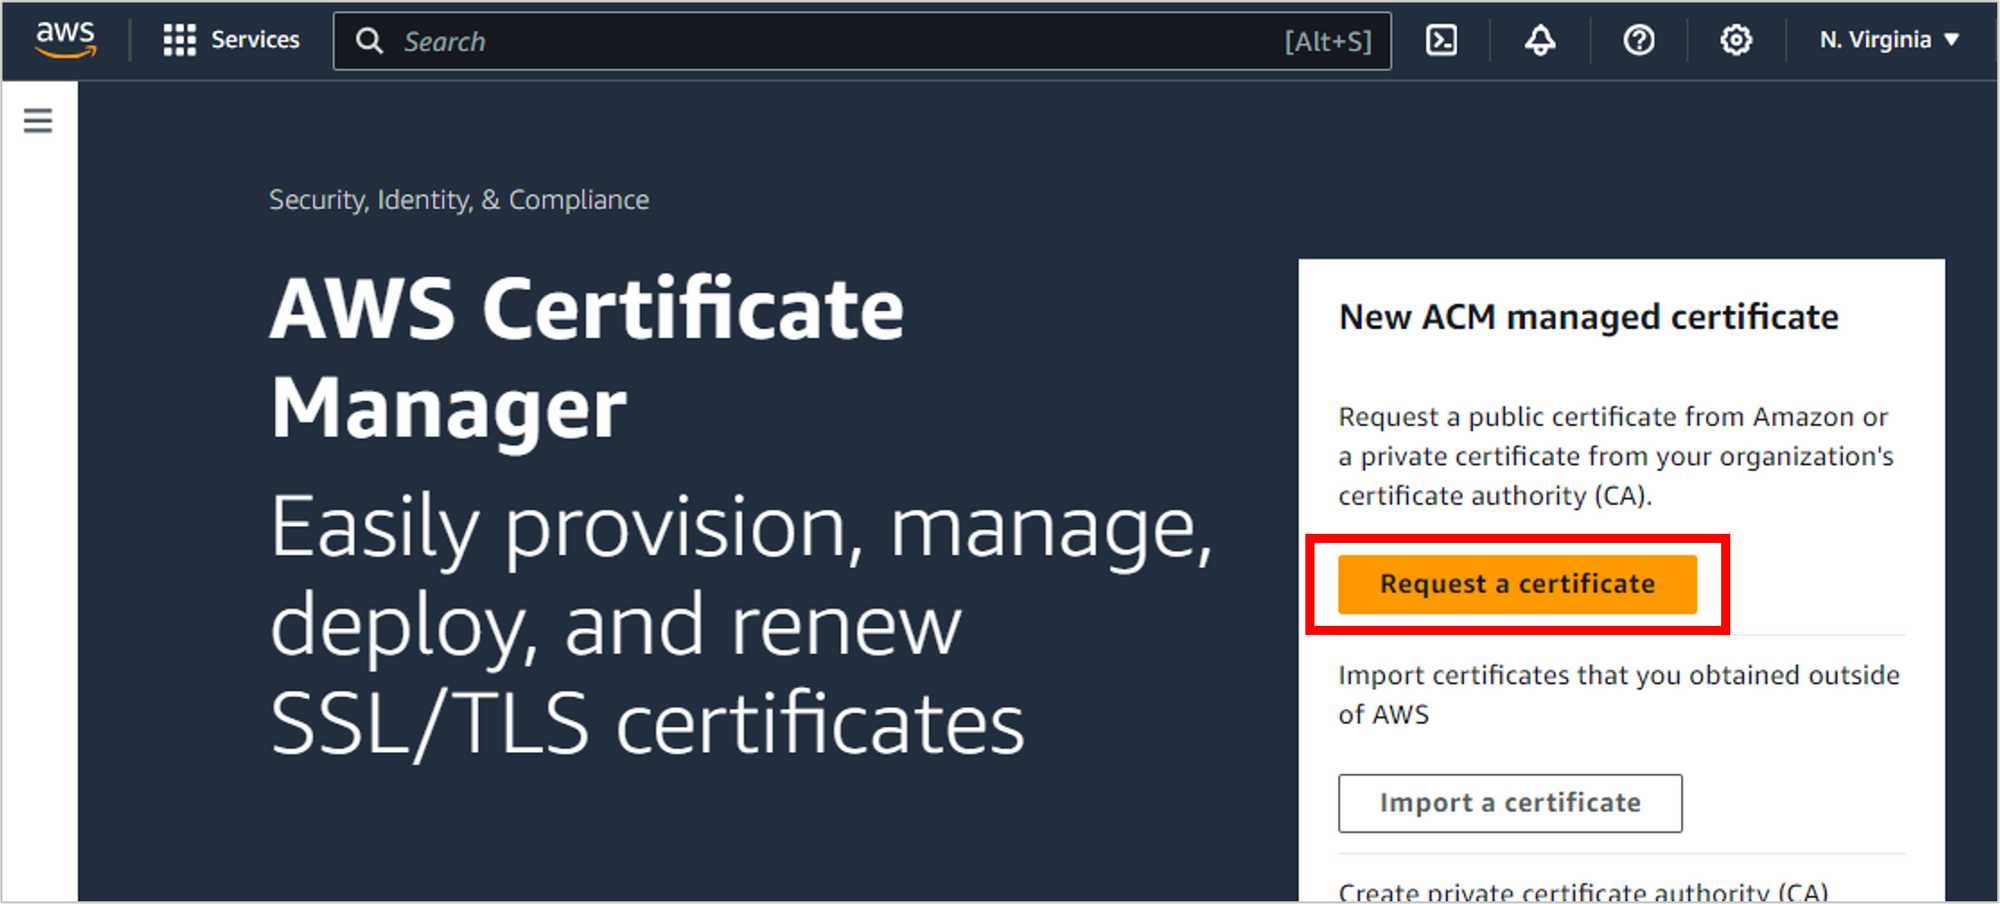
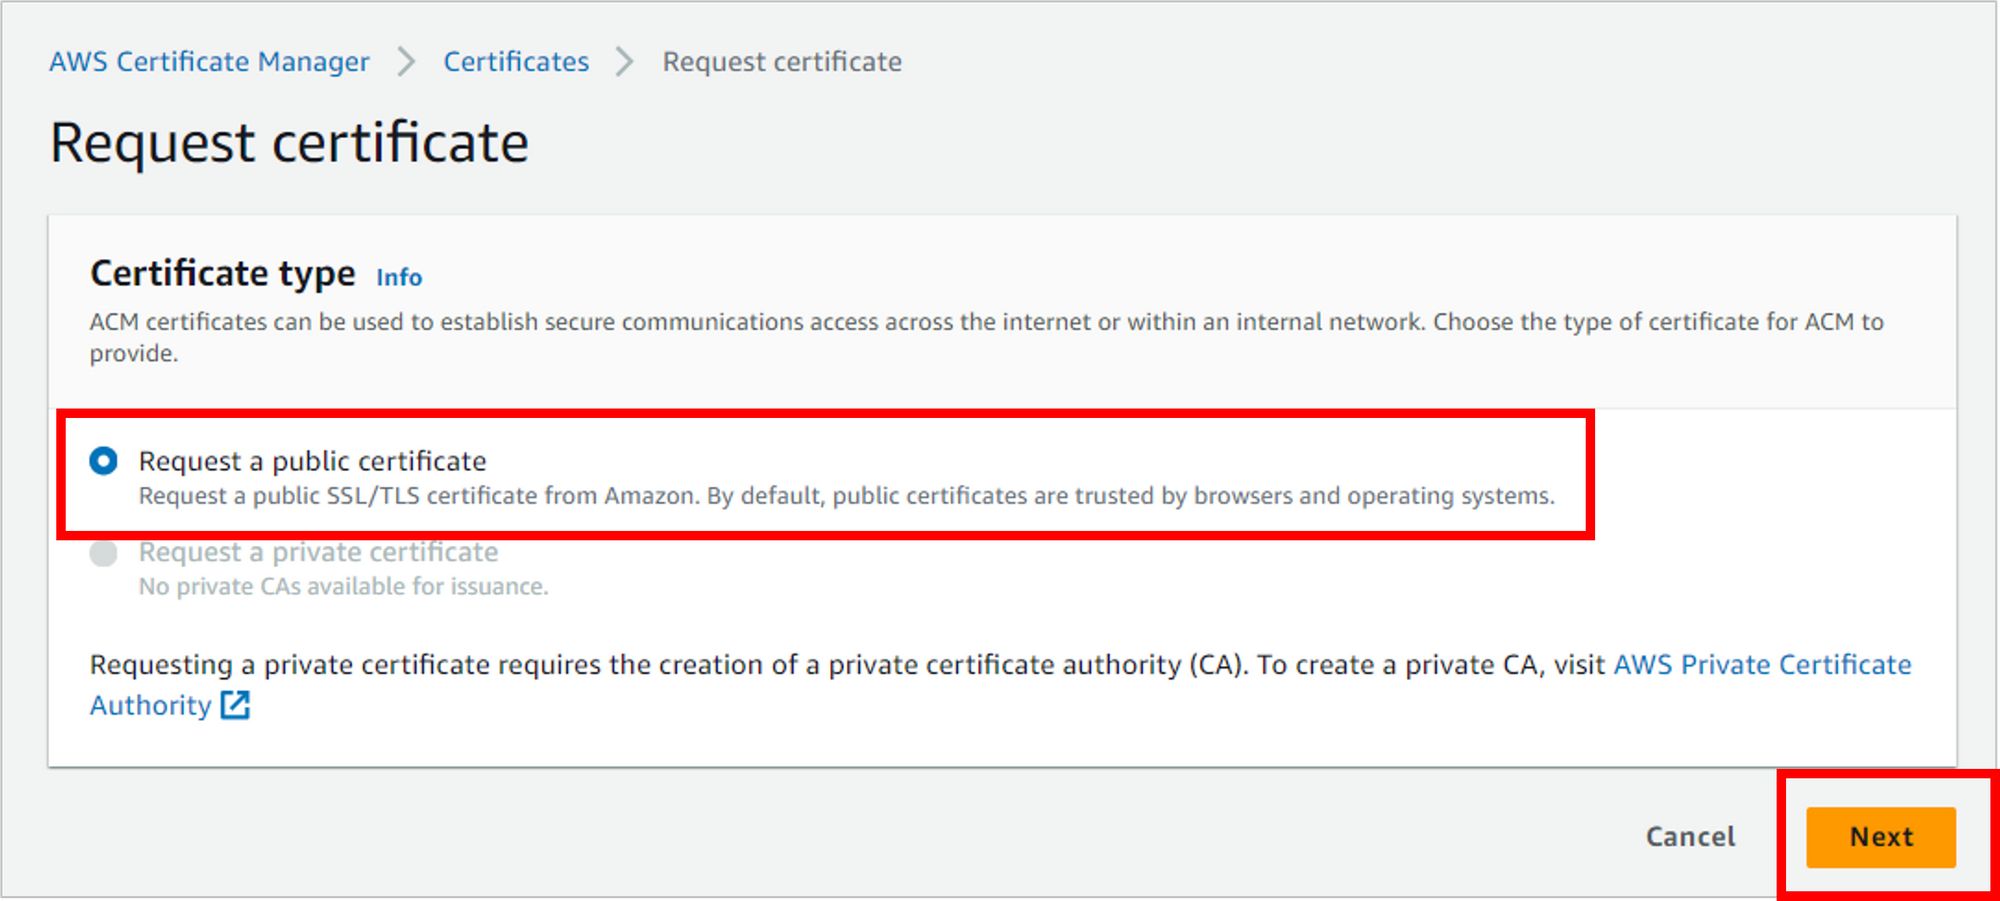
From the Certificate Manager landing page, click Request a certificate.
Select Request a public certificate and then click Next.
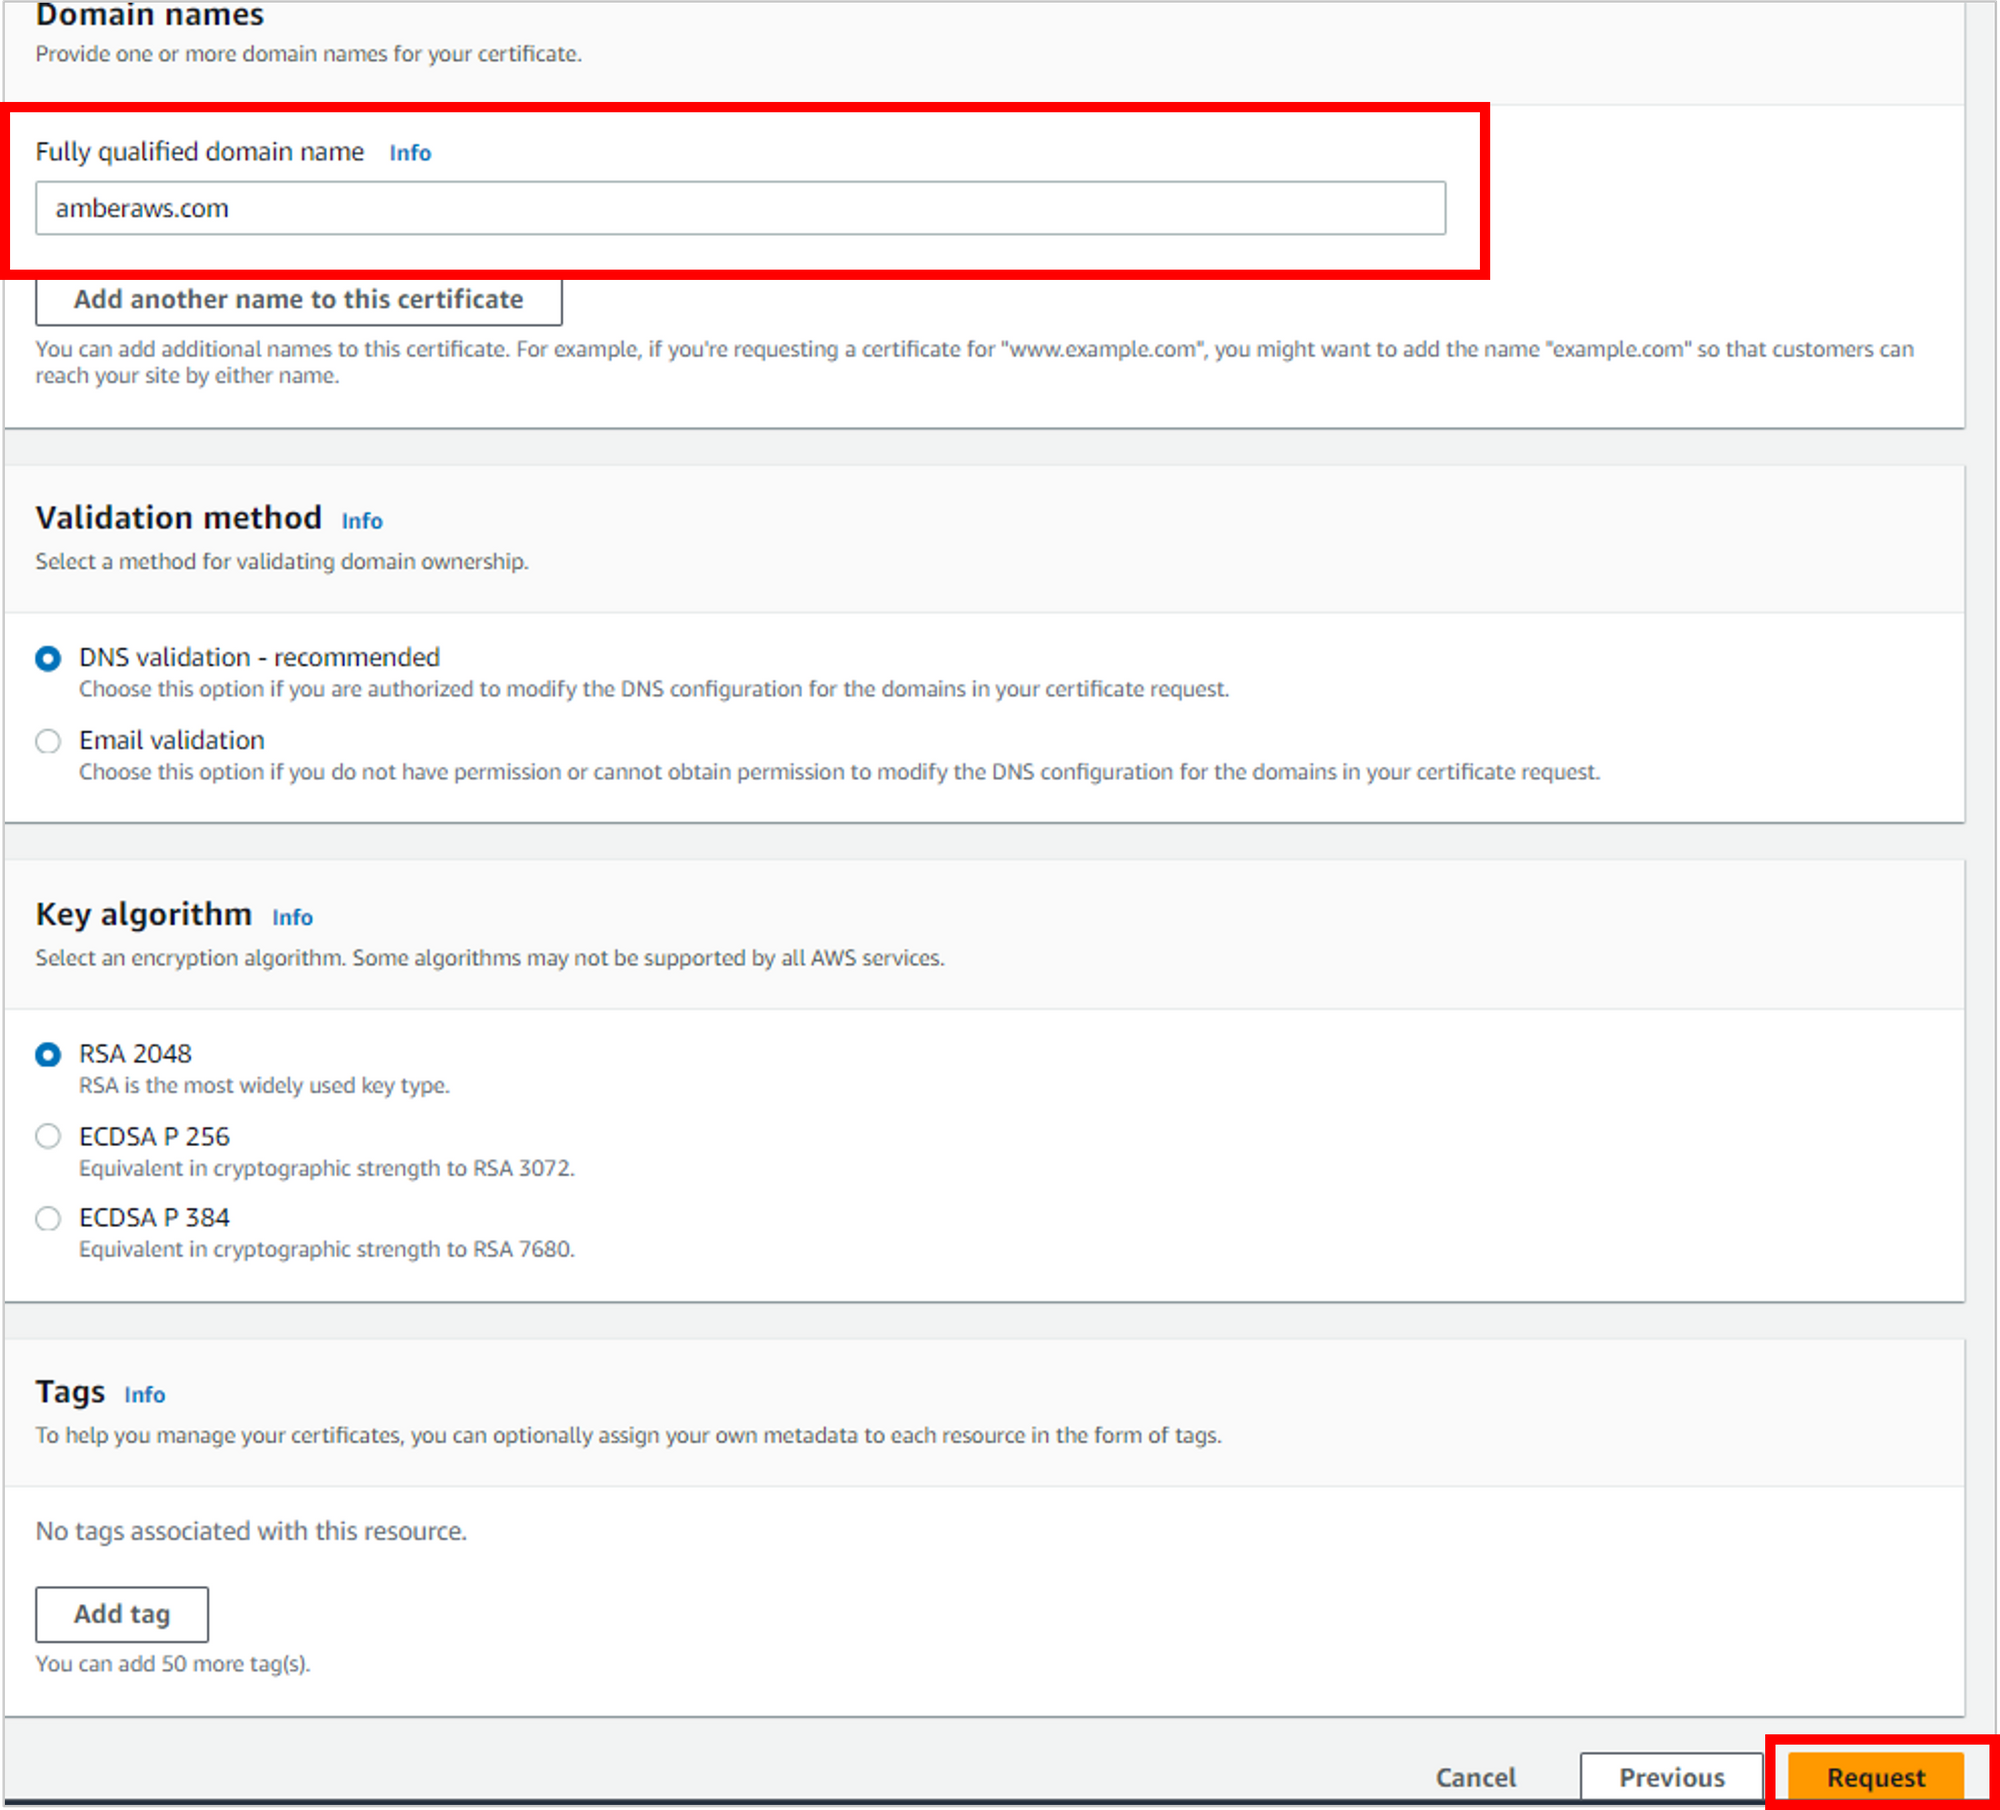
Enter your domain name (like “amberaws.com”), leave the rest of the options as defaults, then click Request.
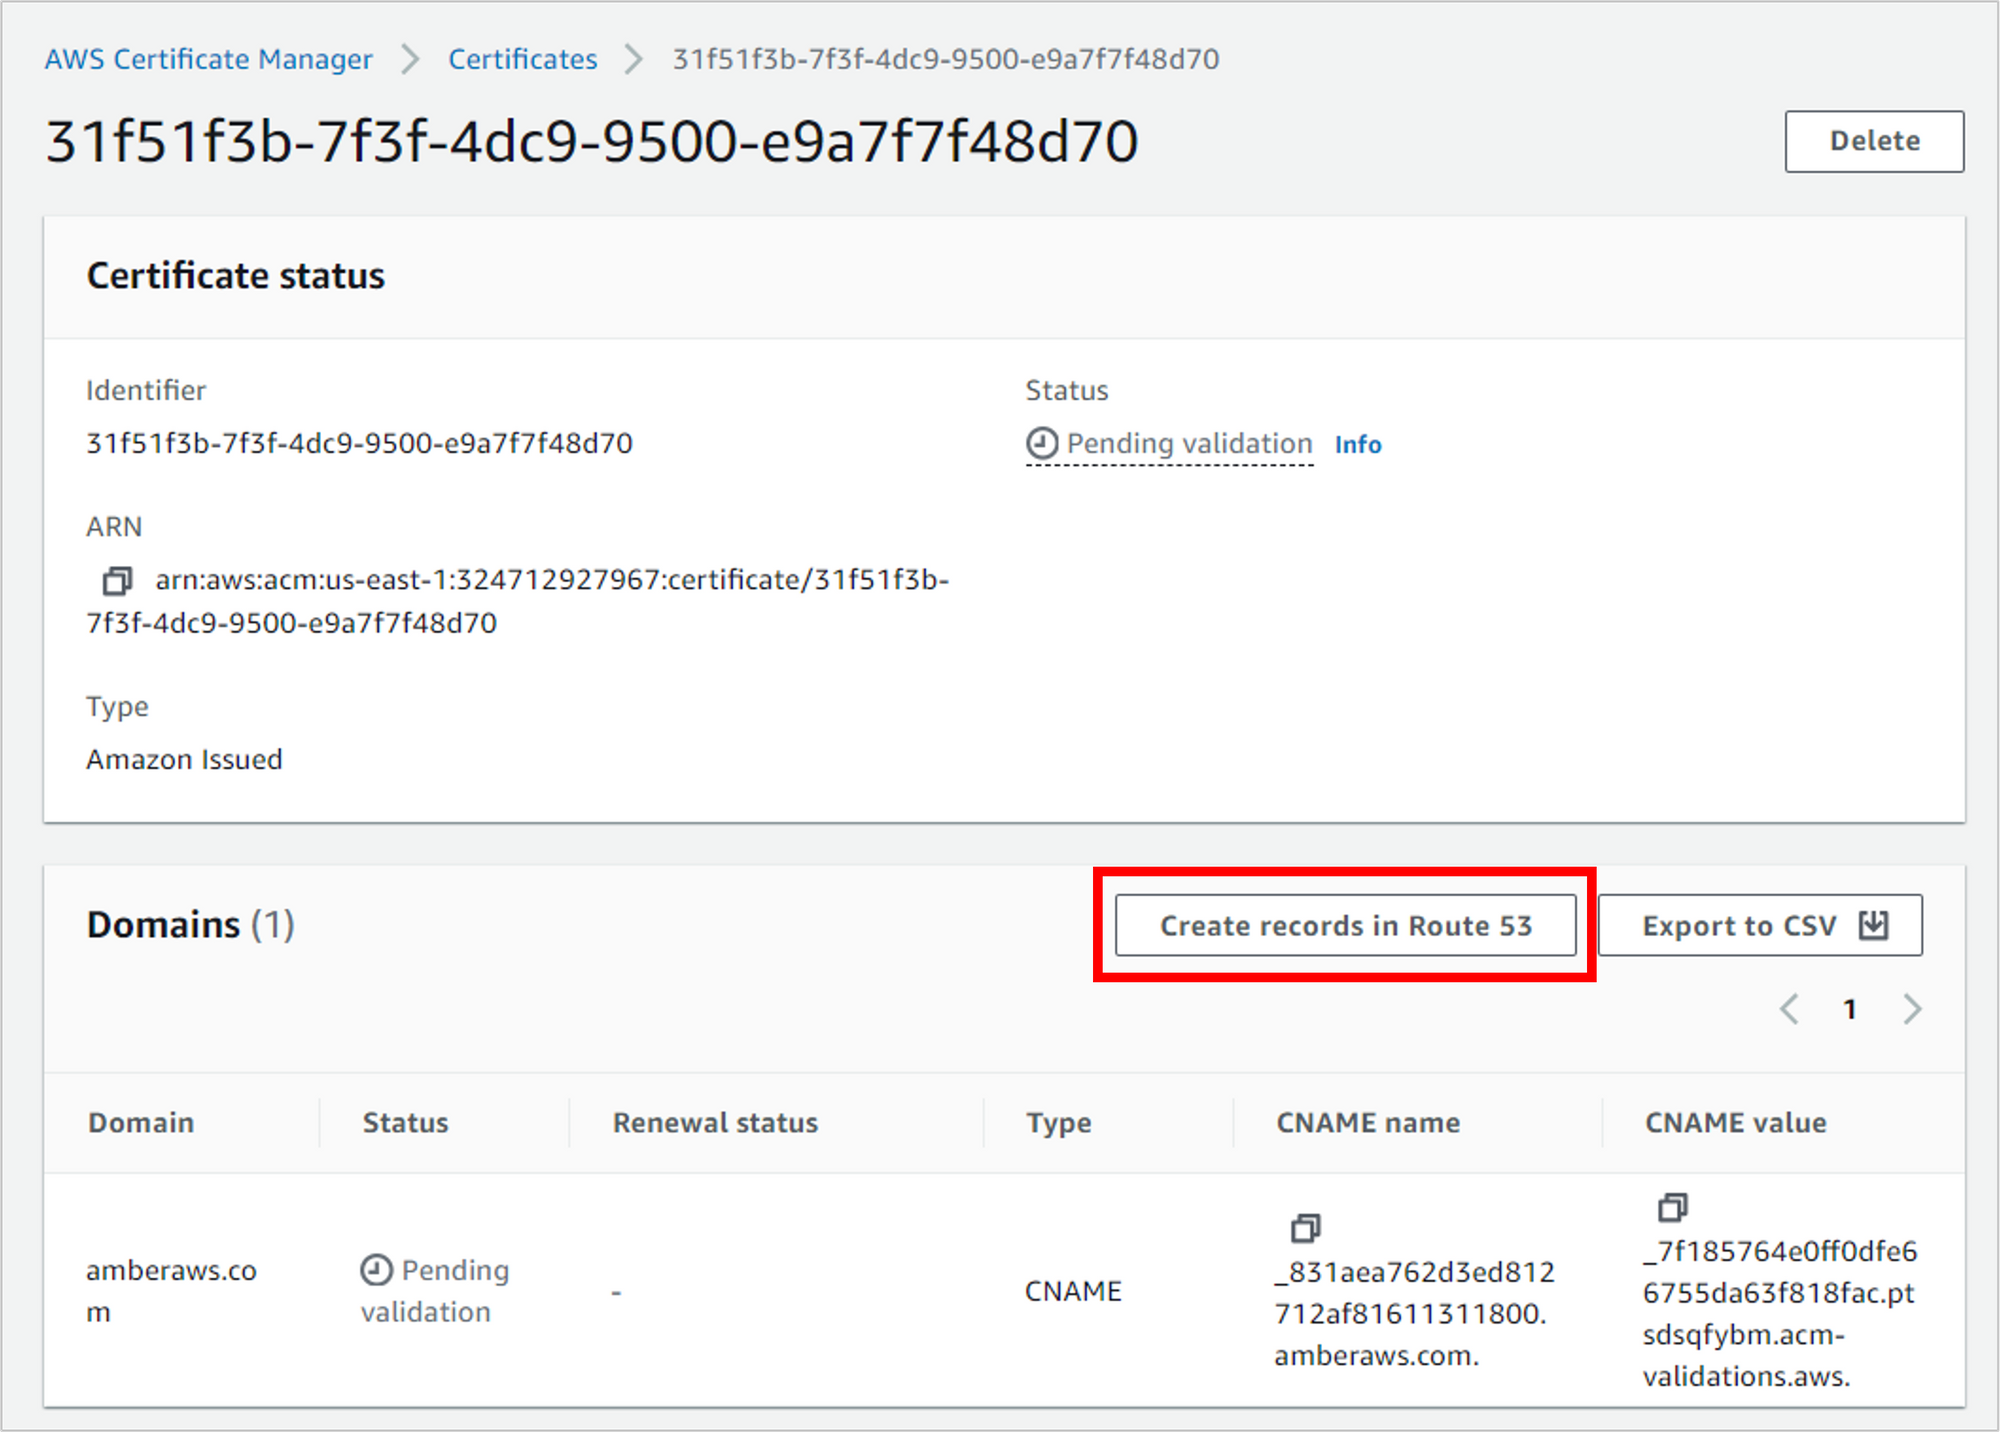
The request was successful, but it will have a “pending validation” status until you validate DNS. Click View certificate.

Before a certificate can be issued, Amazon needs to confirm that you own this domain and that you’re able to modify DNS settings (in Route 53). To start this process, click Create records in Route 53.
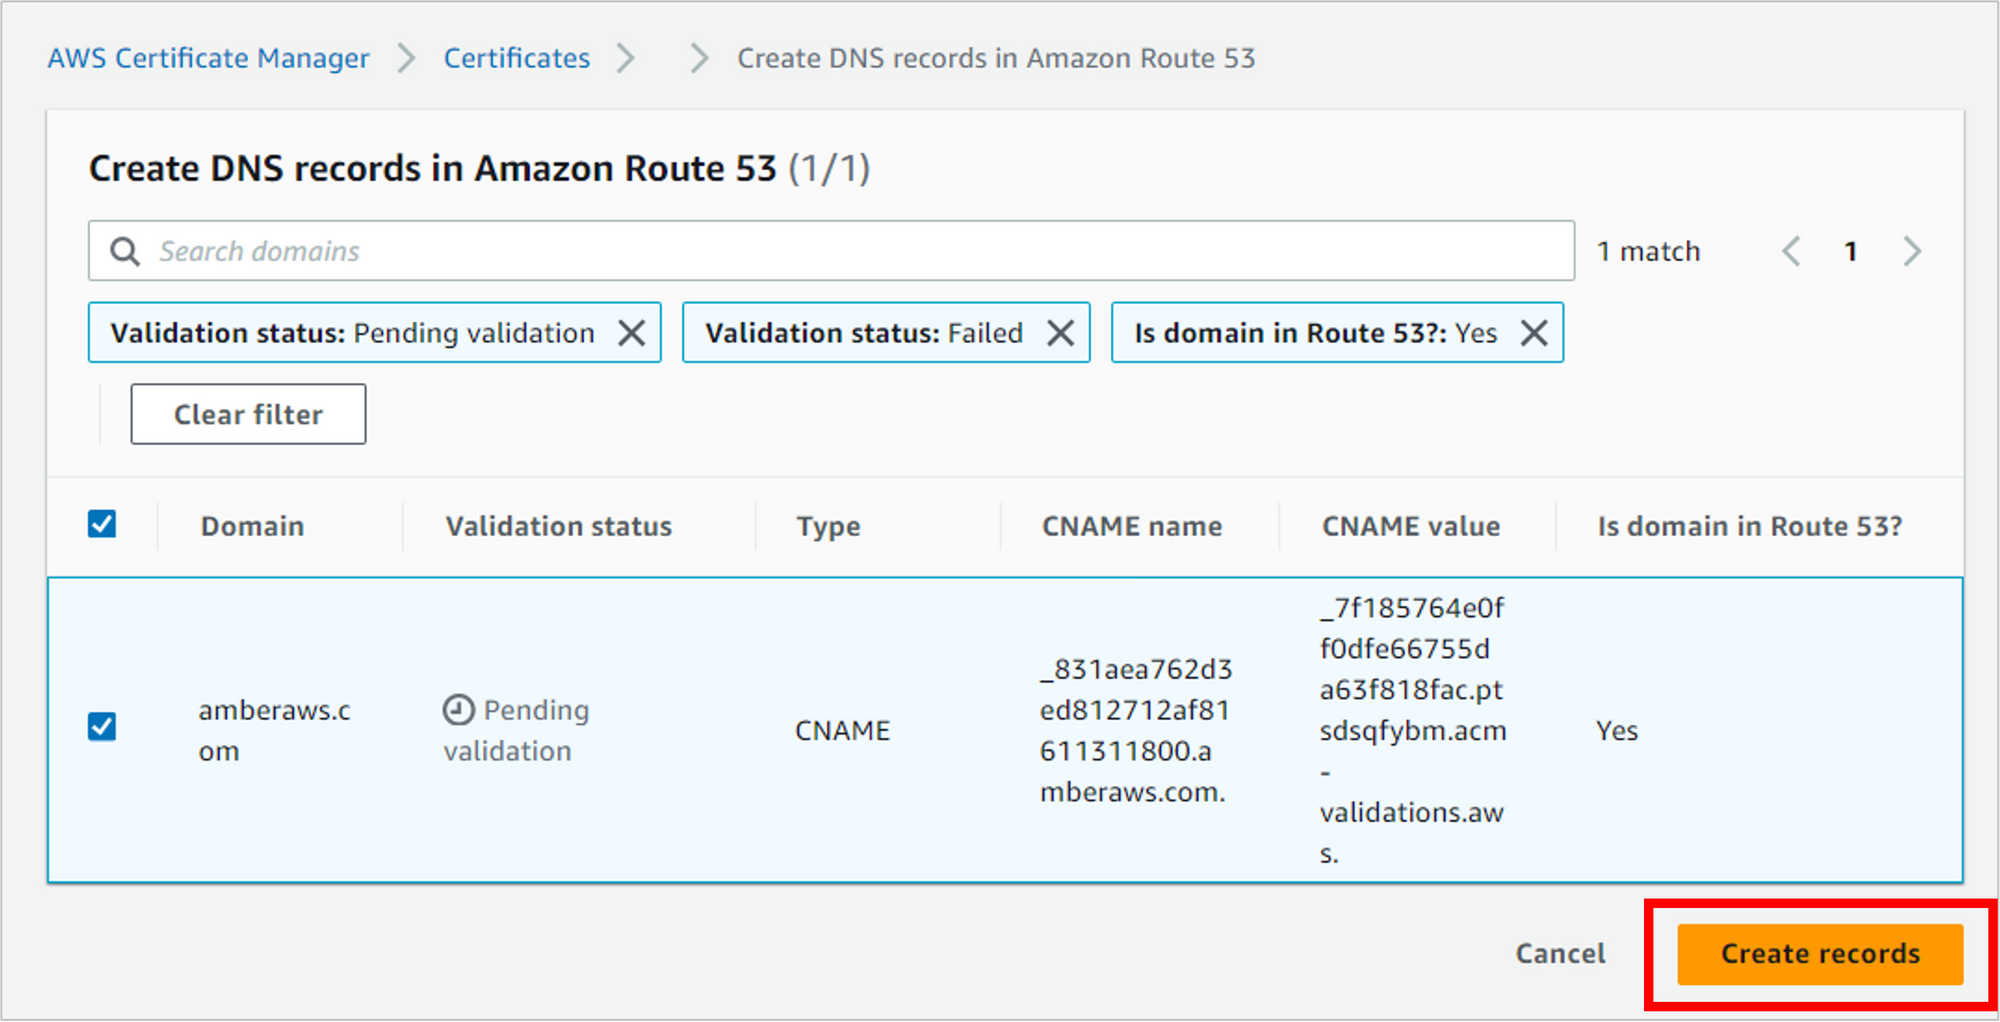
There are various filters applied to this next screen, checking for validation status and whether your domain is found in Route 53. From here, you can click Create records, which will actually – wait for it – create a record in Route 53 for you.
If the record creation was successful, you should see a message to that effect.

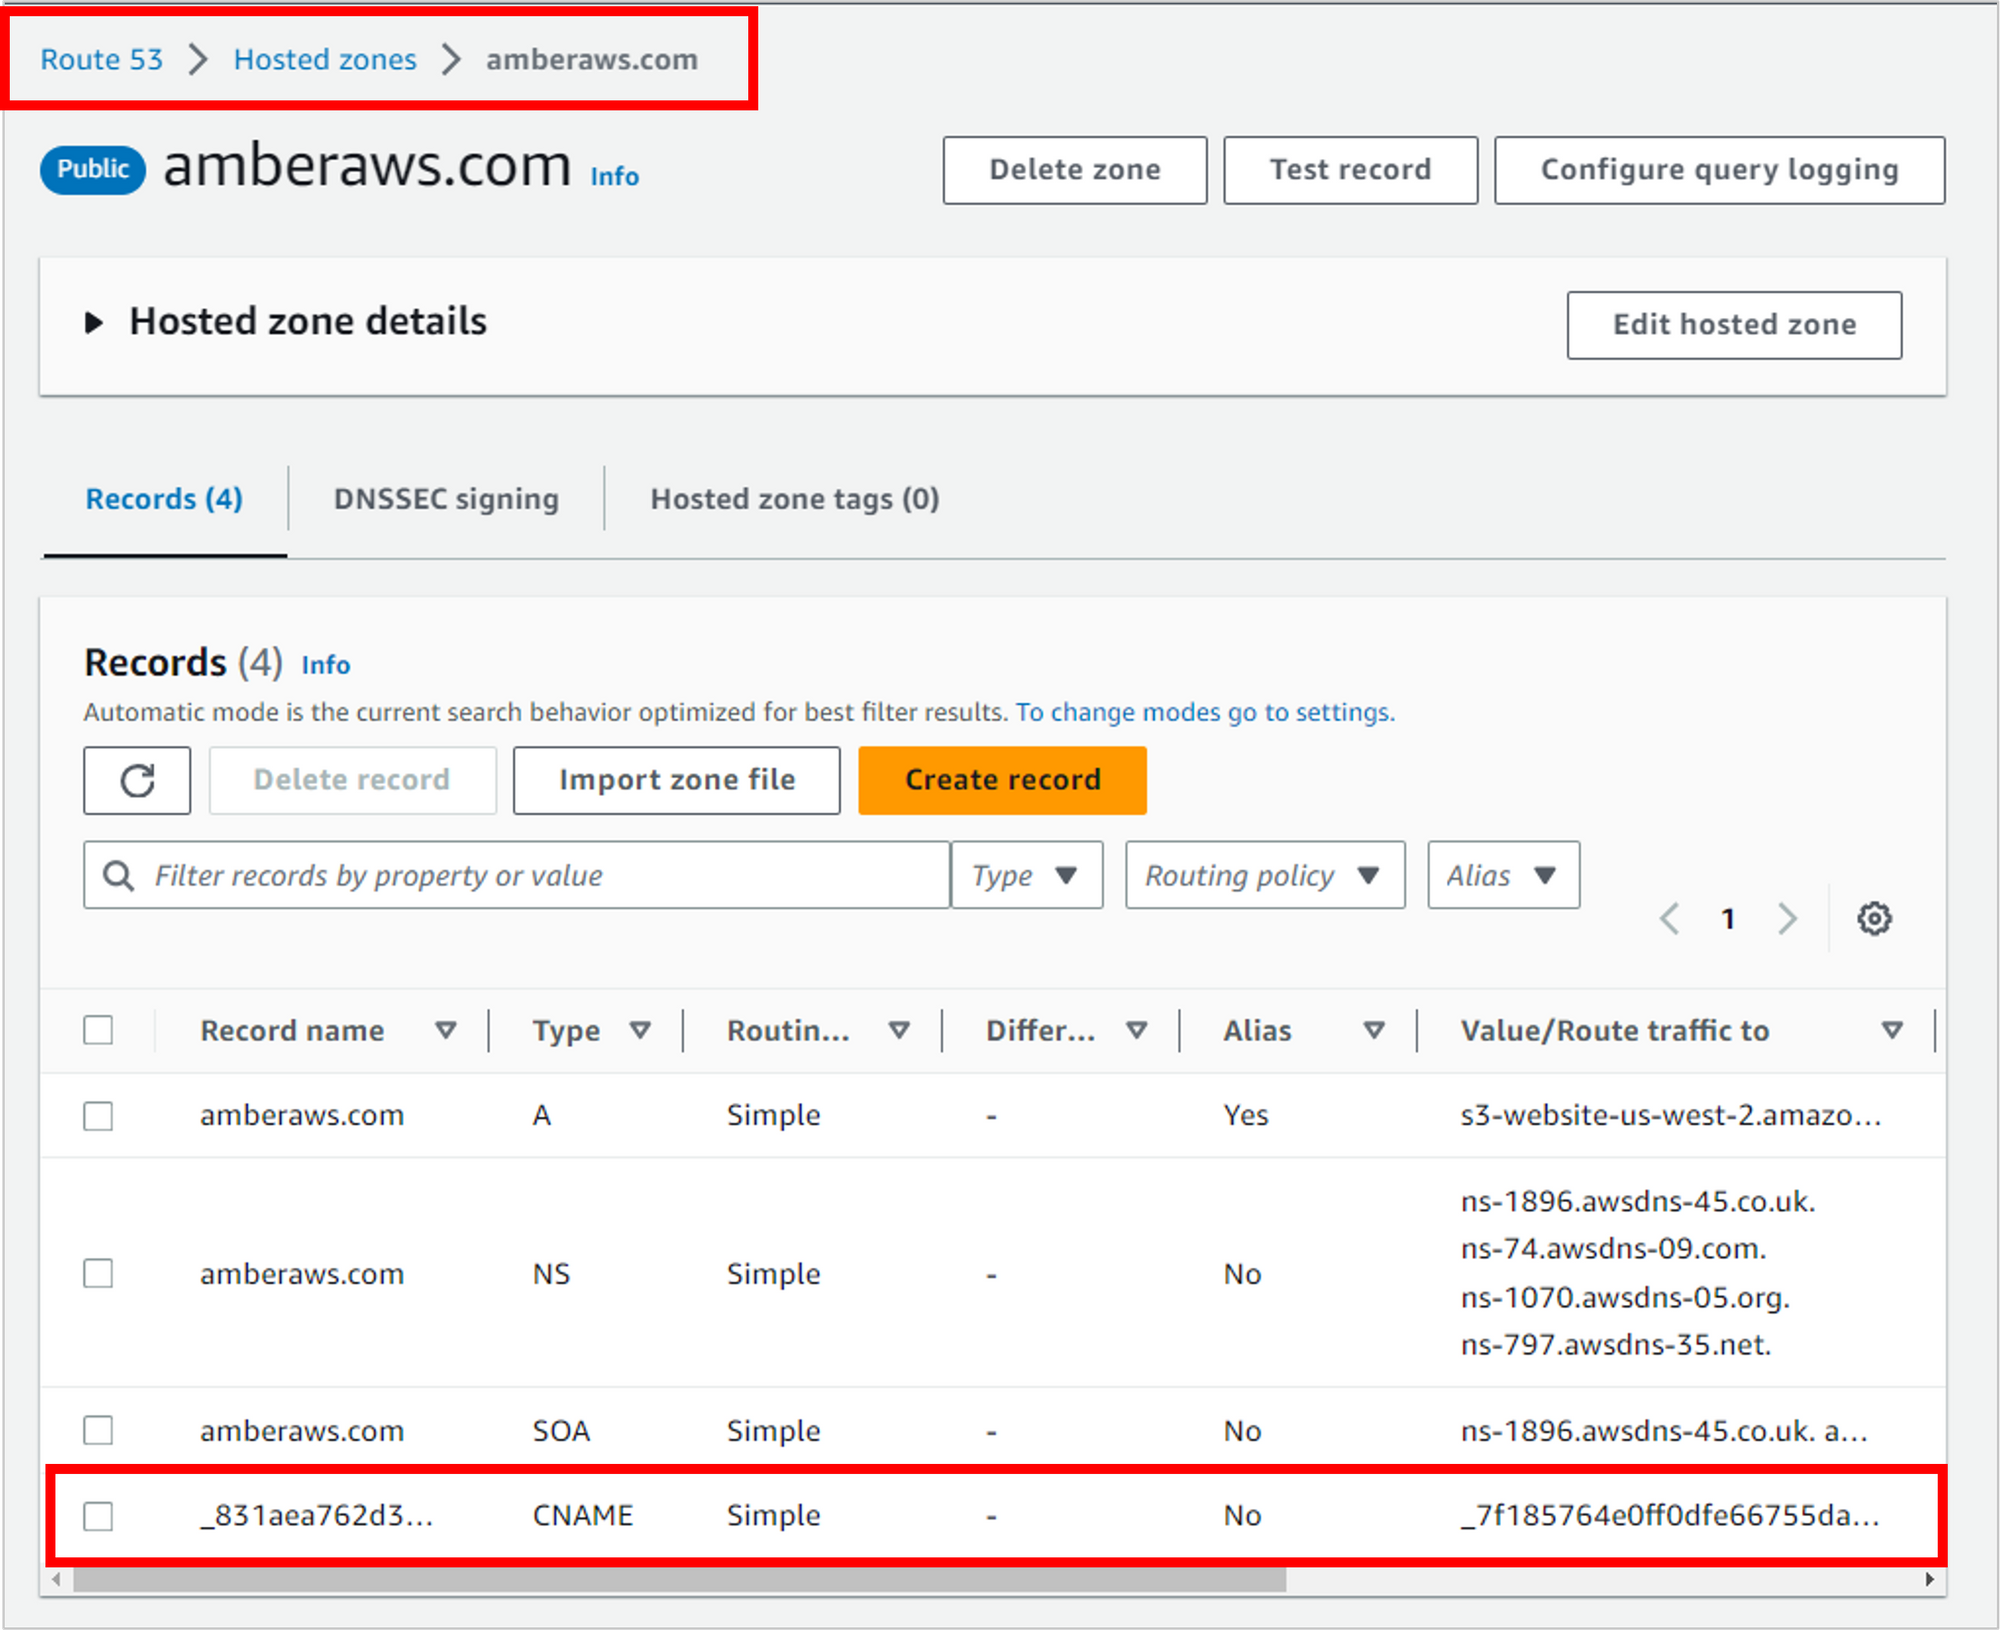
The record was created in Route 53. So navigate to Route 53, to your hosted zone you were working in earlier. You should see a new CNAME record that was created from Certificate Manager.
Great! You have a TLS/SSL certificate, but what do you do with it now?
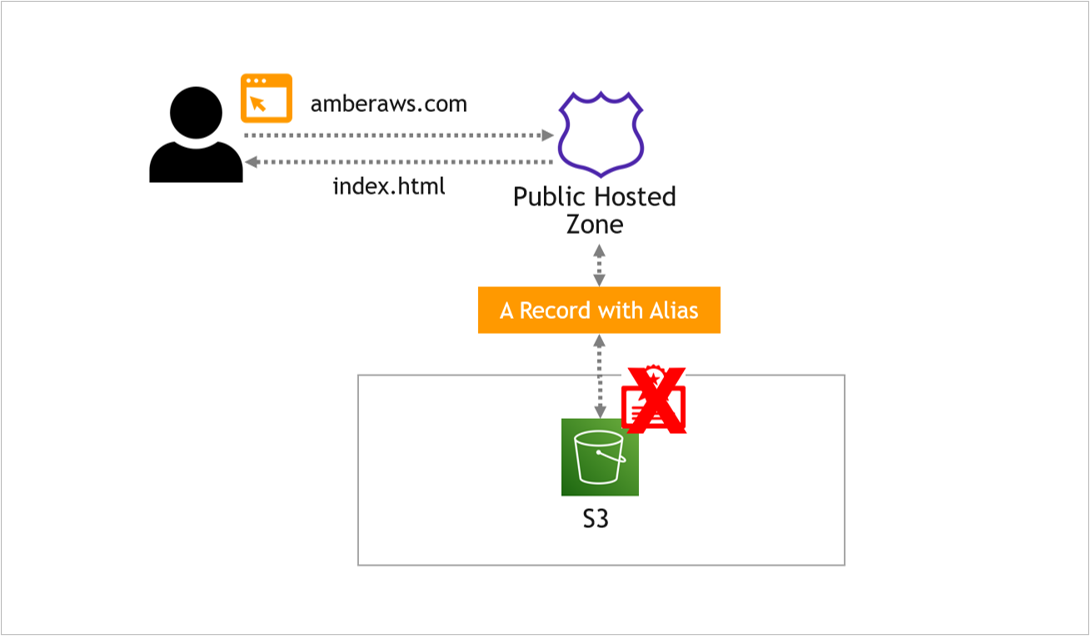
Your website files are currently hosted in S3, but unfortunately, you can’t use a certificate on an S3 bucket.
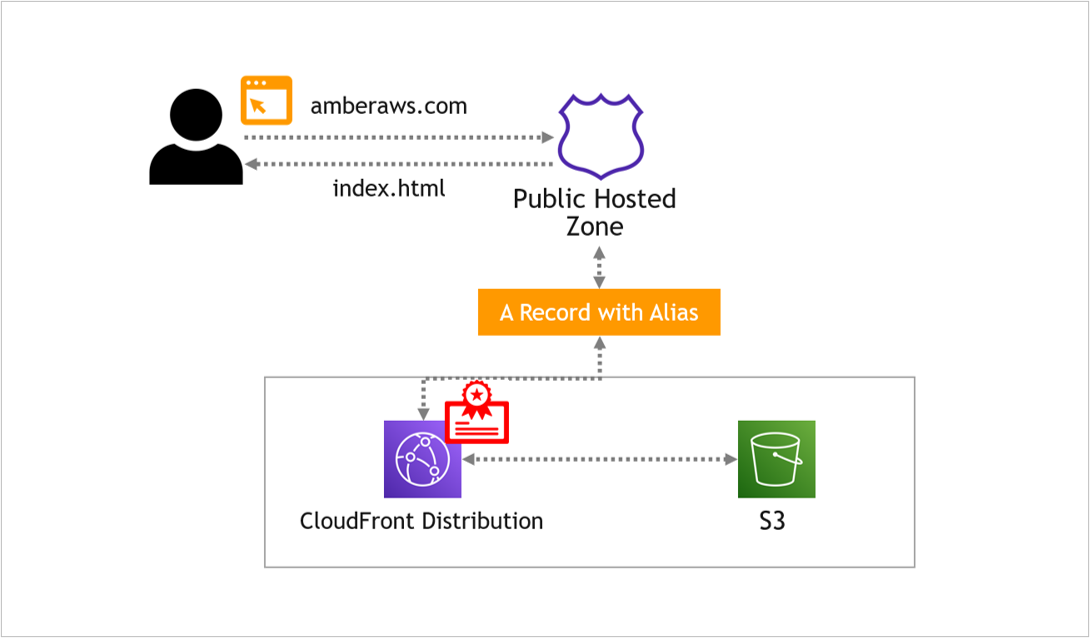
What you need instead is a CloudFront distribution that points to the S3 bucket. And then the certificate is applied to the CloudFront distribution.
You know what that means, right? It means we need to head off to CloudFront next!
Create a CloudFront Distribution
CloudFront is Amazon’s content delivery network, or CDN. It’s used to get content to users faster by caching it at “edge locations” around the world. This works great for things like videos and images, making them faster to load.
For your simple résumé, because the files are so small, you won’t notice much of a performance difference. But it is the way you’ll be able to apply the TLS/SSL certificate you created in the last section.
Navigate to CloudFront.
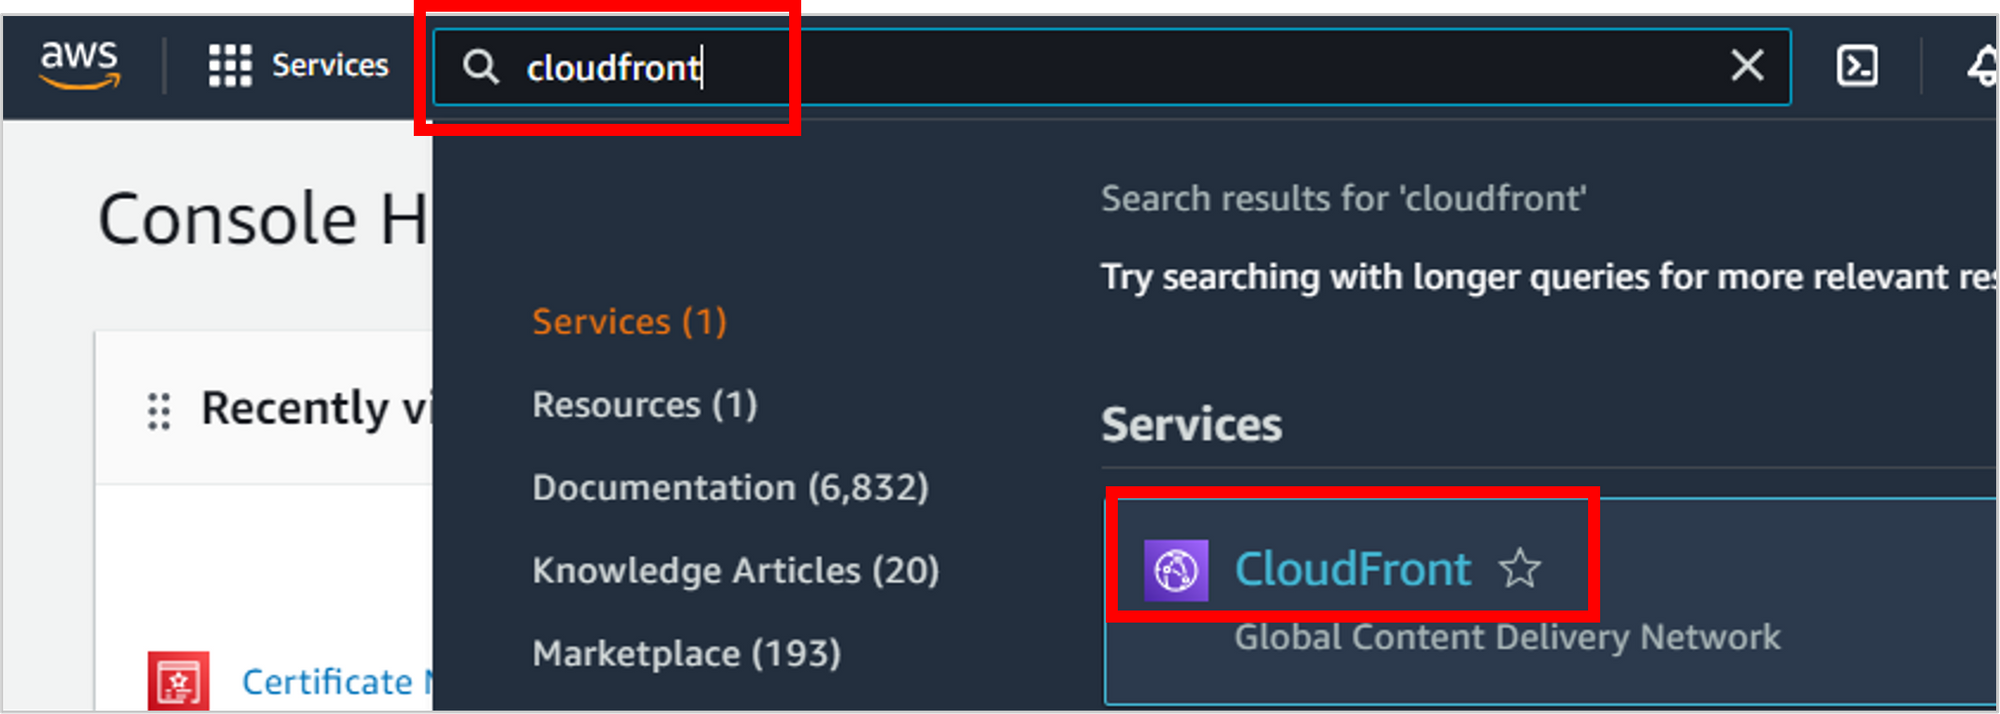
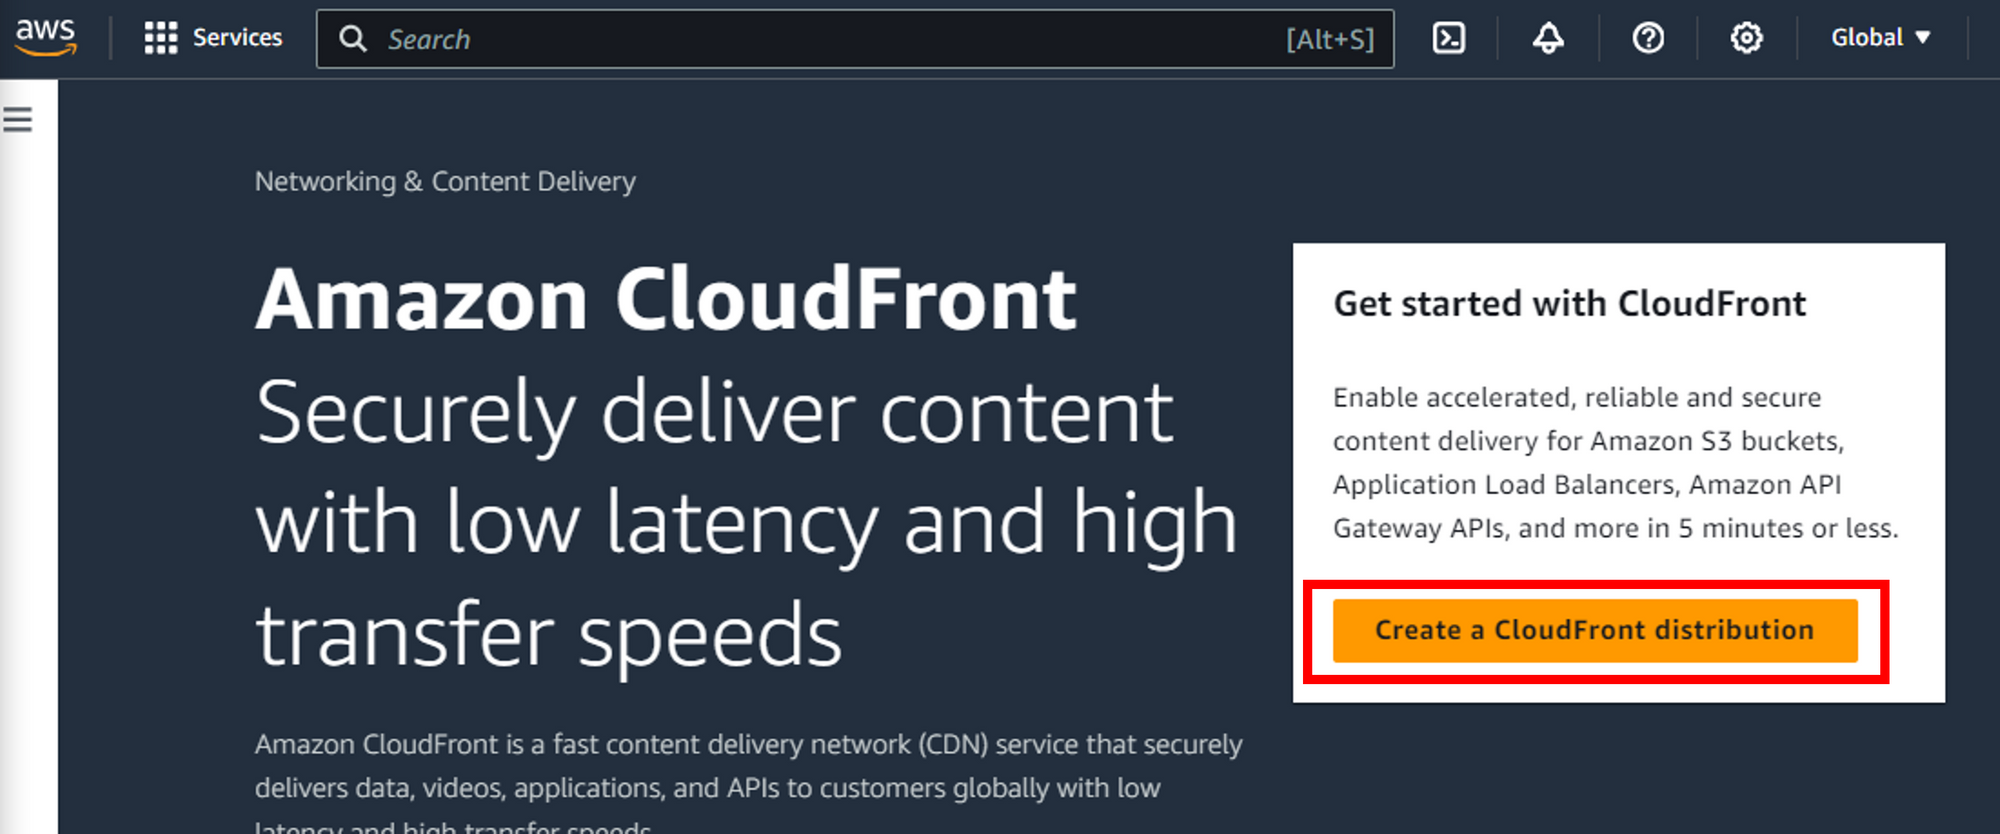
On the CloudFront home page, click Create a CloudFront distribution.
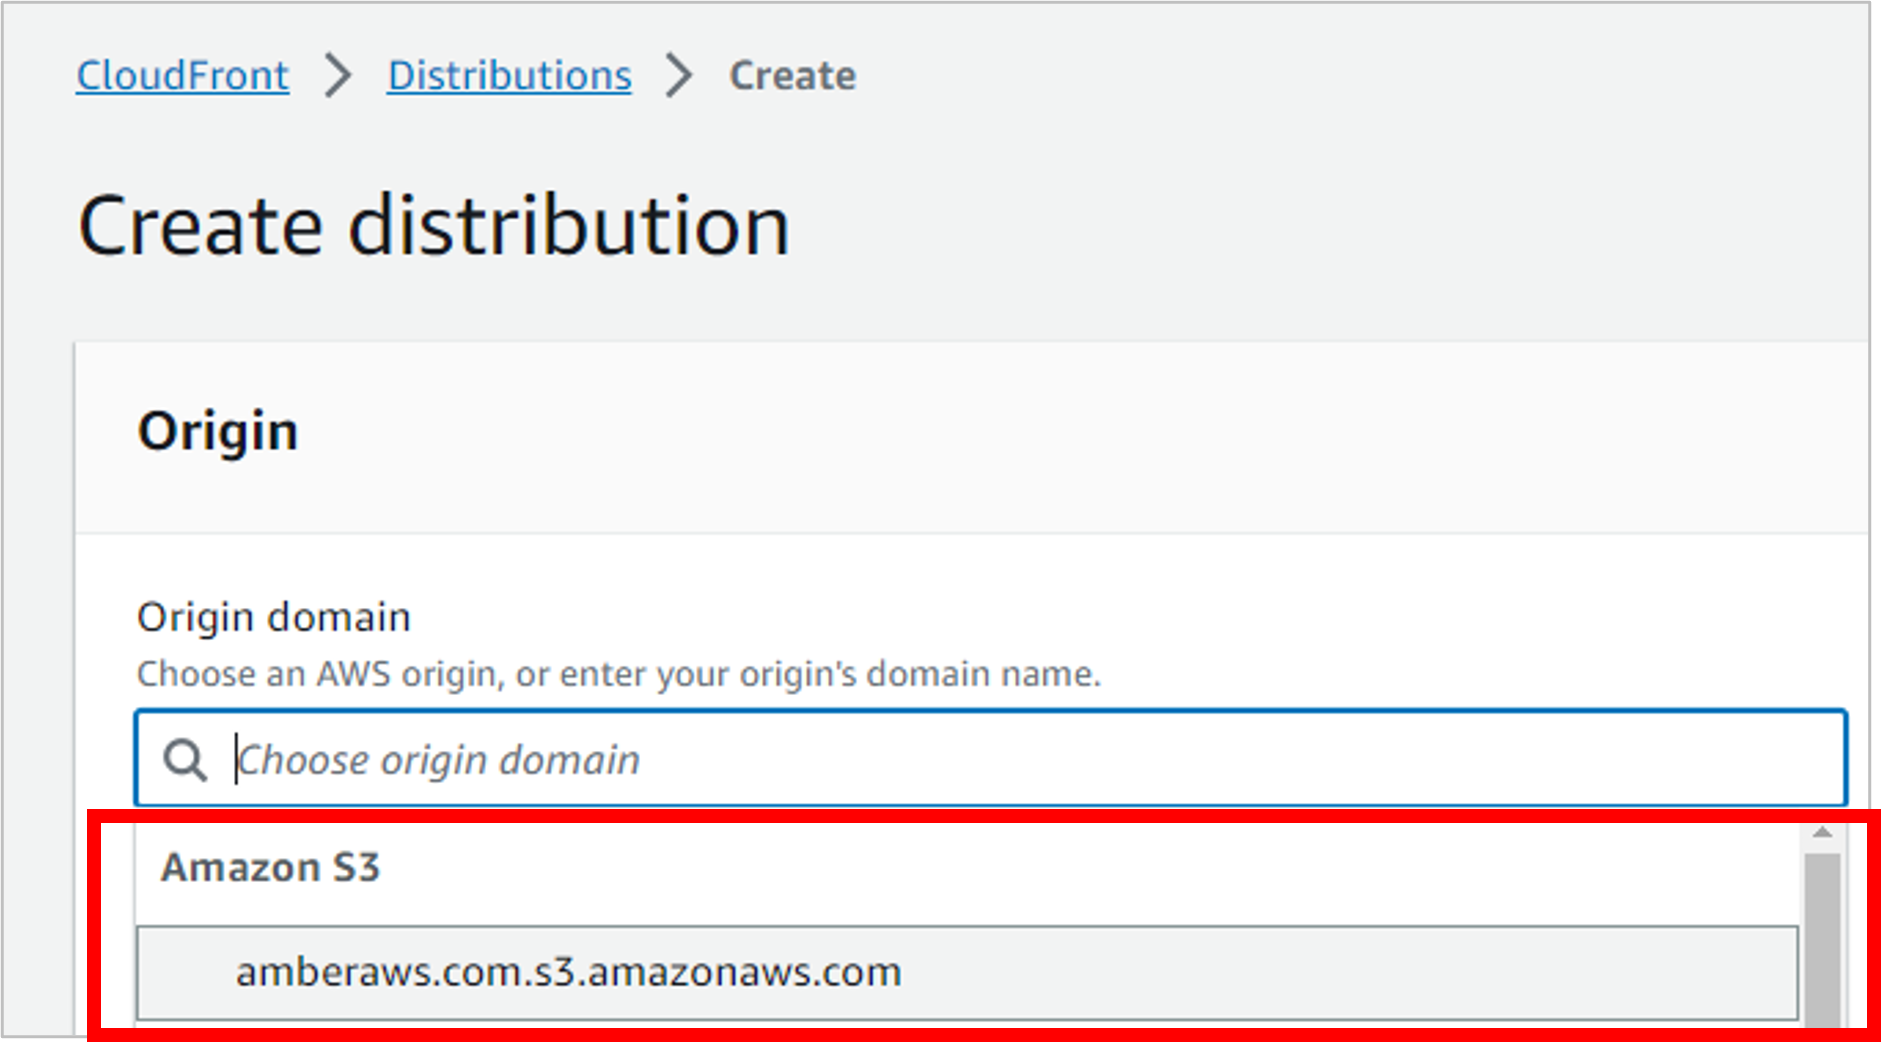
The origin domain is where your website files live, which is in S3. If you type in S3 to filter, it should pull up your bucket.
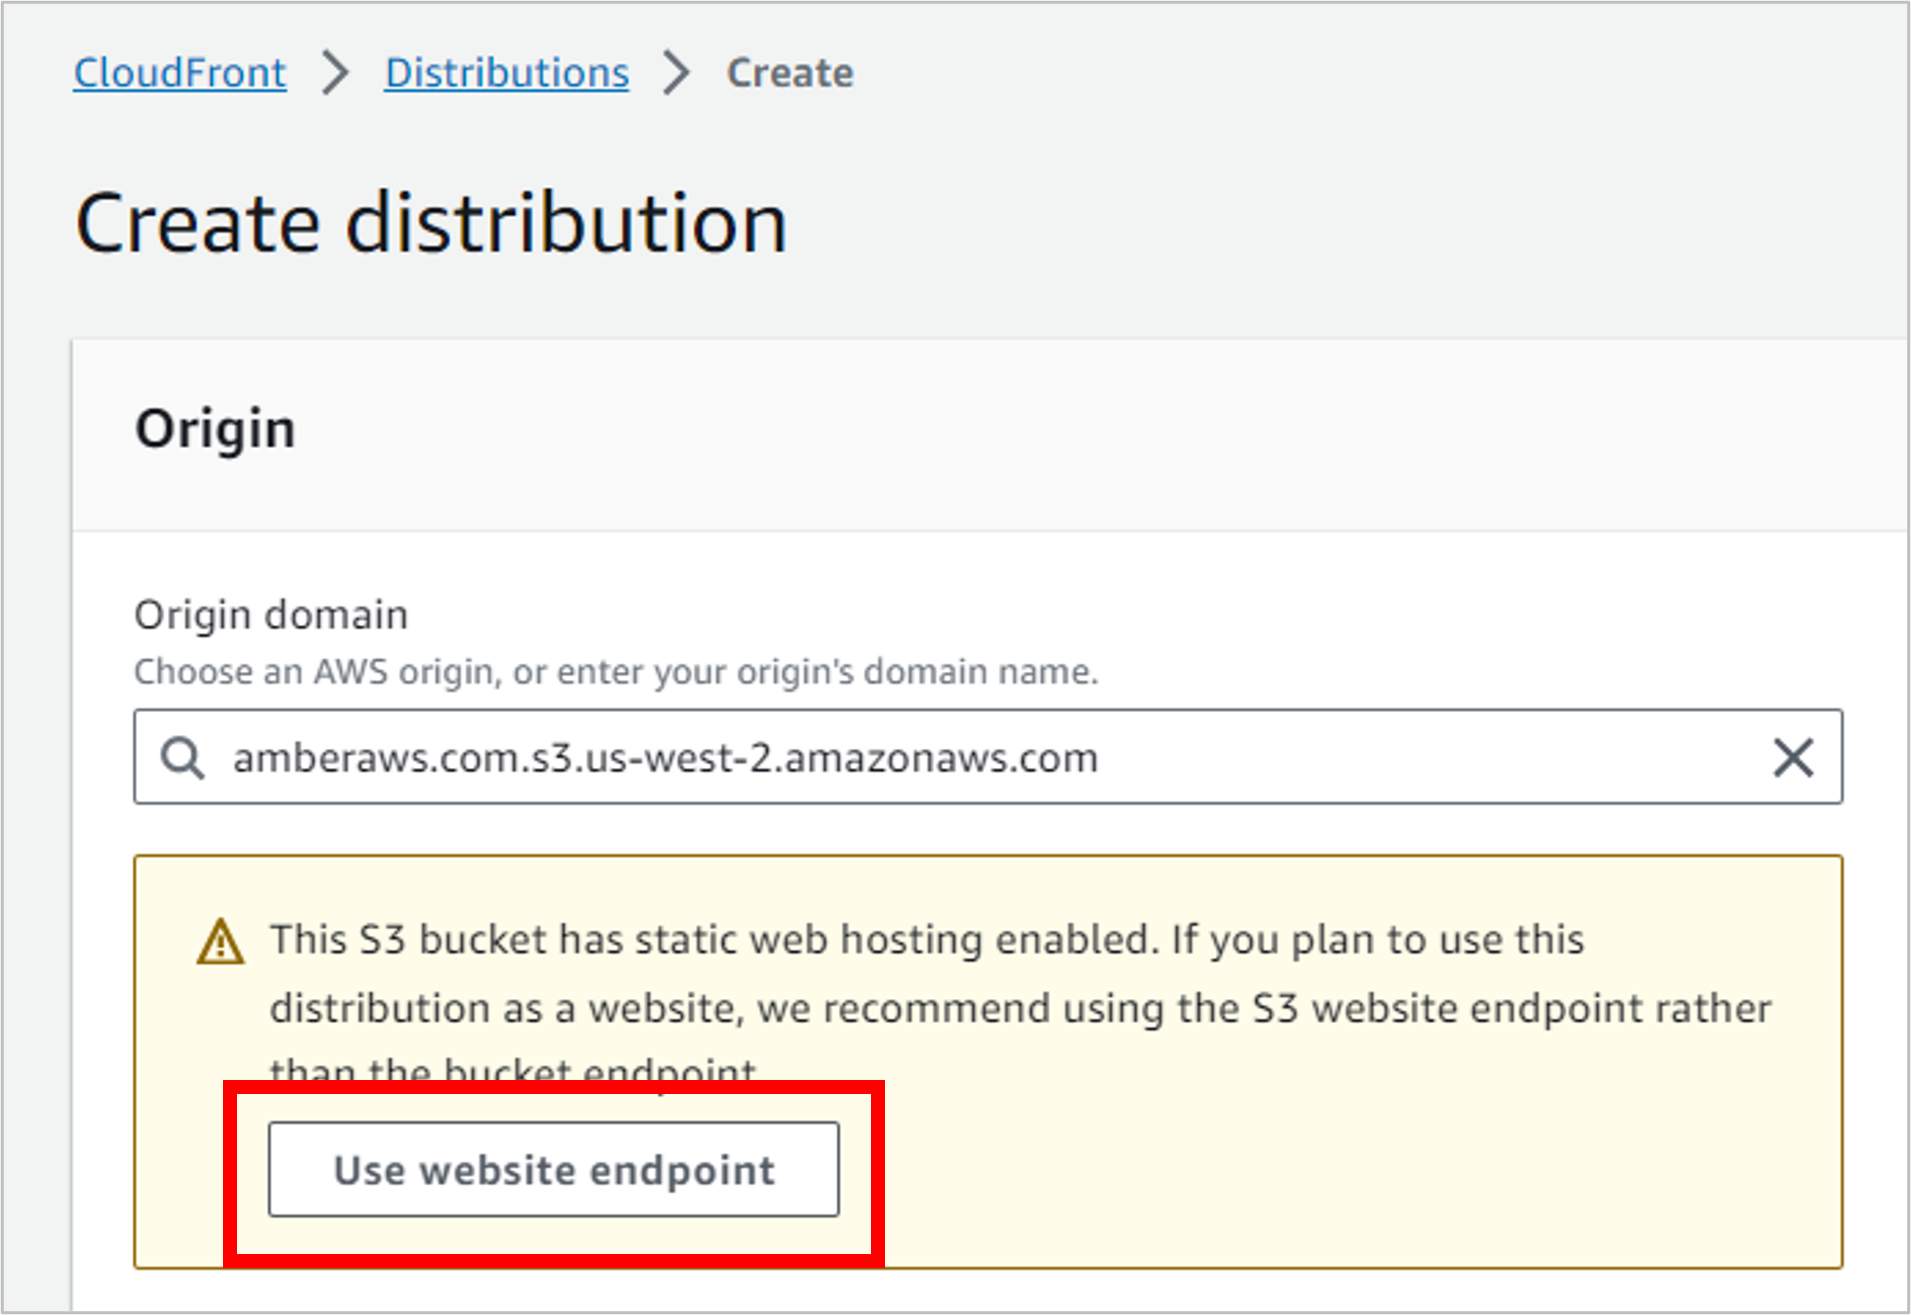
But wait! You get a message about using the website endpoint rather than the bucket endpoint. Yes, that’s what you want! Click Use website endpoint, and AWS will update the endpoint for you.
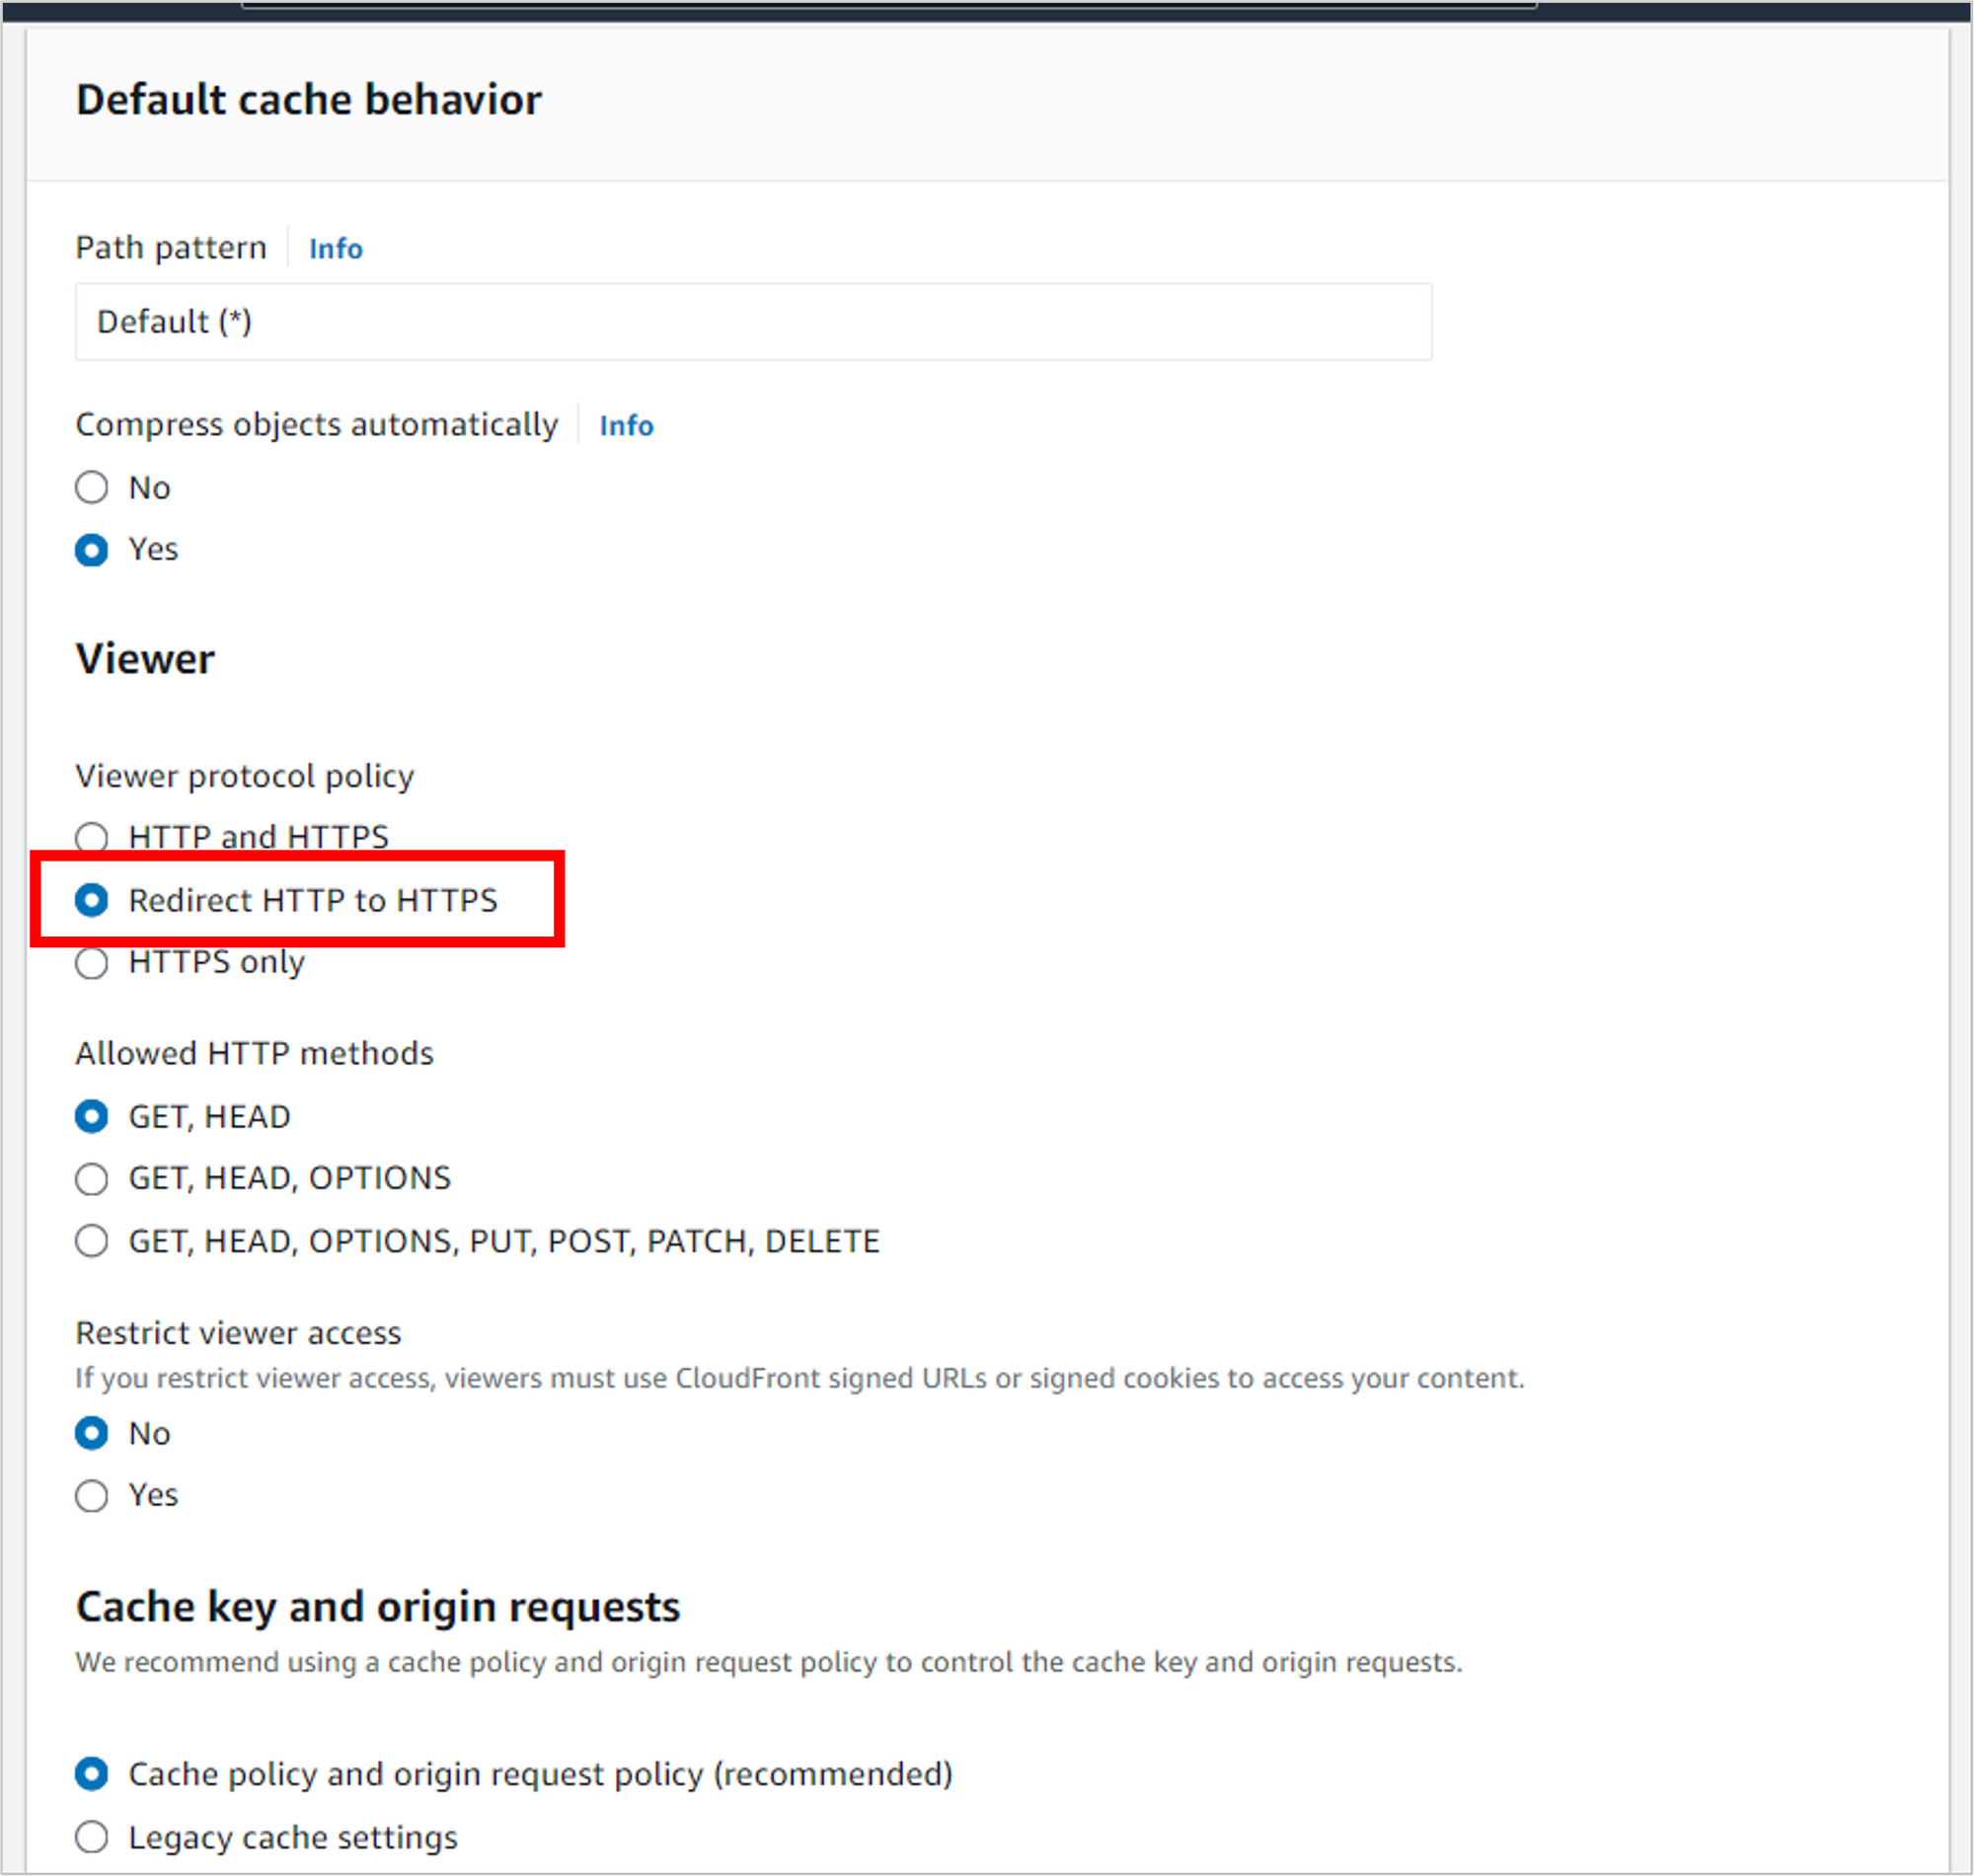
There are gobs of settings on the rest of this page, but you only need to update a few of them.
Scroll down to the Default cache behavior section, then under Viewer, select Redirect HTTP to HTTPS.
Scroll down to Web Application Firewall (WAF) and select Do not enable security protections.

In the next section, Settings:
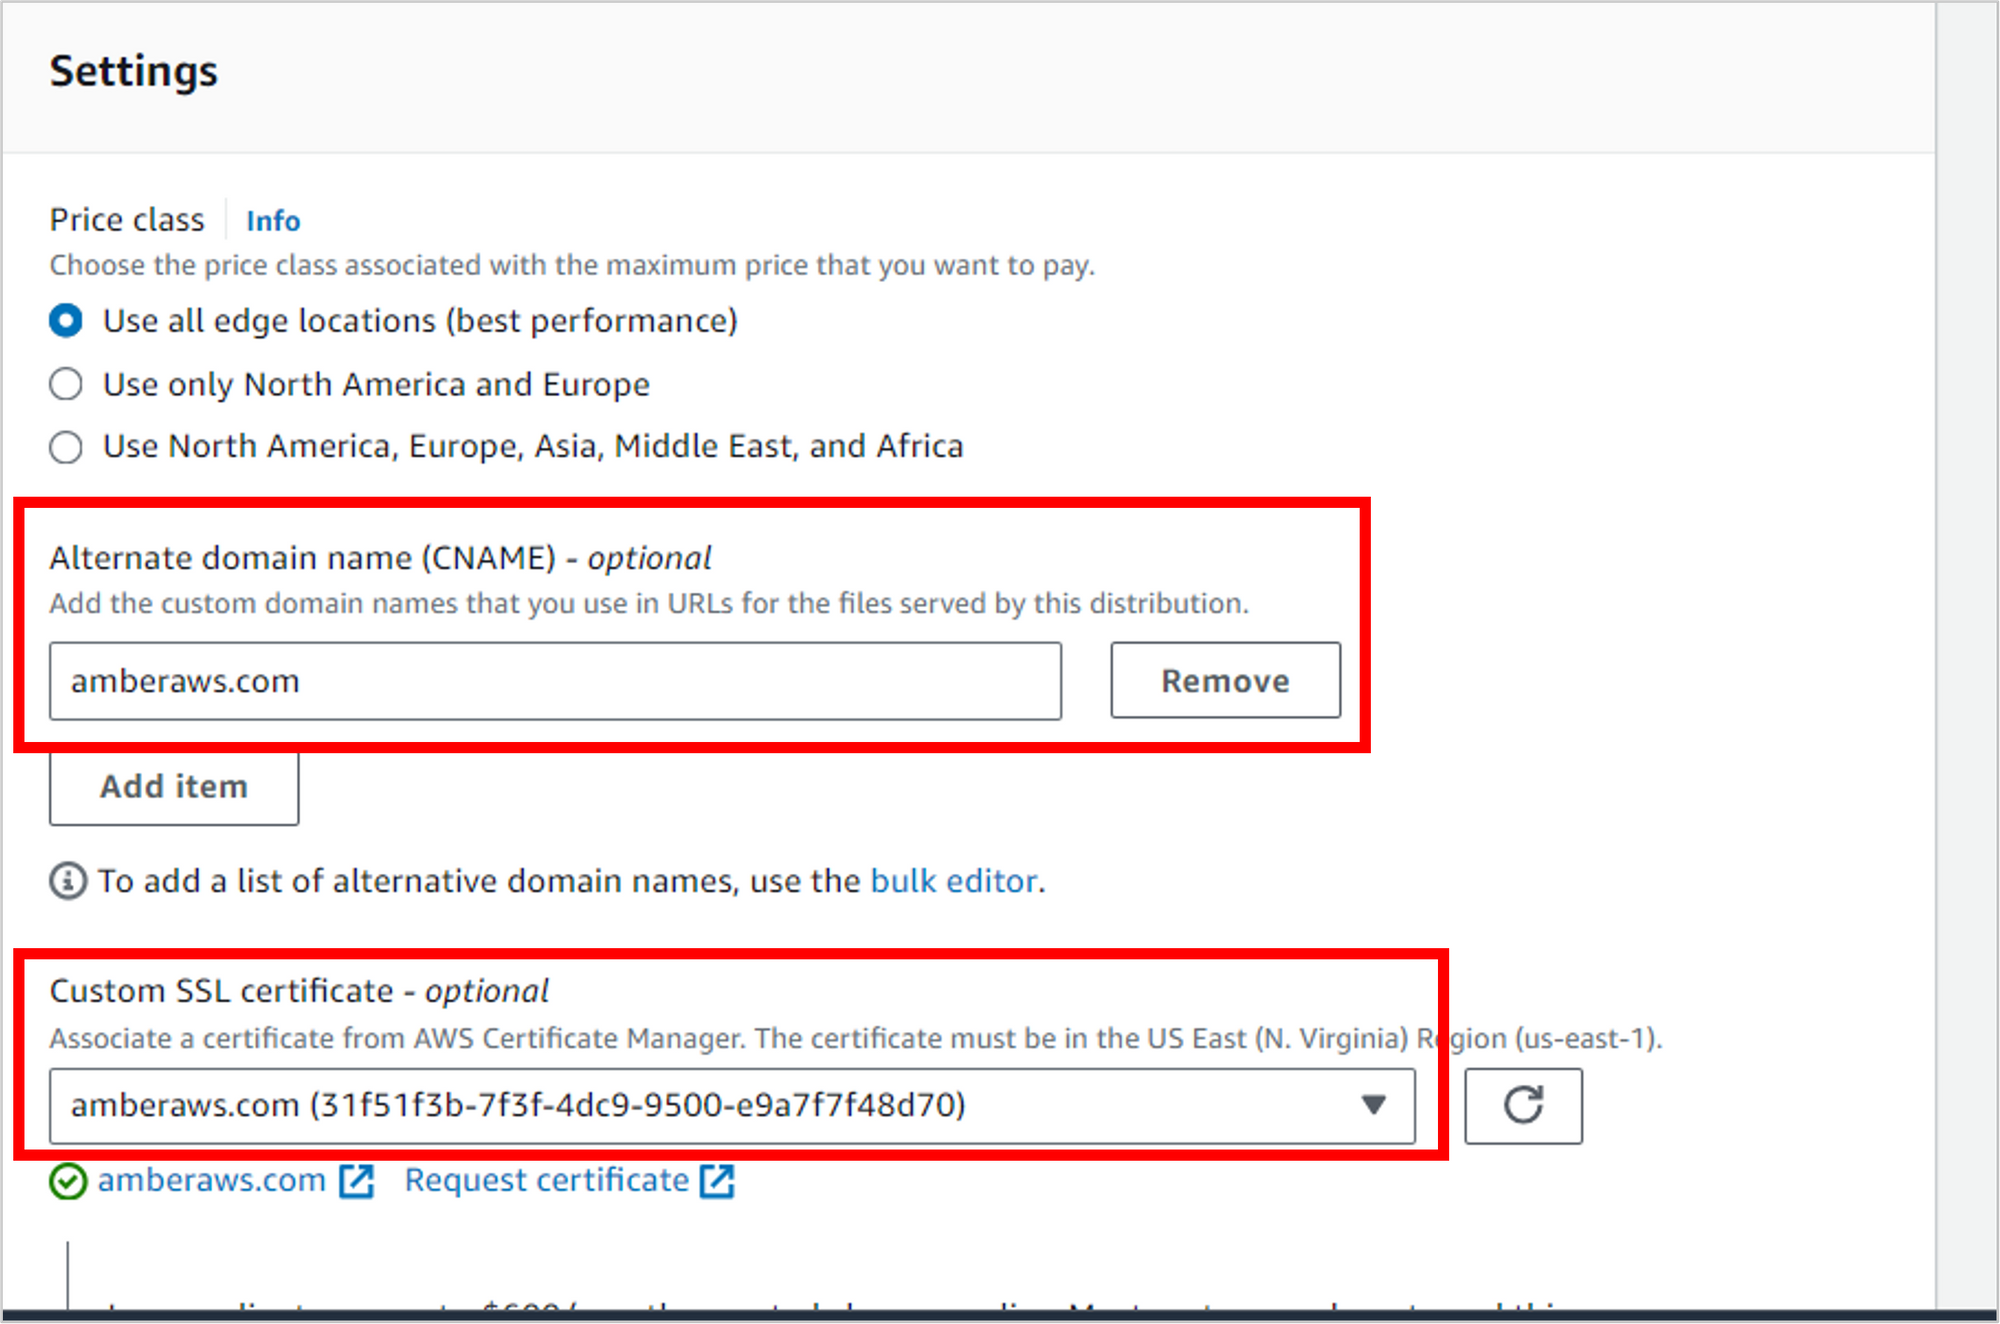
- For Alternate domain name (CNAME), enter your domain name (like “amberaws.com”).
- For Custom SSL certificate, select the certificate you set up earlier. NOTE: if you set it up in a region other than us-east-1 (N. Virginia), it won’t show up here. D’oh! You’ll need to recreate it in us-east-1.
Scroll to the bottom of the page.
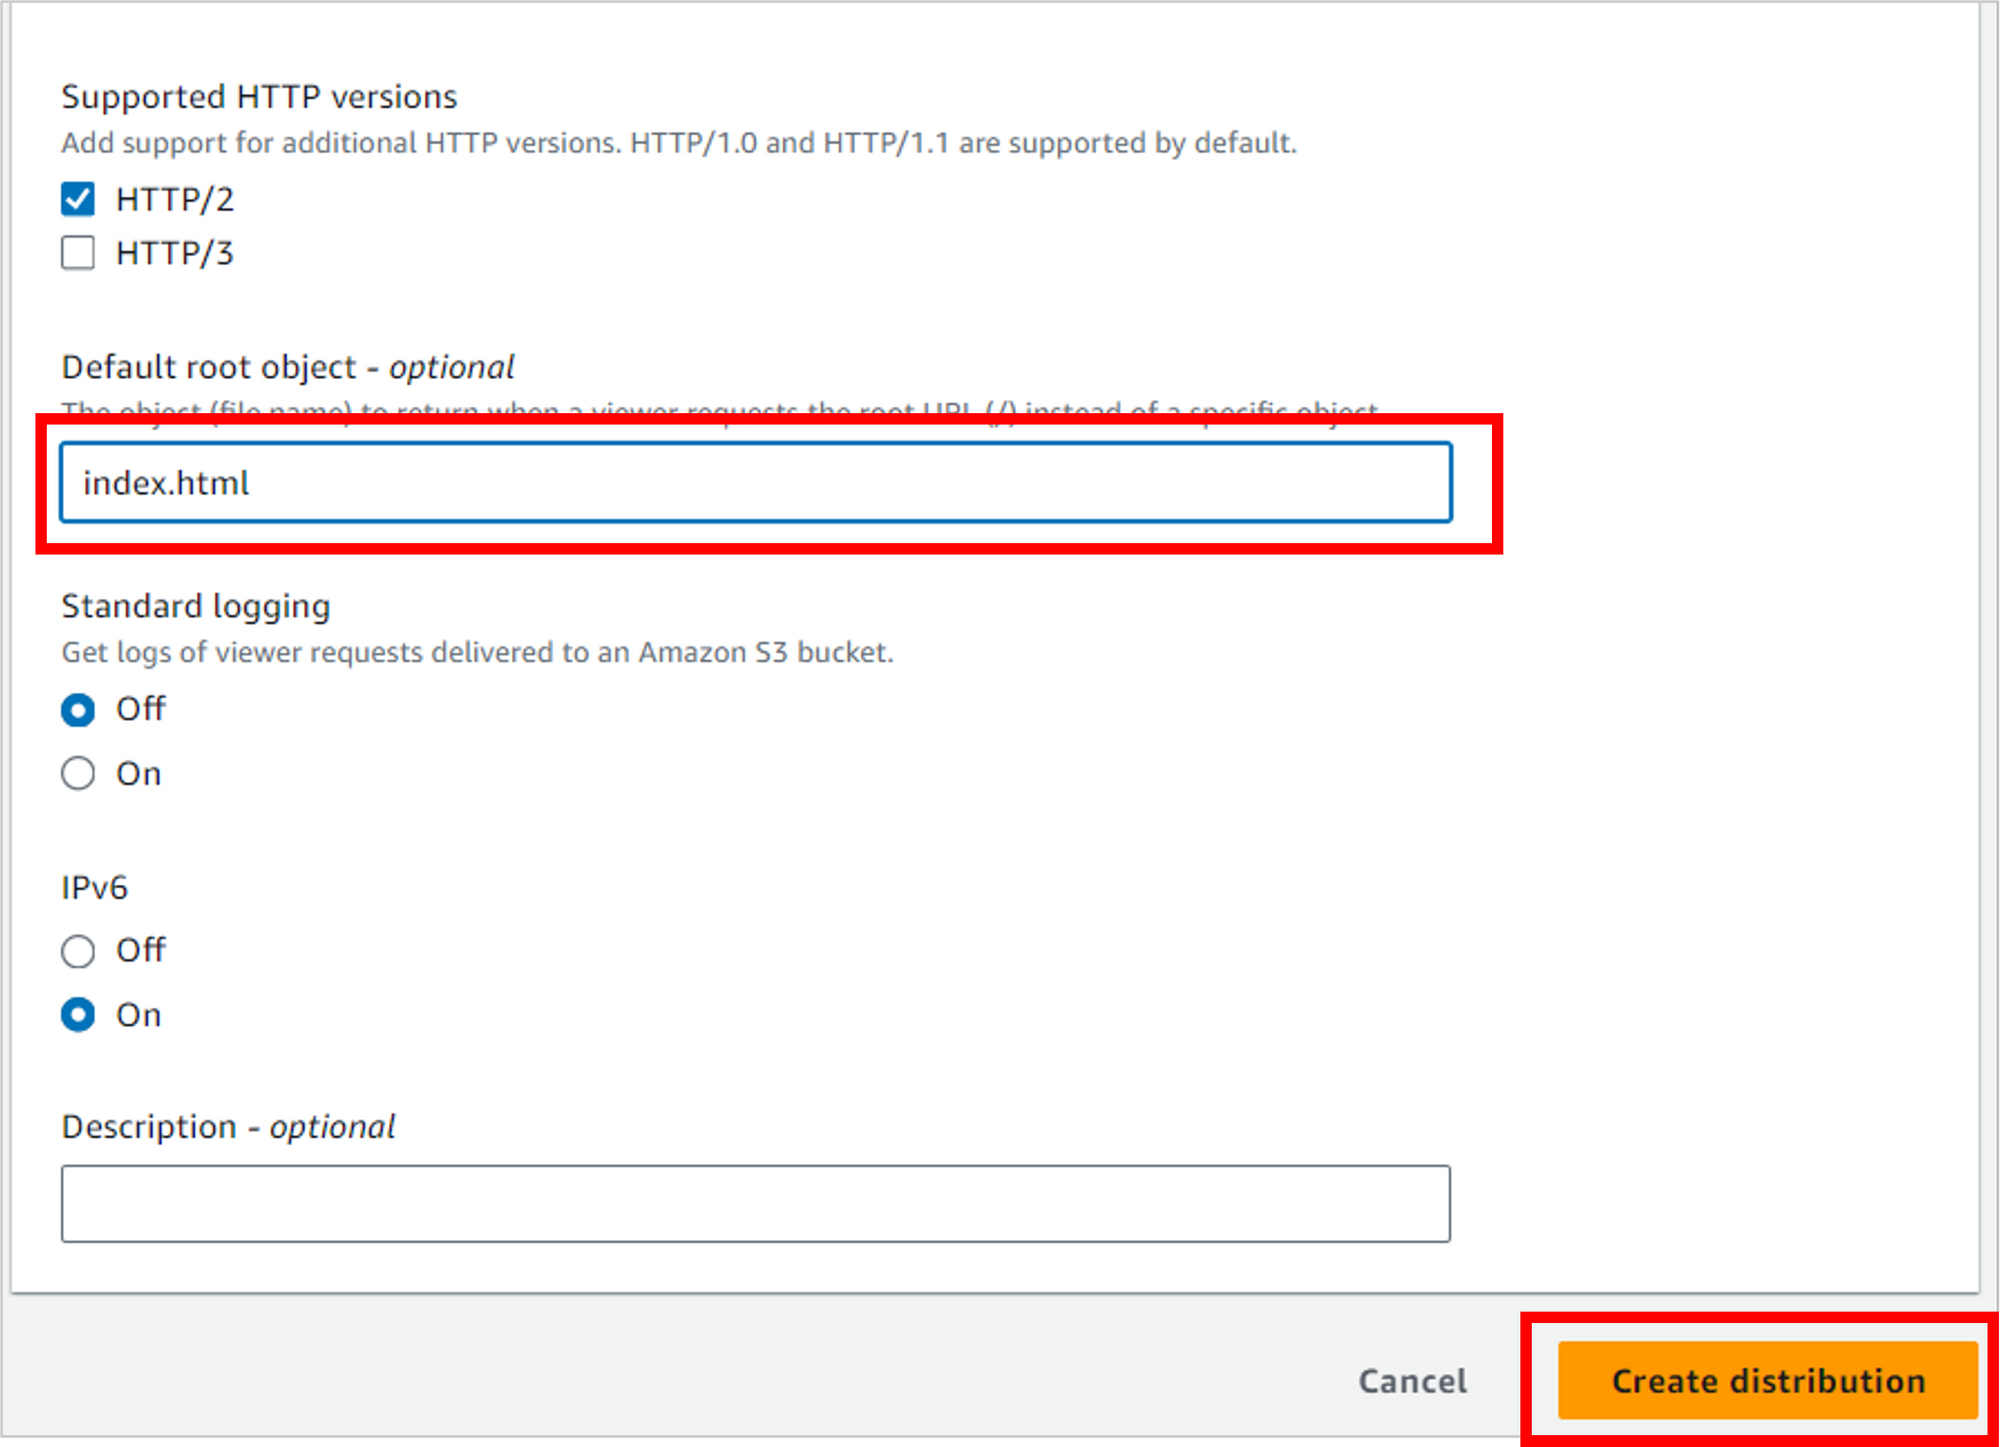
For Default root object, enter index.html (your default home page) and then click Create distribution.
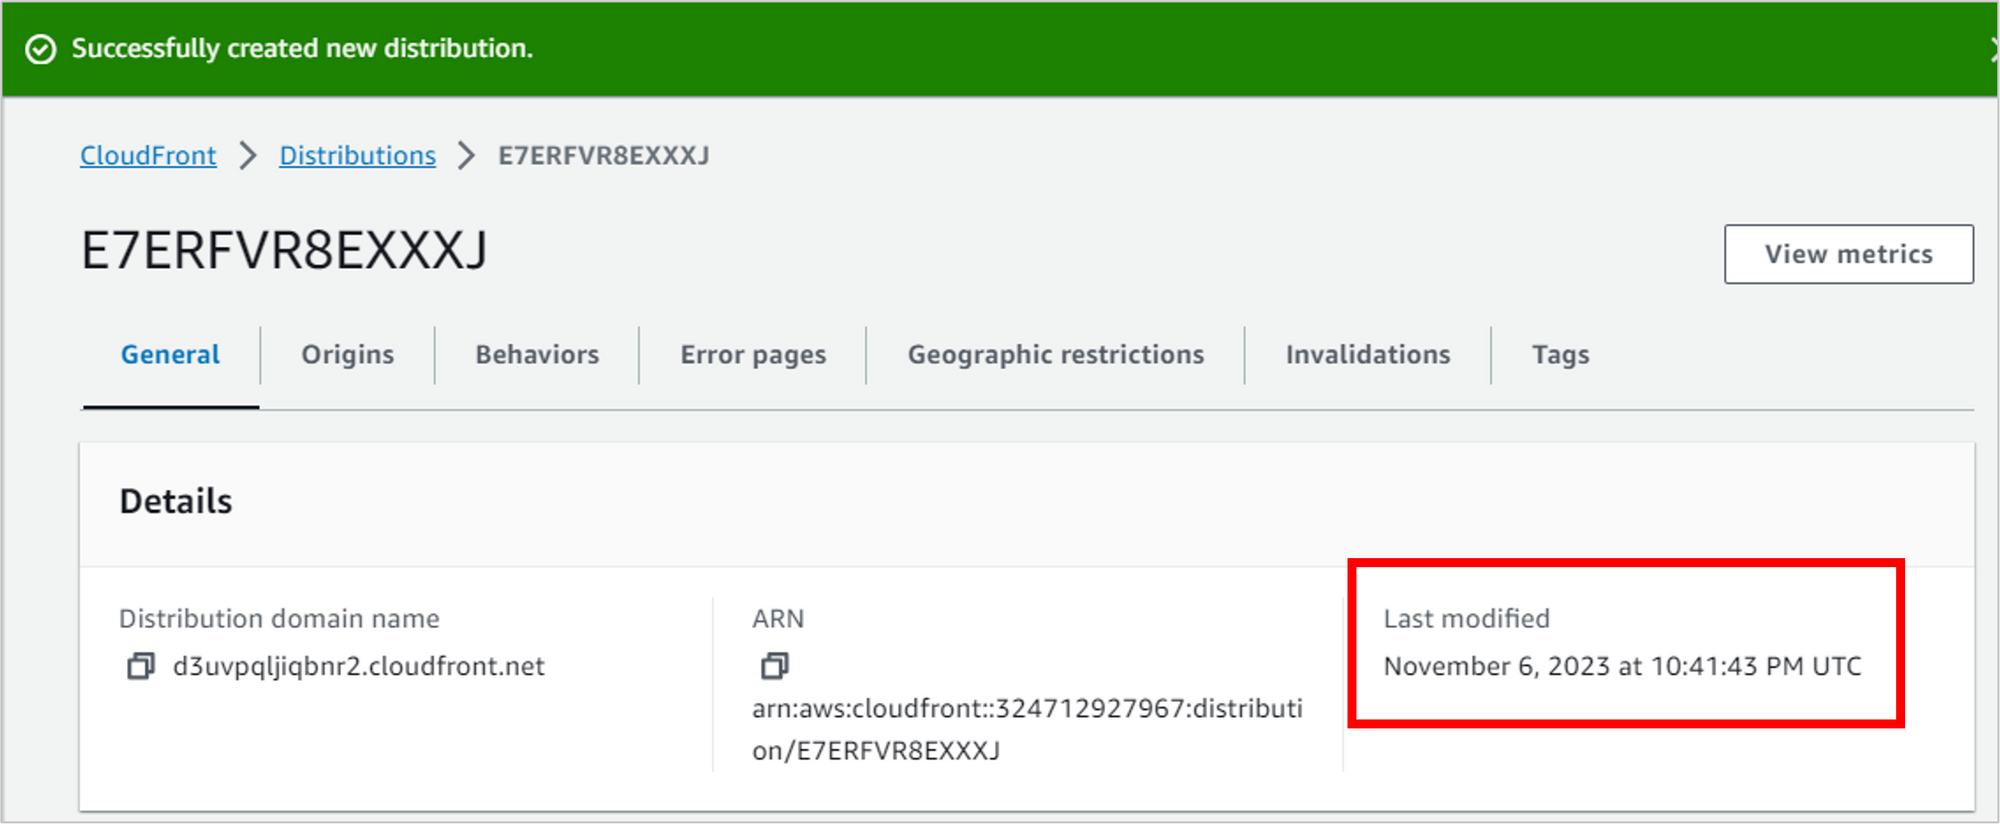
It will take several minutes for the CloudFront distribution to finish deploying (even if it says “Successfully created” at the top of the page). You’ll know it’s done when the Last modified value shows a date and time.
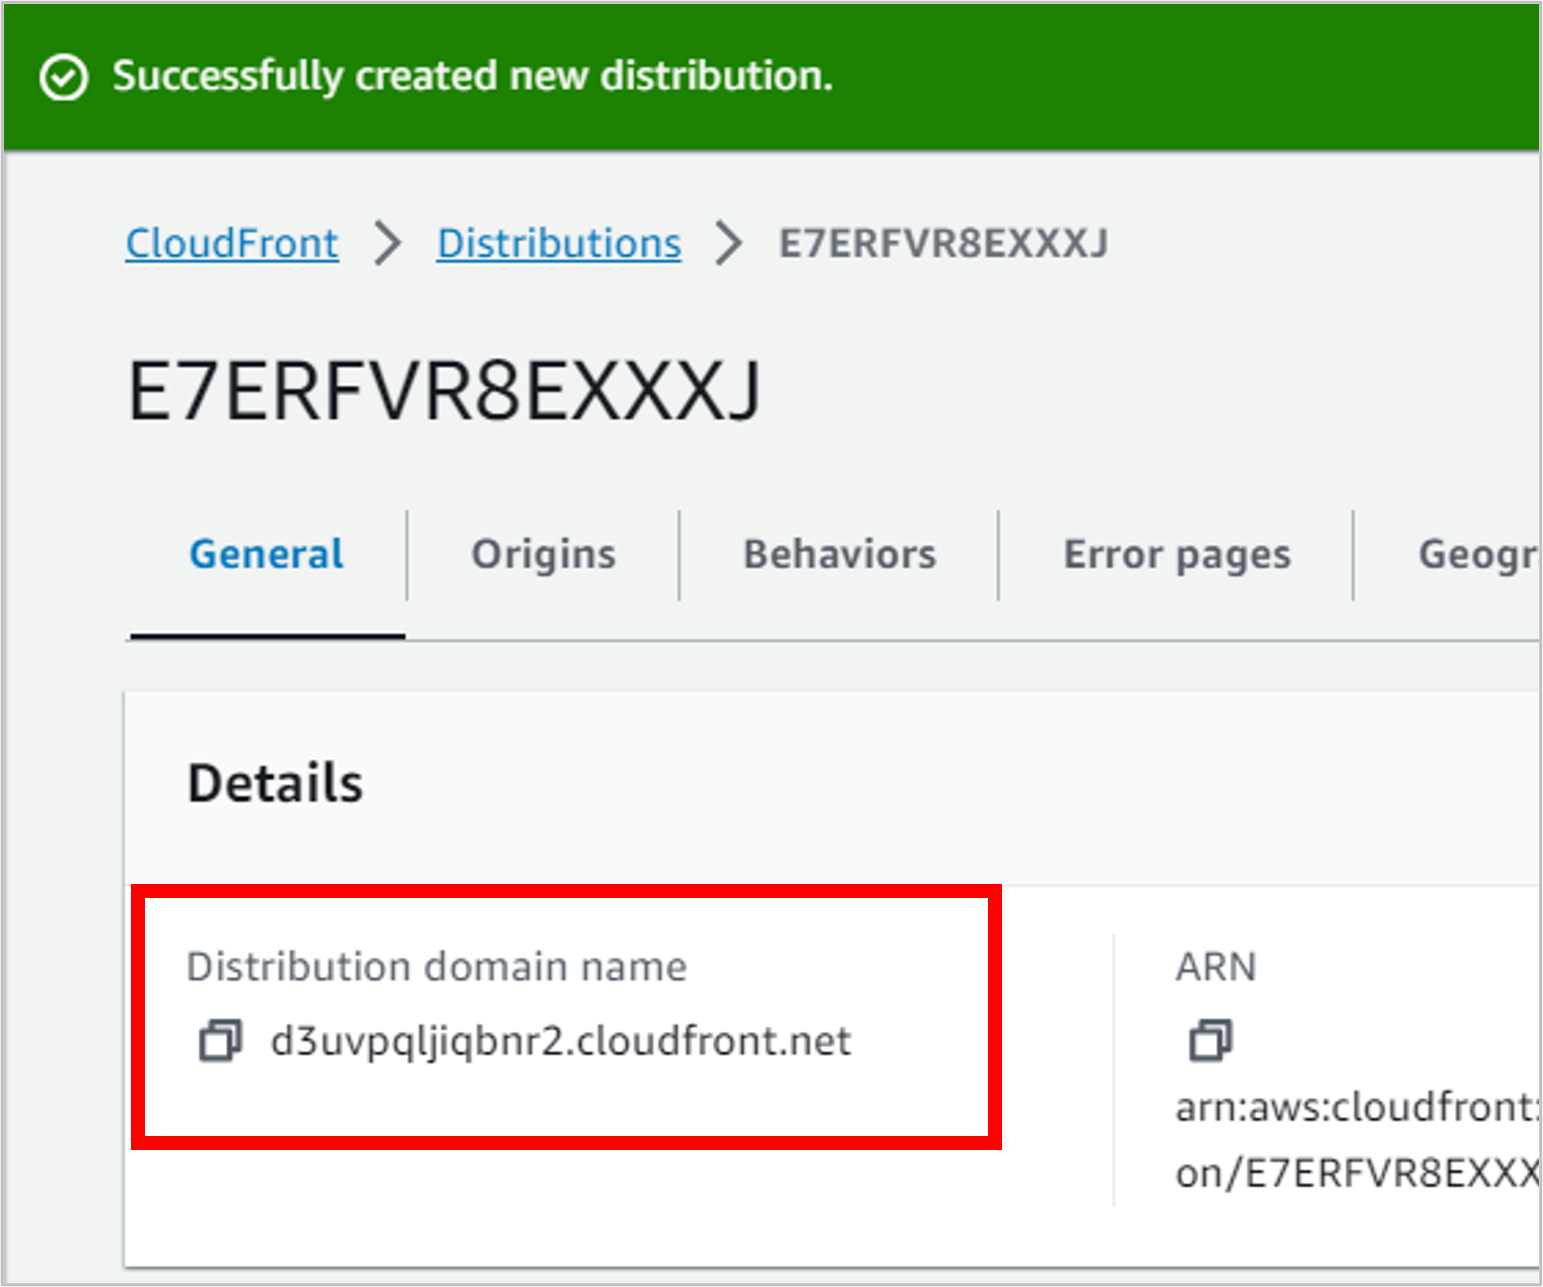
To test that everything is working with CloudFront and the TLS/SSL certificate, copy the Distribution domain name. Open a new tab in the browser and navigate to that address.
If everything worked, you should now see the all-important padlock icon in your browser, indicating that you’re on a secure connection using the certificate set up through Certificate Manager.
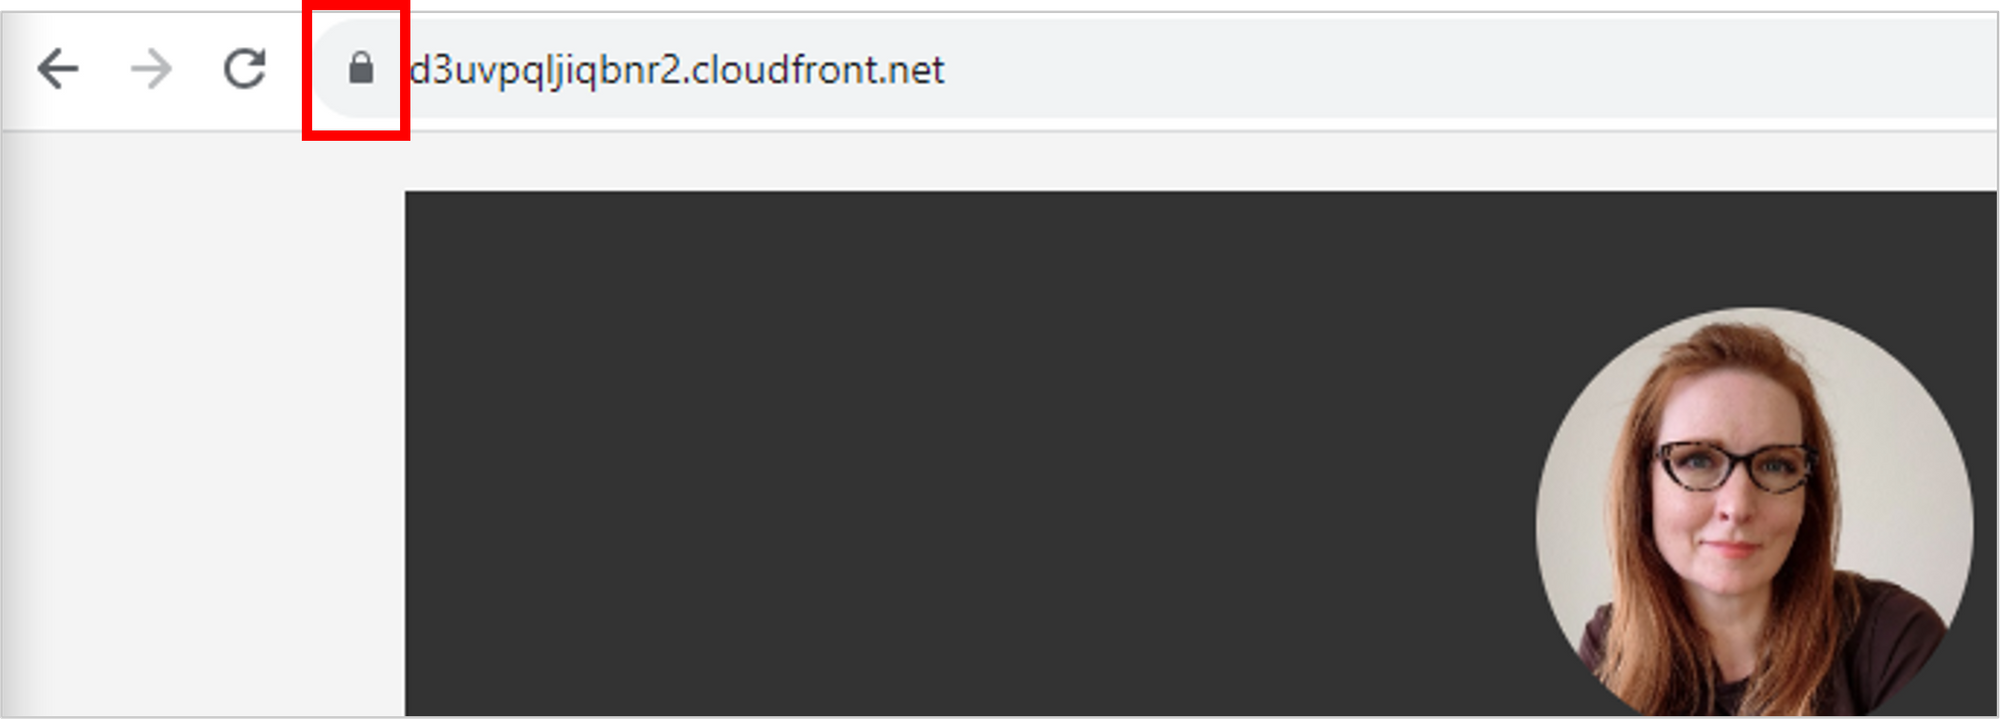
Awesome! But before you get excited thinking we’re done, remember that you ultimately want to go to your custom domain name to load the résumé, not to this lengthy CloudFront distribution domain name.
Update Route 53 to Point to the CloudFront Distribution
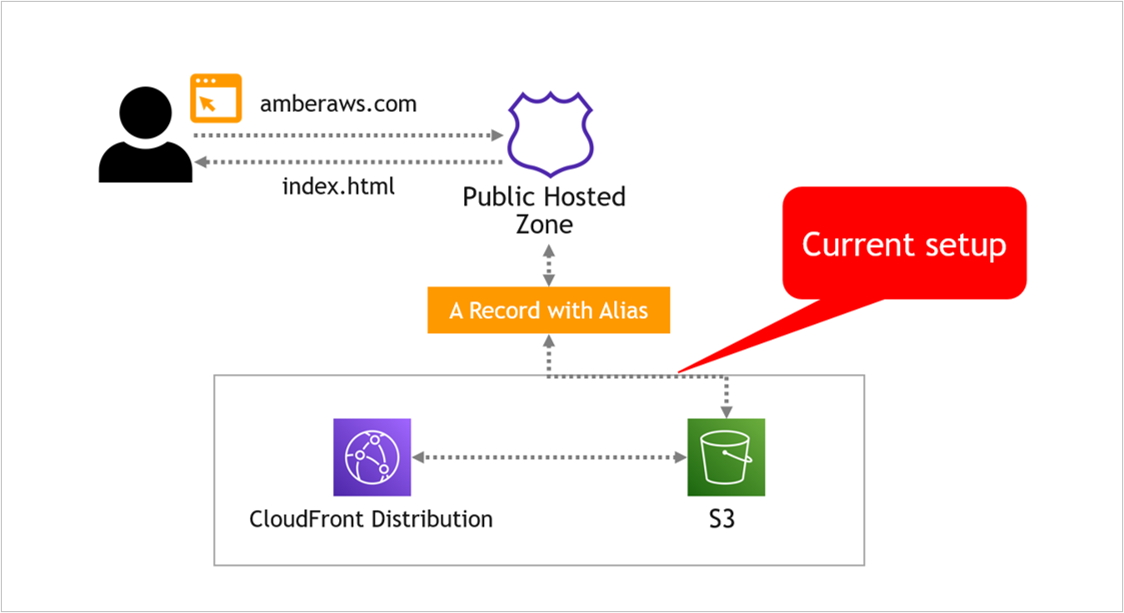
At the moment, the A Record in Route 53 is pointing to the S3 bucket, like this…
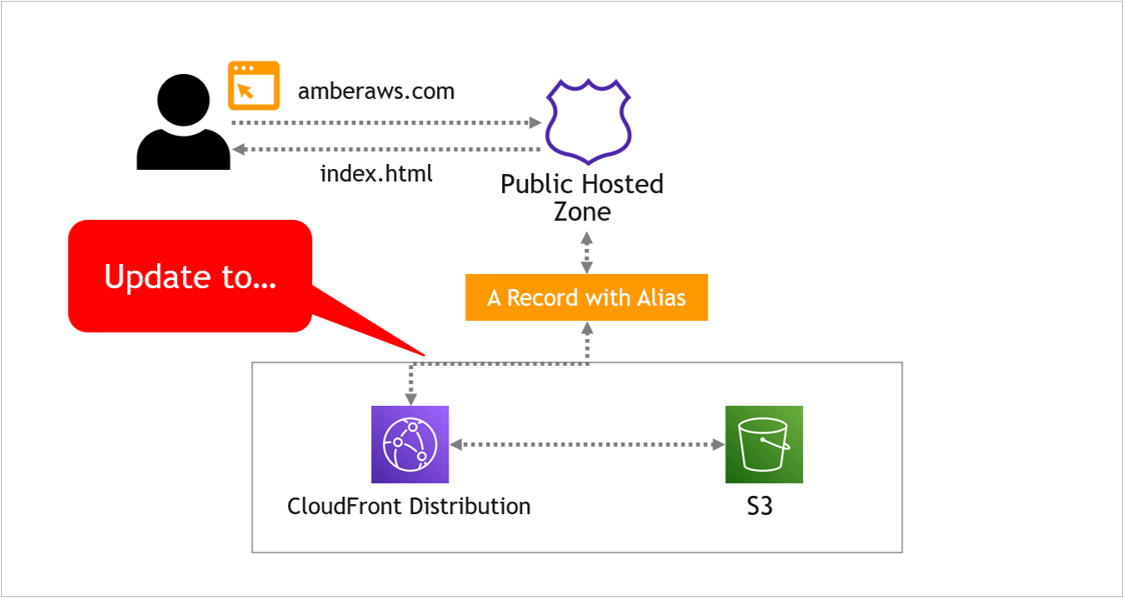
Instead, we want Route 53 to point to the CloudFront distribution, which then points to S3, like this…
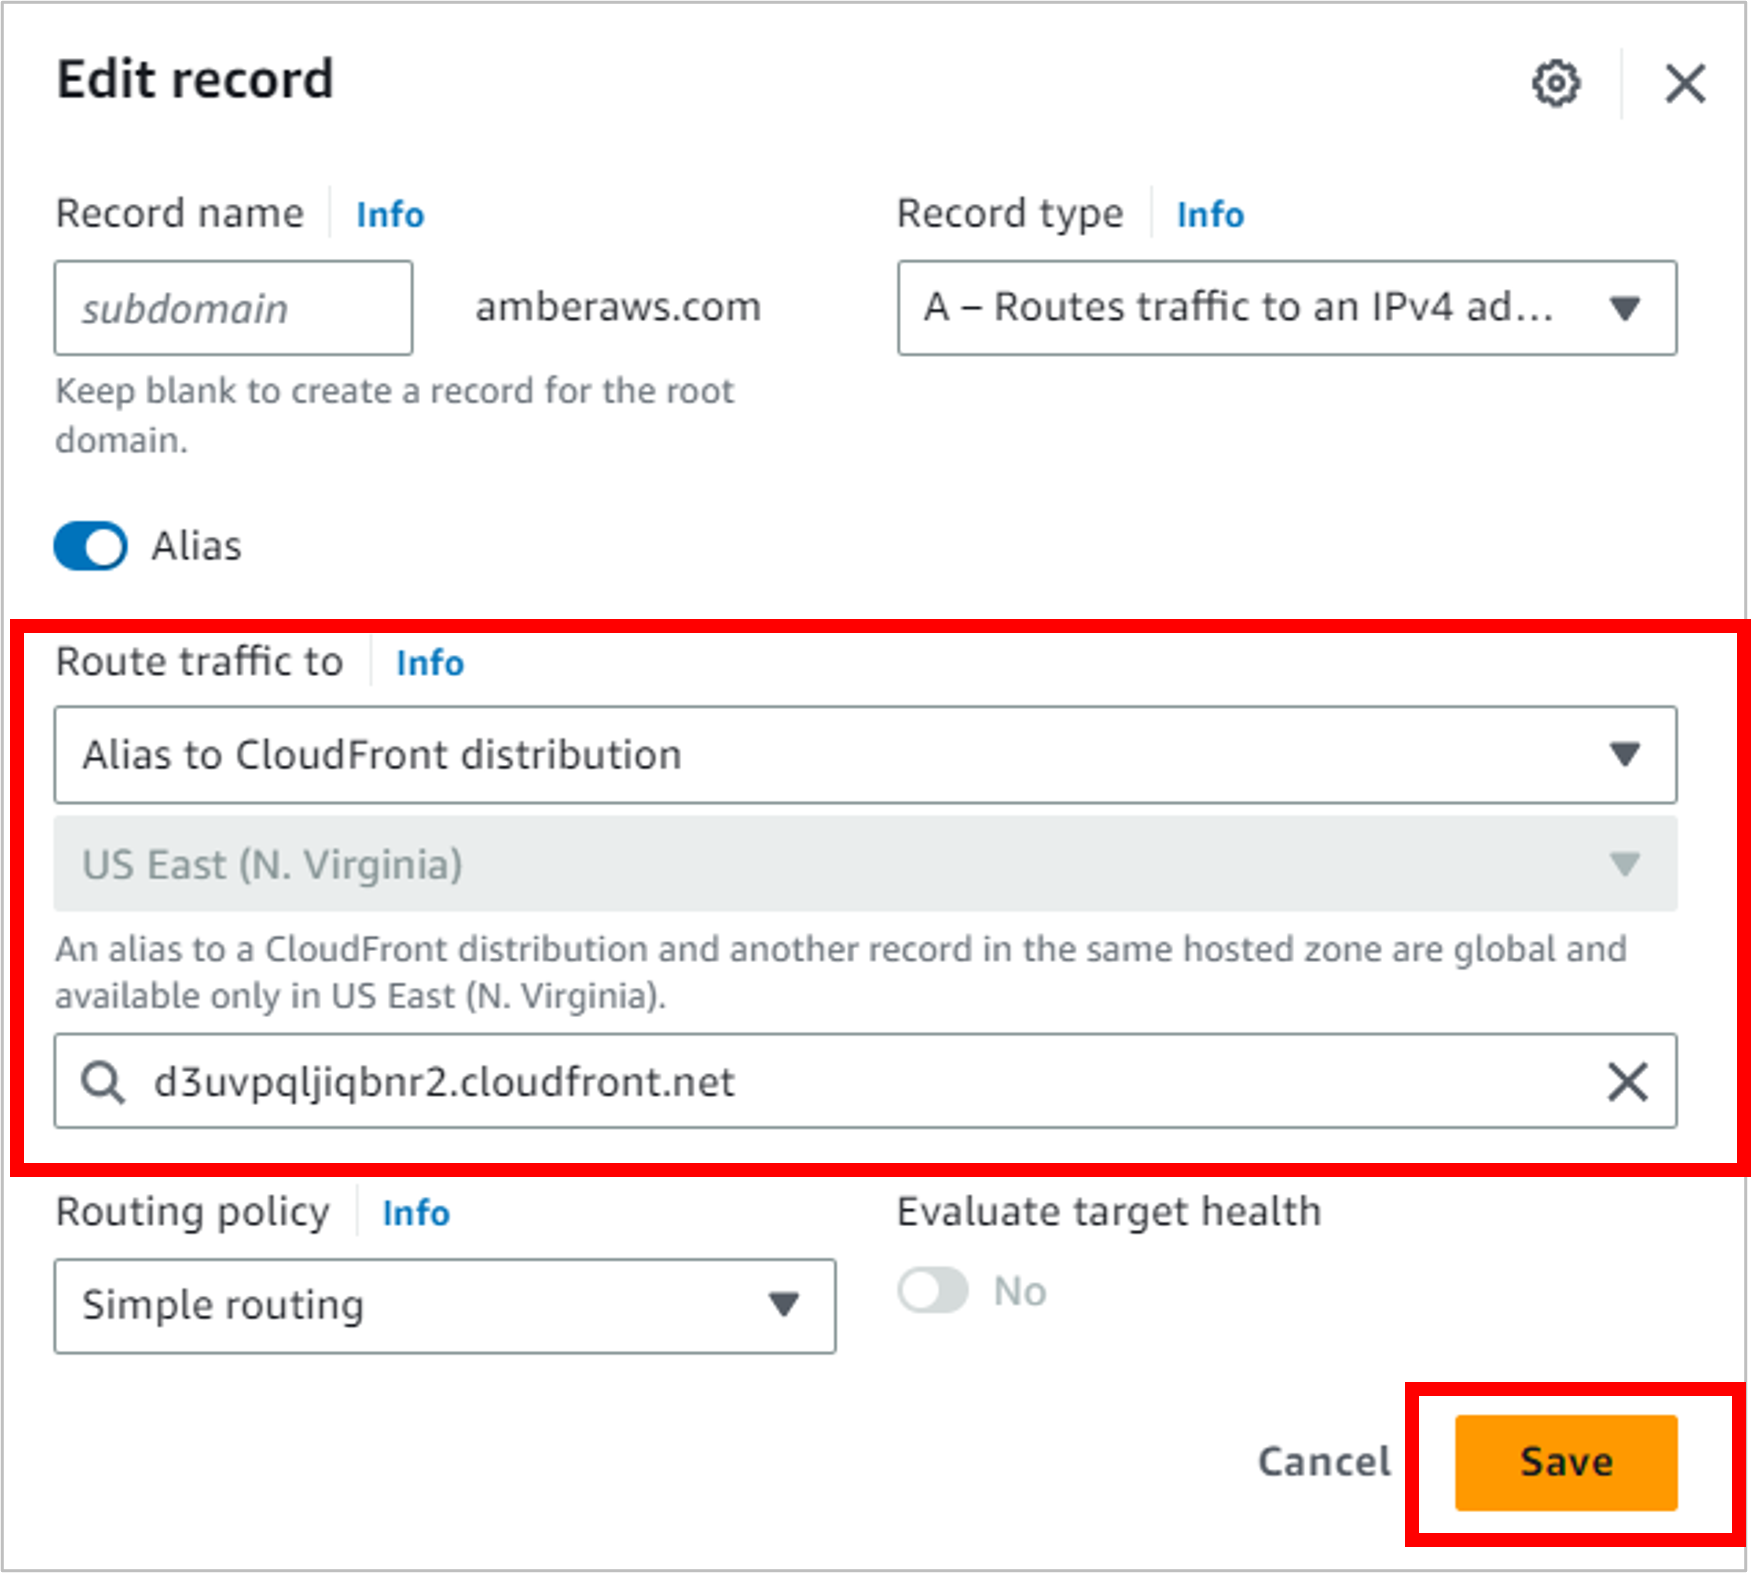
Navigate back to Route 53, to the hosted zone you’ve been working with. Select the A Record, then on the right of the screen, click Edit record.
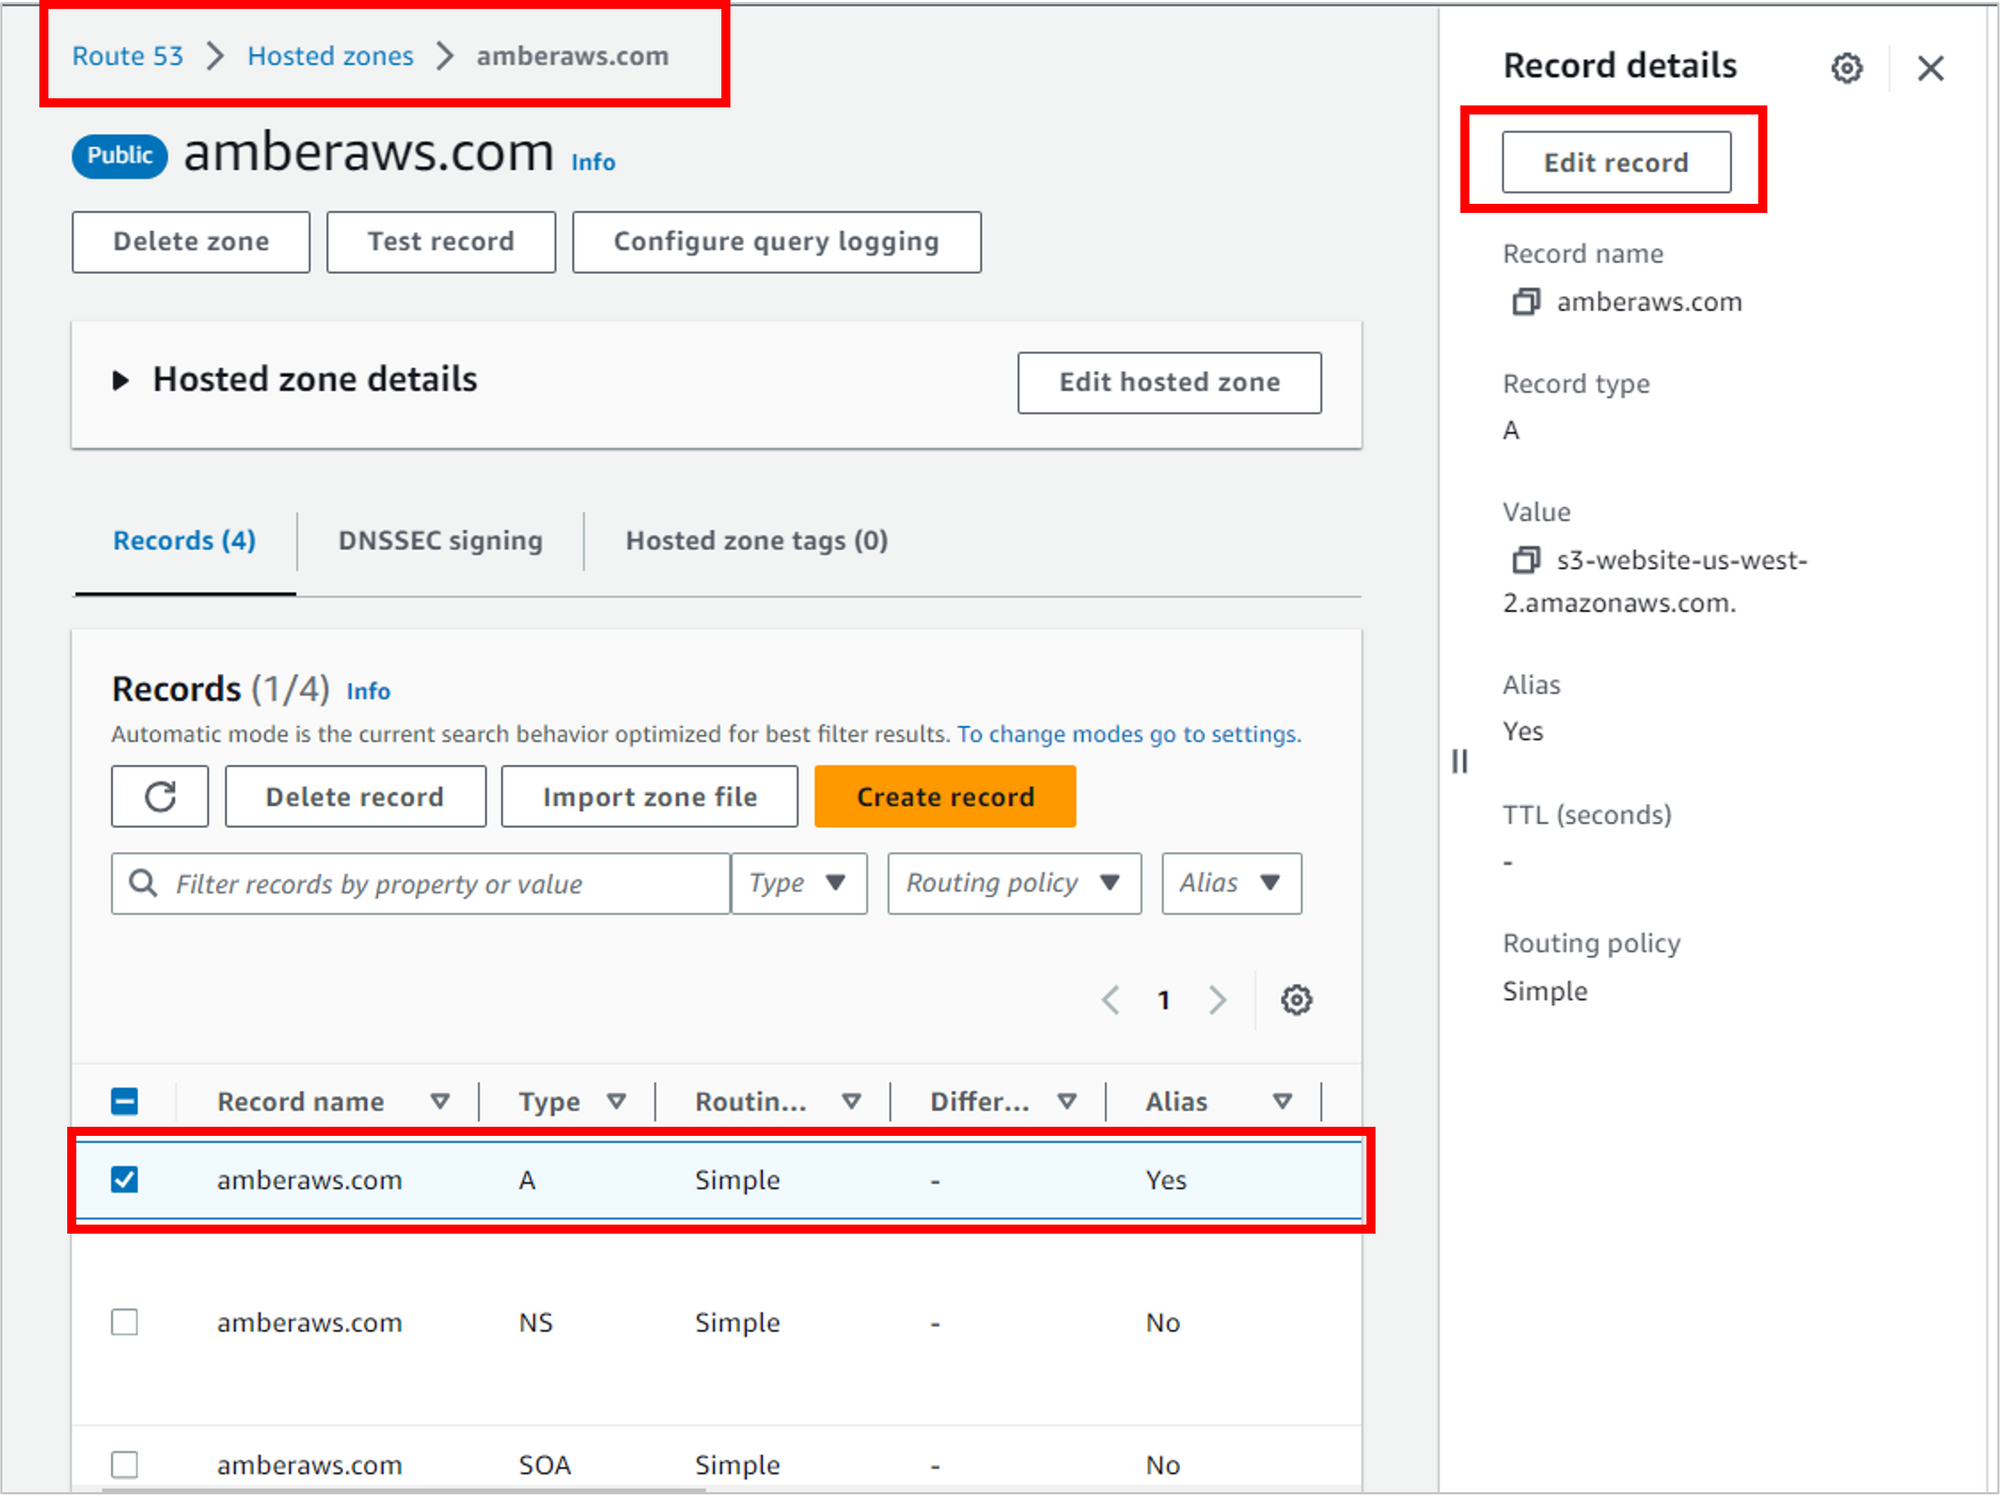
Instead of routing traffic to S3, update the three dropdowns to point to your CloudFront distribution.
- Alias to CloudFront distribution
- US East (N. Virginia) (this option is selected for you and grayed out)
- Choose your distribution (it should automatically populate in the third dropdown)
Click Save.
Behold the Final Result
And now the moment of truth: if everything worked, you should be able to navigate to your custom domain name and have it load your résumé on a secure connection.
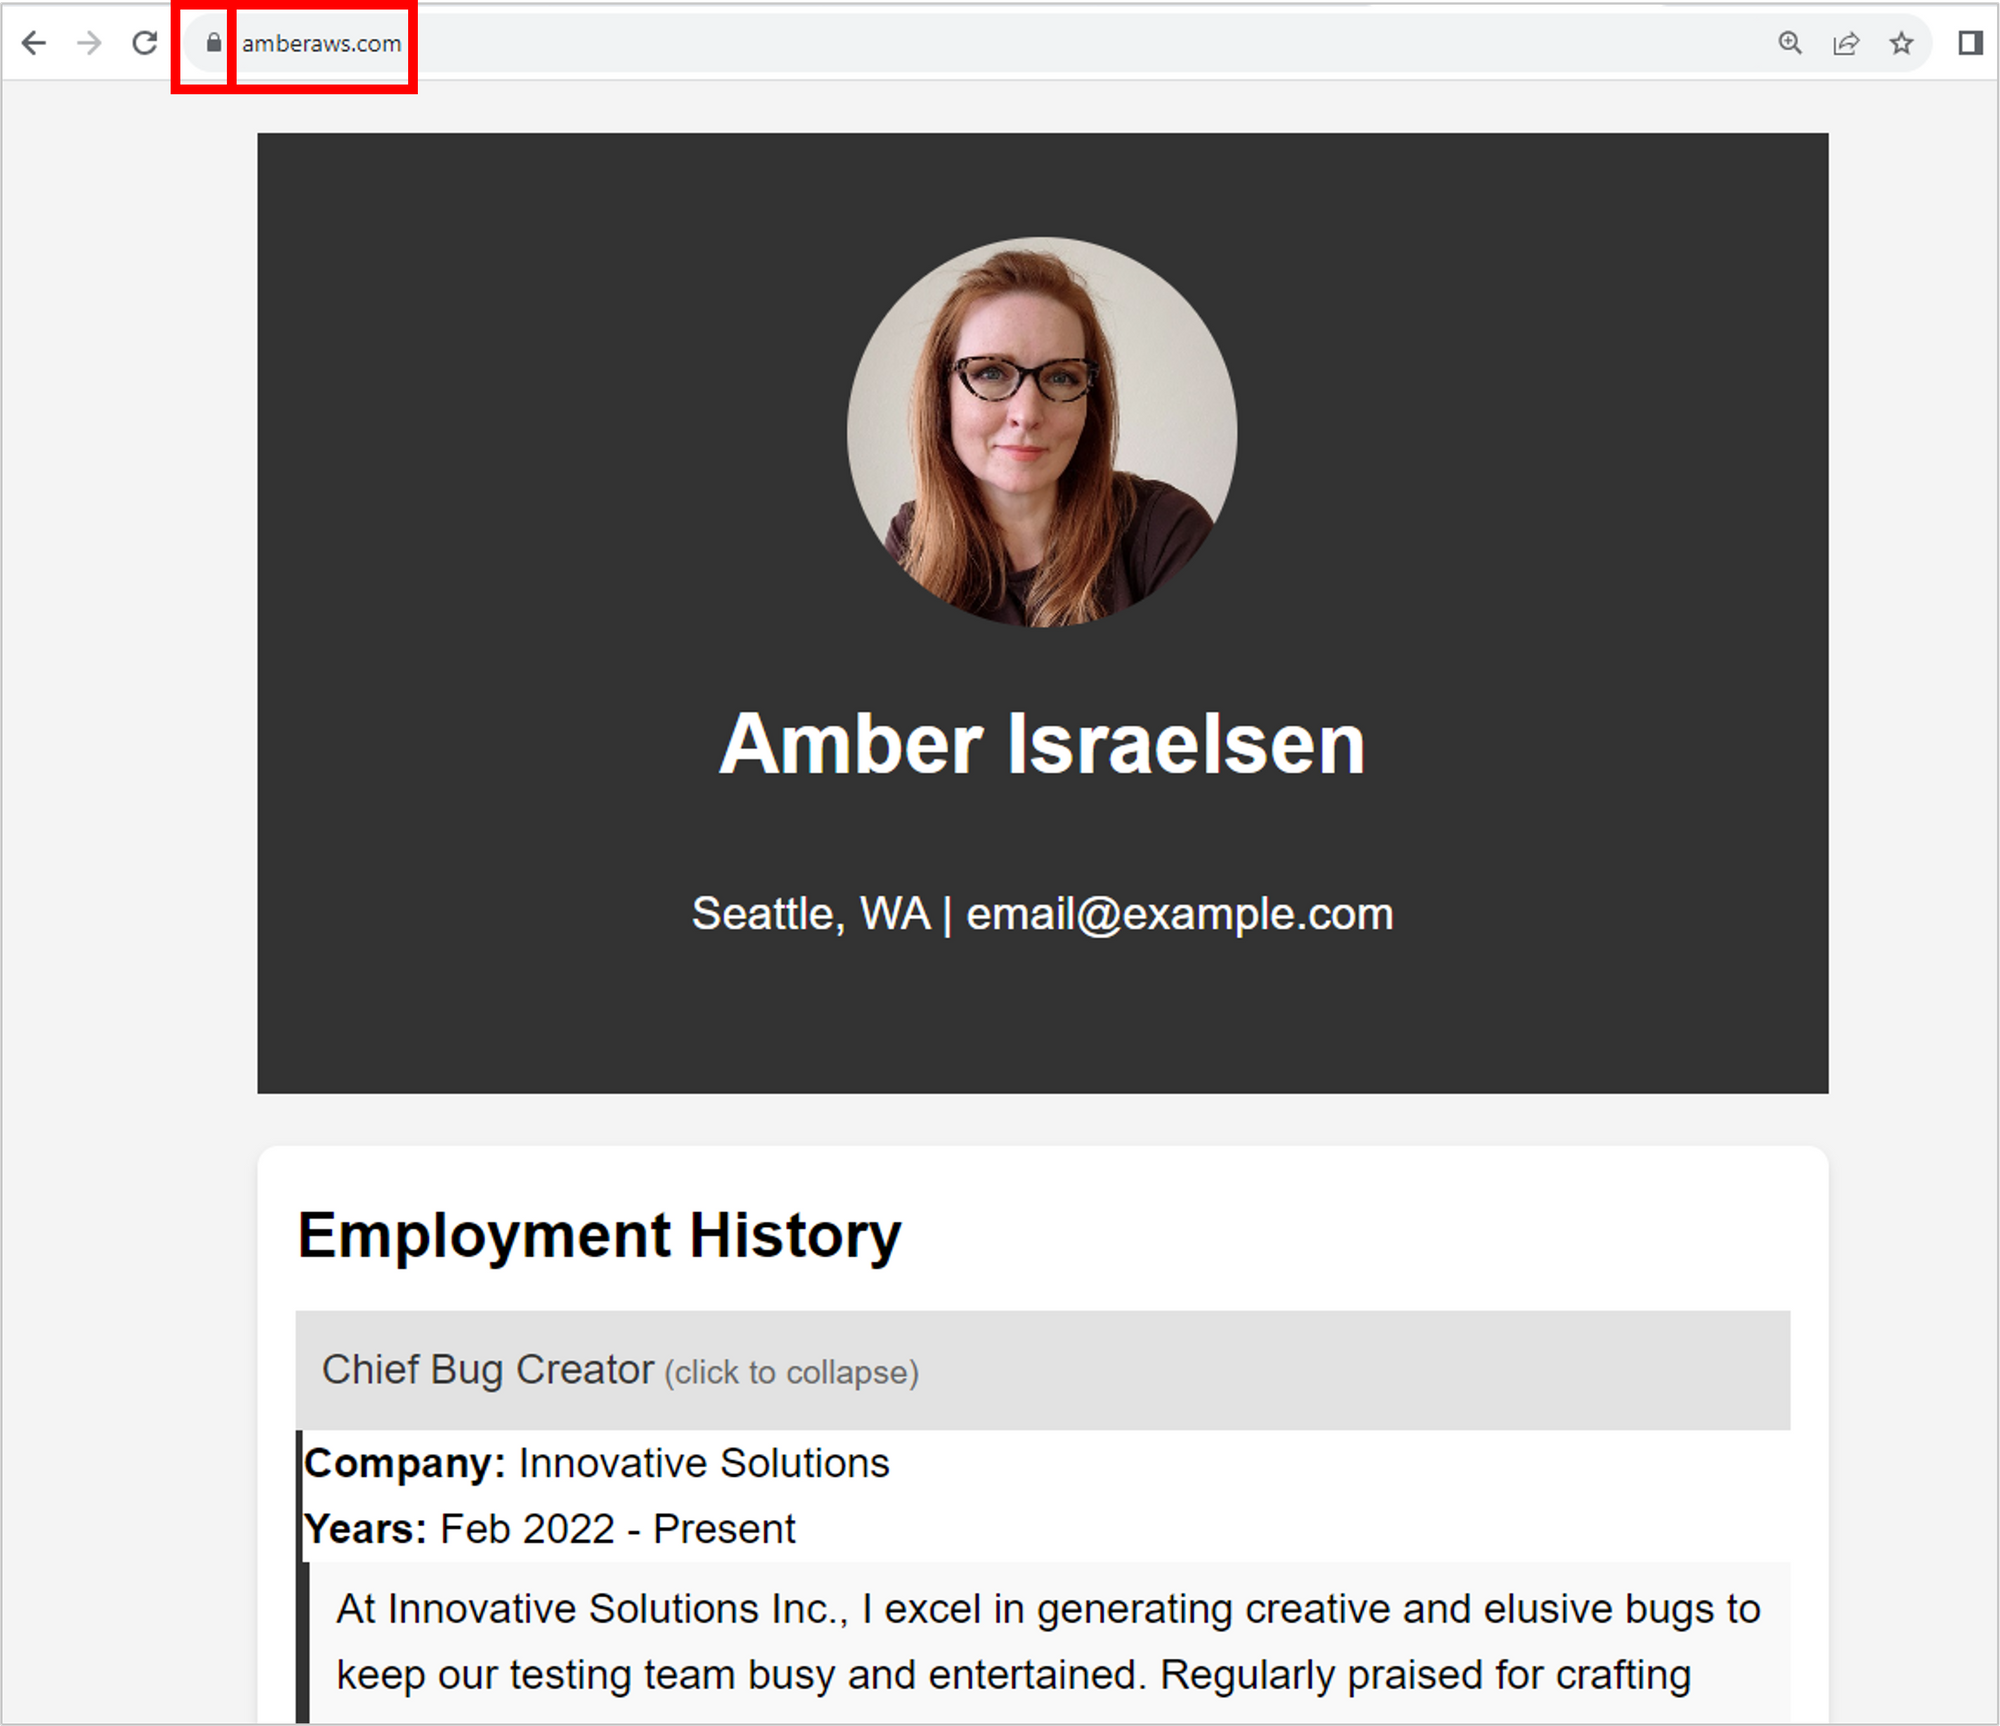
And VOILÀ! It works.
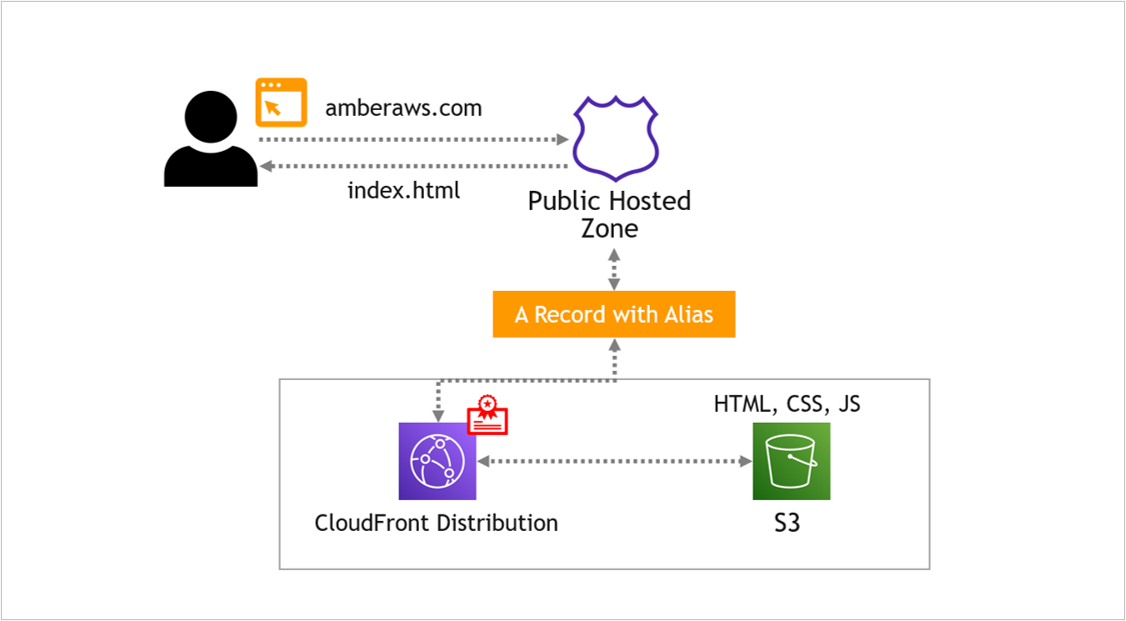
The résumé files (coming from S3 via CloudFront) load on the custom domain name (from Route 53) over a secure connection using the TLS/SSL certificate (from Certificate Manager). Nice work.
Here’s what you’ve built:
IMPORTANT! Delete Your Resources
At the beginning of the article, I covered the costs for the services. If you choose to leave them running, it shouldn’t cost you a fortune (unless, of course, your résumé goes viral and you’re suddenly paying for a ton of Route 53 and CloudFront traffic…maybe a good problem?).
But definitely set up an AWS Budget to be notified when charges reach a certain threshold.
For those of you who want to delete everything you built, let’s do that now.
Disable and delete the CloudFront distribution
Navigate to CloudFront and select your distribution. Before you can delete it, you first have to Disable it.

This will take several minutes to complete, and it has to finish before you can delete some other things. So let it run. When it’s done, you should see a date and time in the Last modified column.

Once the distribution is disabled, select it and then click Delete.

Delete records from the Route 53 hosted zone
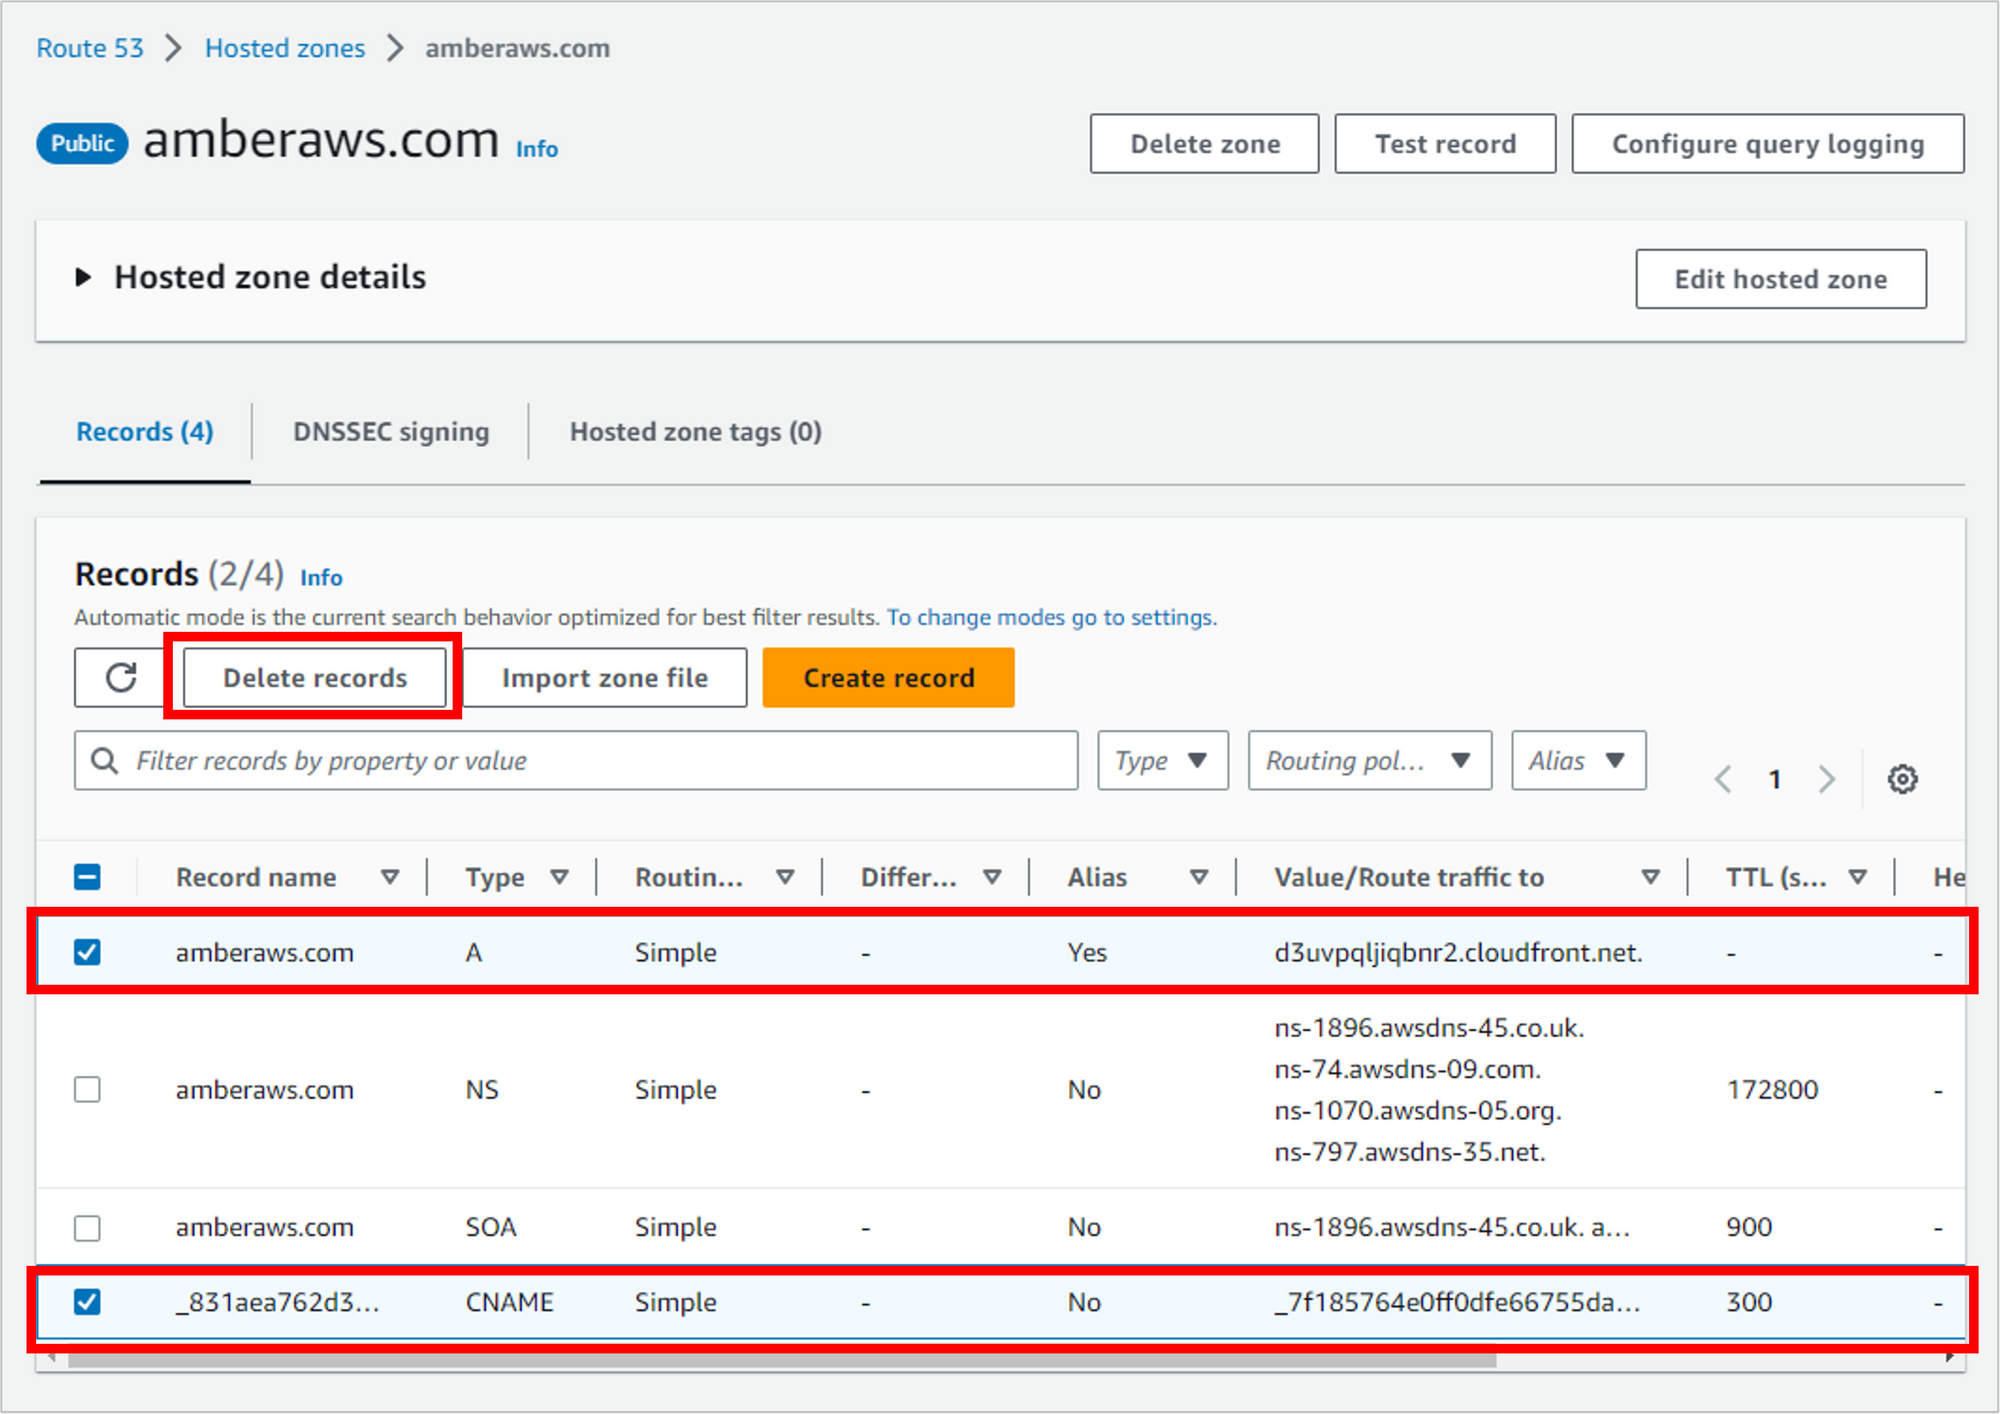
Navigate to Route 53 and the hosted zone you’ve been working in. Records won’t cost any money, but if you don’t plan to use them, it’s a good idea to delete them to avoid confusion in the future.
Select the A Record and the CNAME Record and then click Delete records.
Delete the hosted zone (optional)
You can also choose to delete your hosted zone in Route 53, but if you do, your domain might become unavailable on the internet.
If you plan to use your domain name at some point in the future, I’d recommend keeping the hosted zone (I’ve chosen to keep mine). Keeping the zone will cost you 50 cents per month.
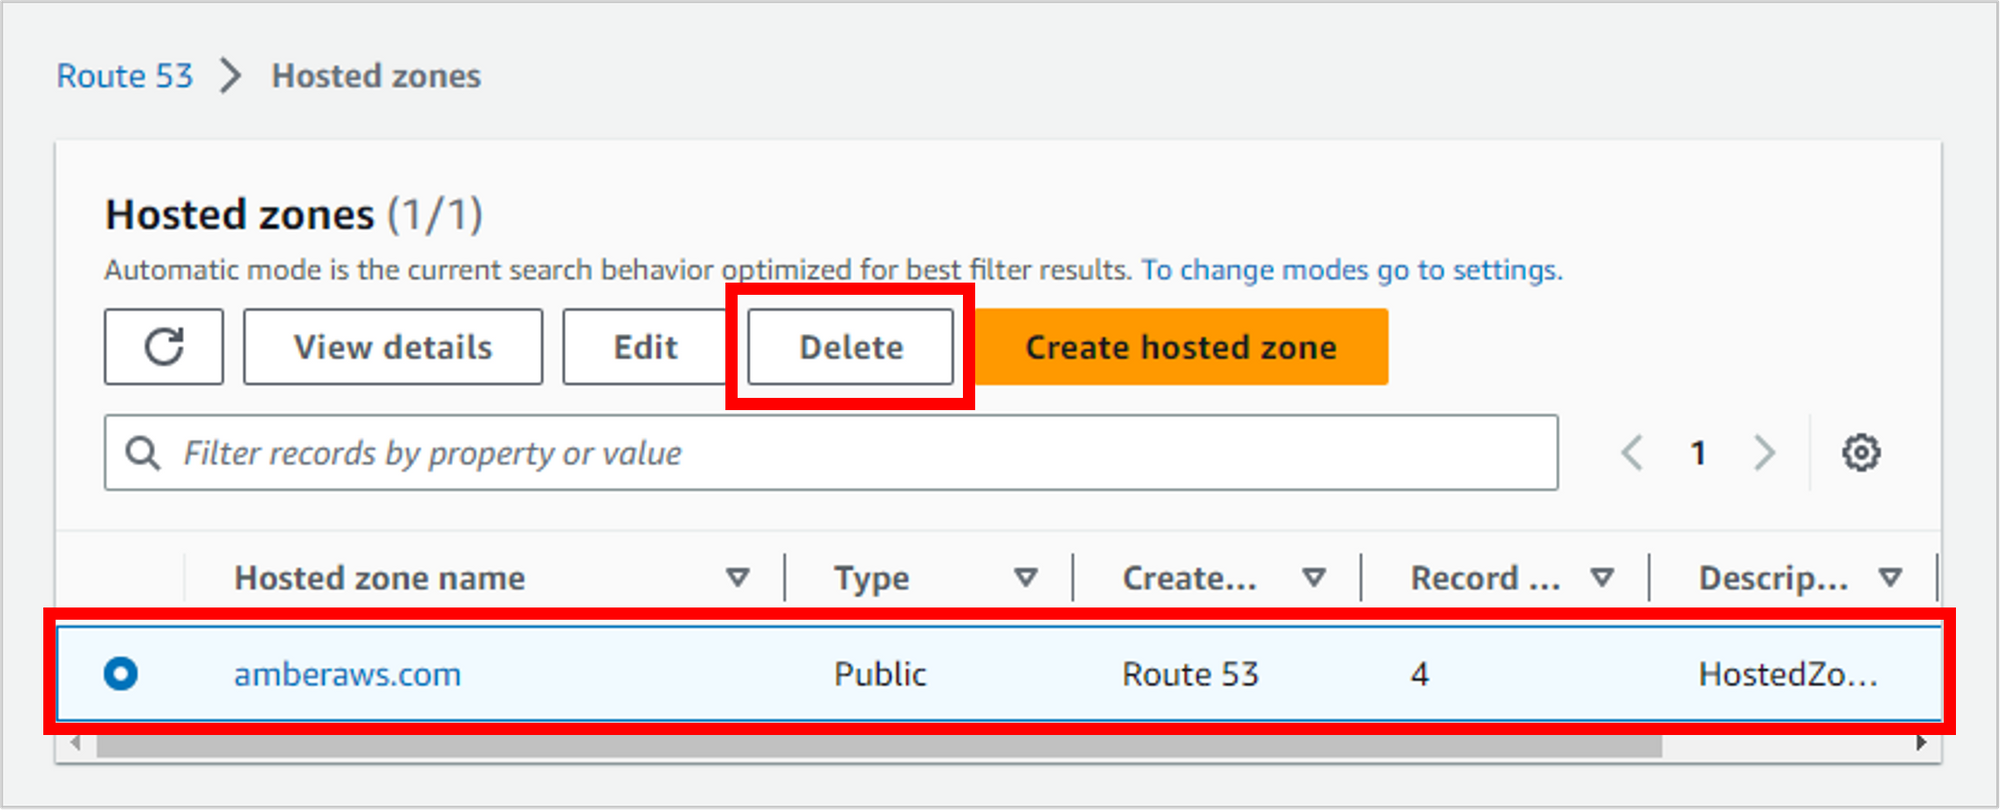
But if you’d like to go ahead with deletion, just select the hosted zone and click Delete.
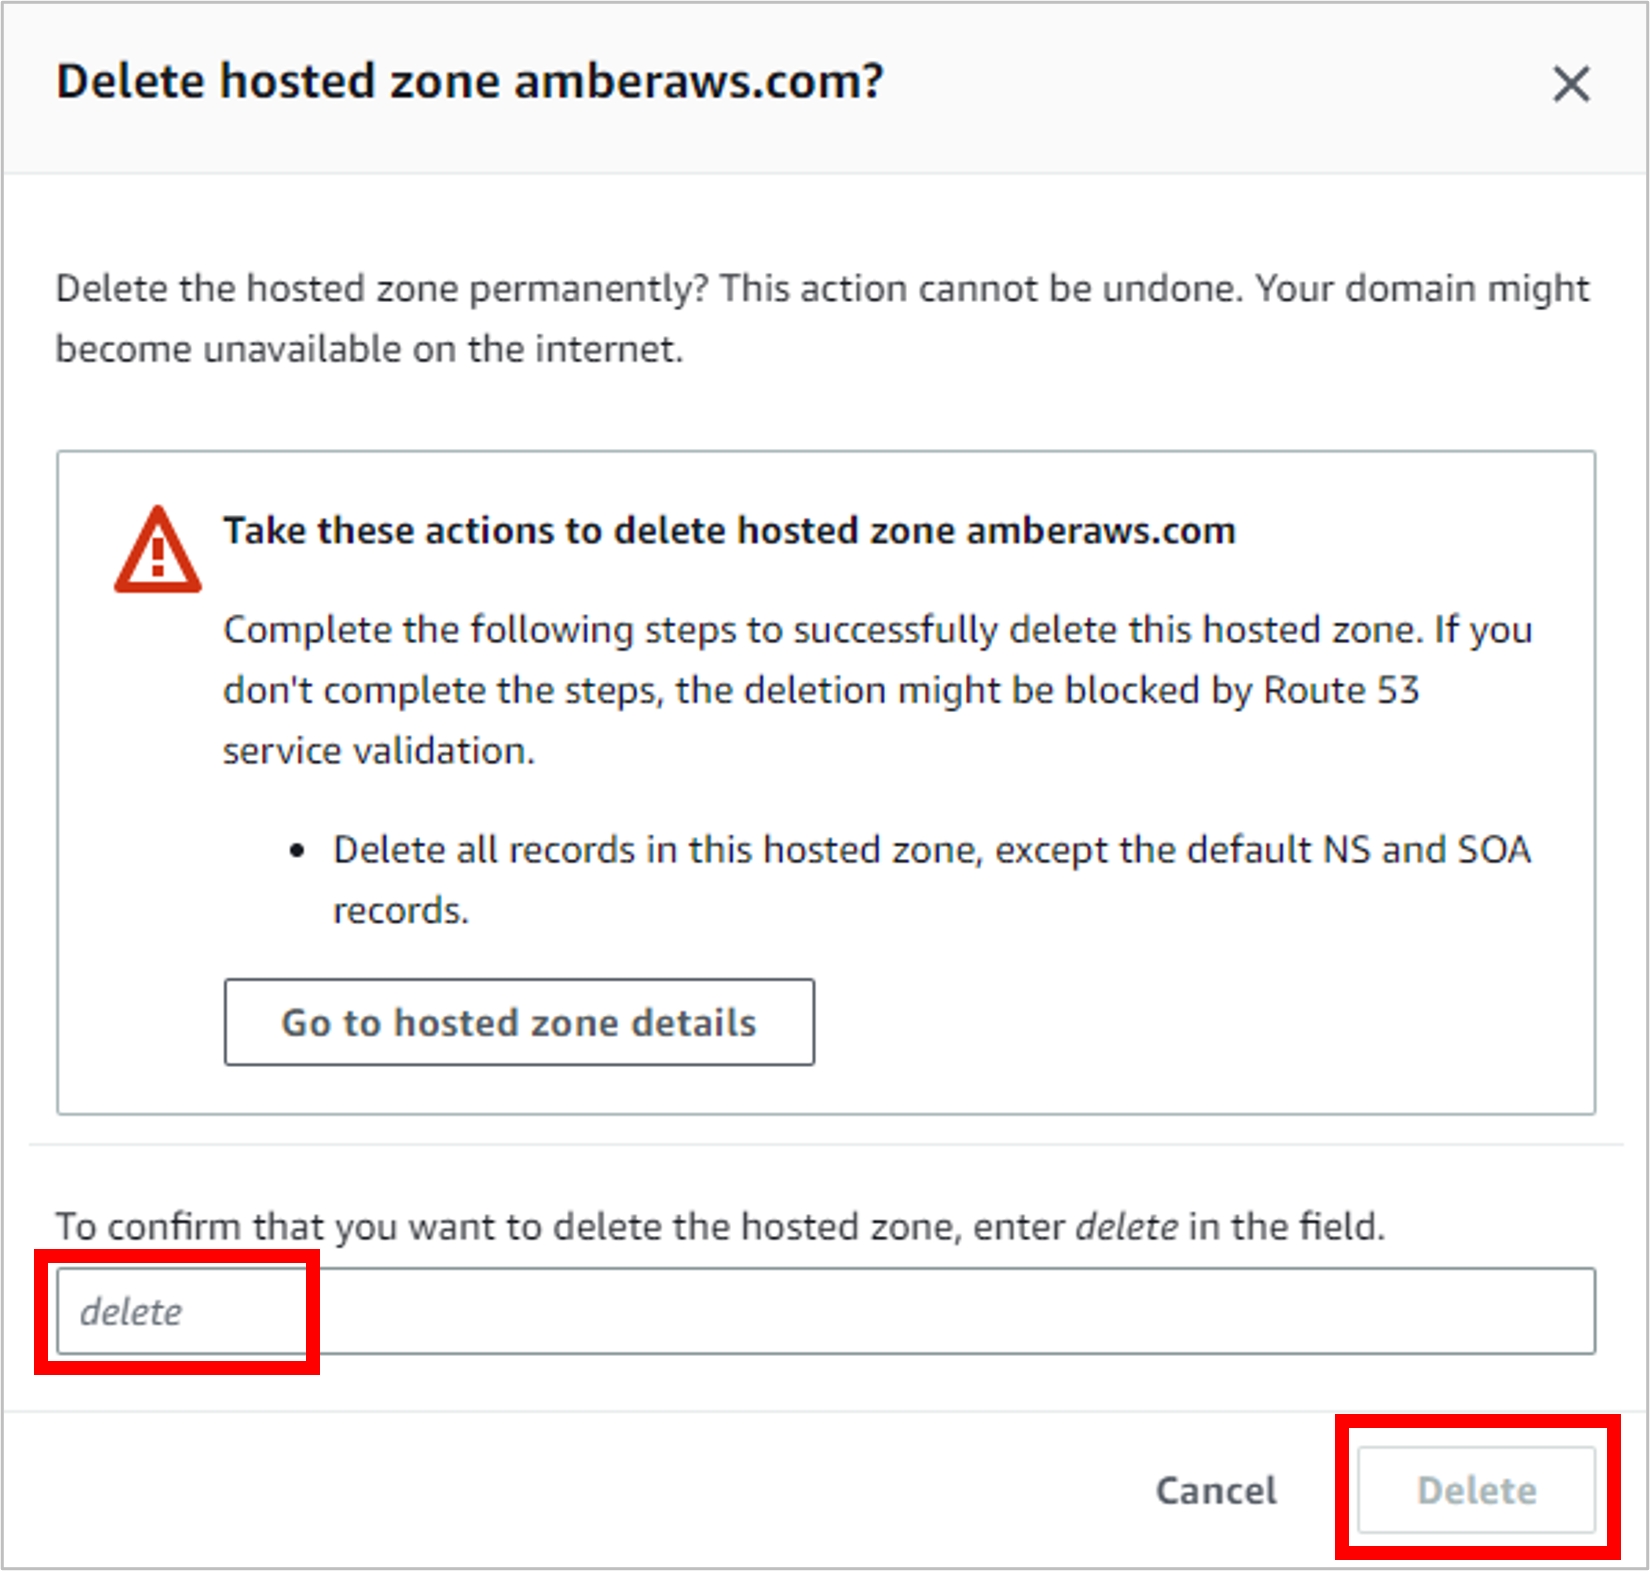
Confirm that you’ve completed the actions in this warning message, type “delete,” and then click Delete.
Delete the certificate from Certificate Manager
Navigate to Certificate Manager. Select the certificate you created, then click Delete. (If the CloudFront distribution hasn’t been disabled yet, you’ll get an error on this step saying the resource is still in use.)

Empty the S3 bucket and then delete it
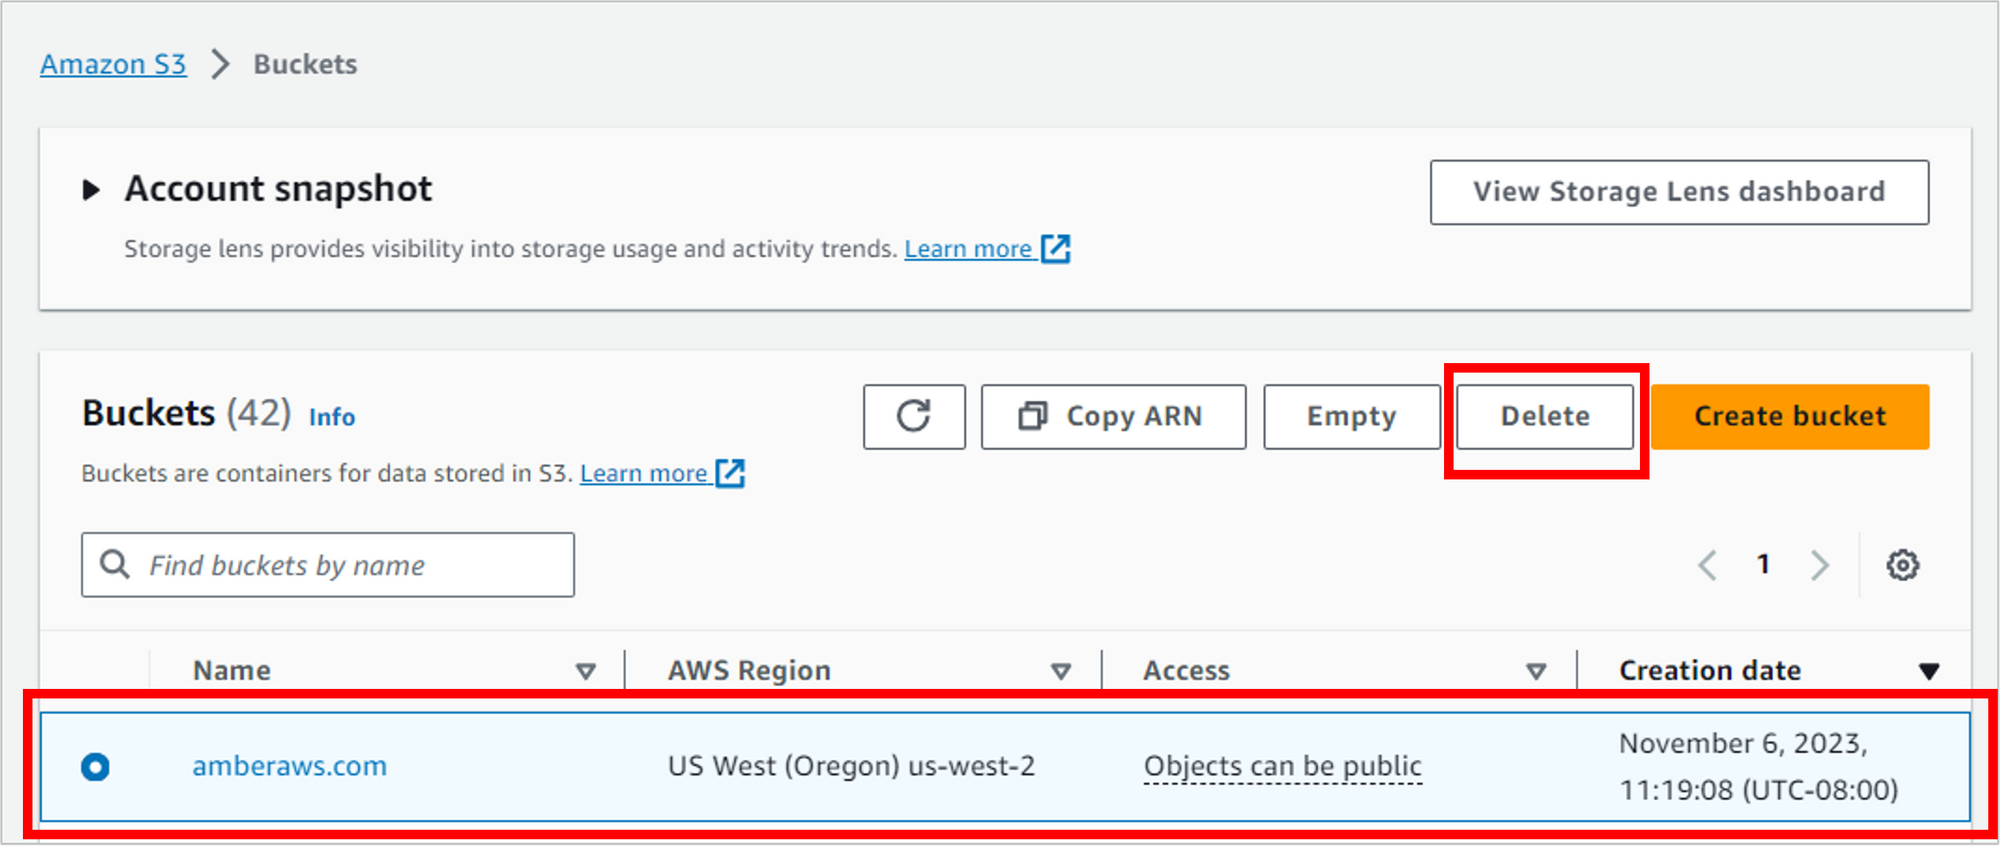
Navigate to S3, to the list of all your buckets. Select the bucket and then click Delete.
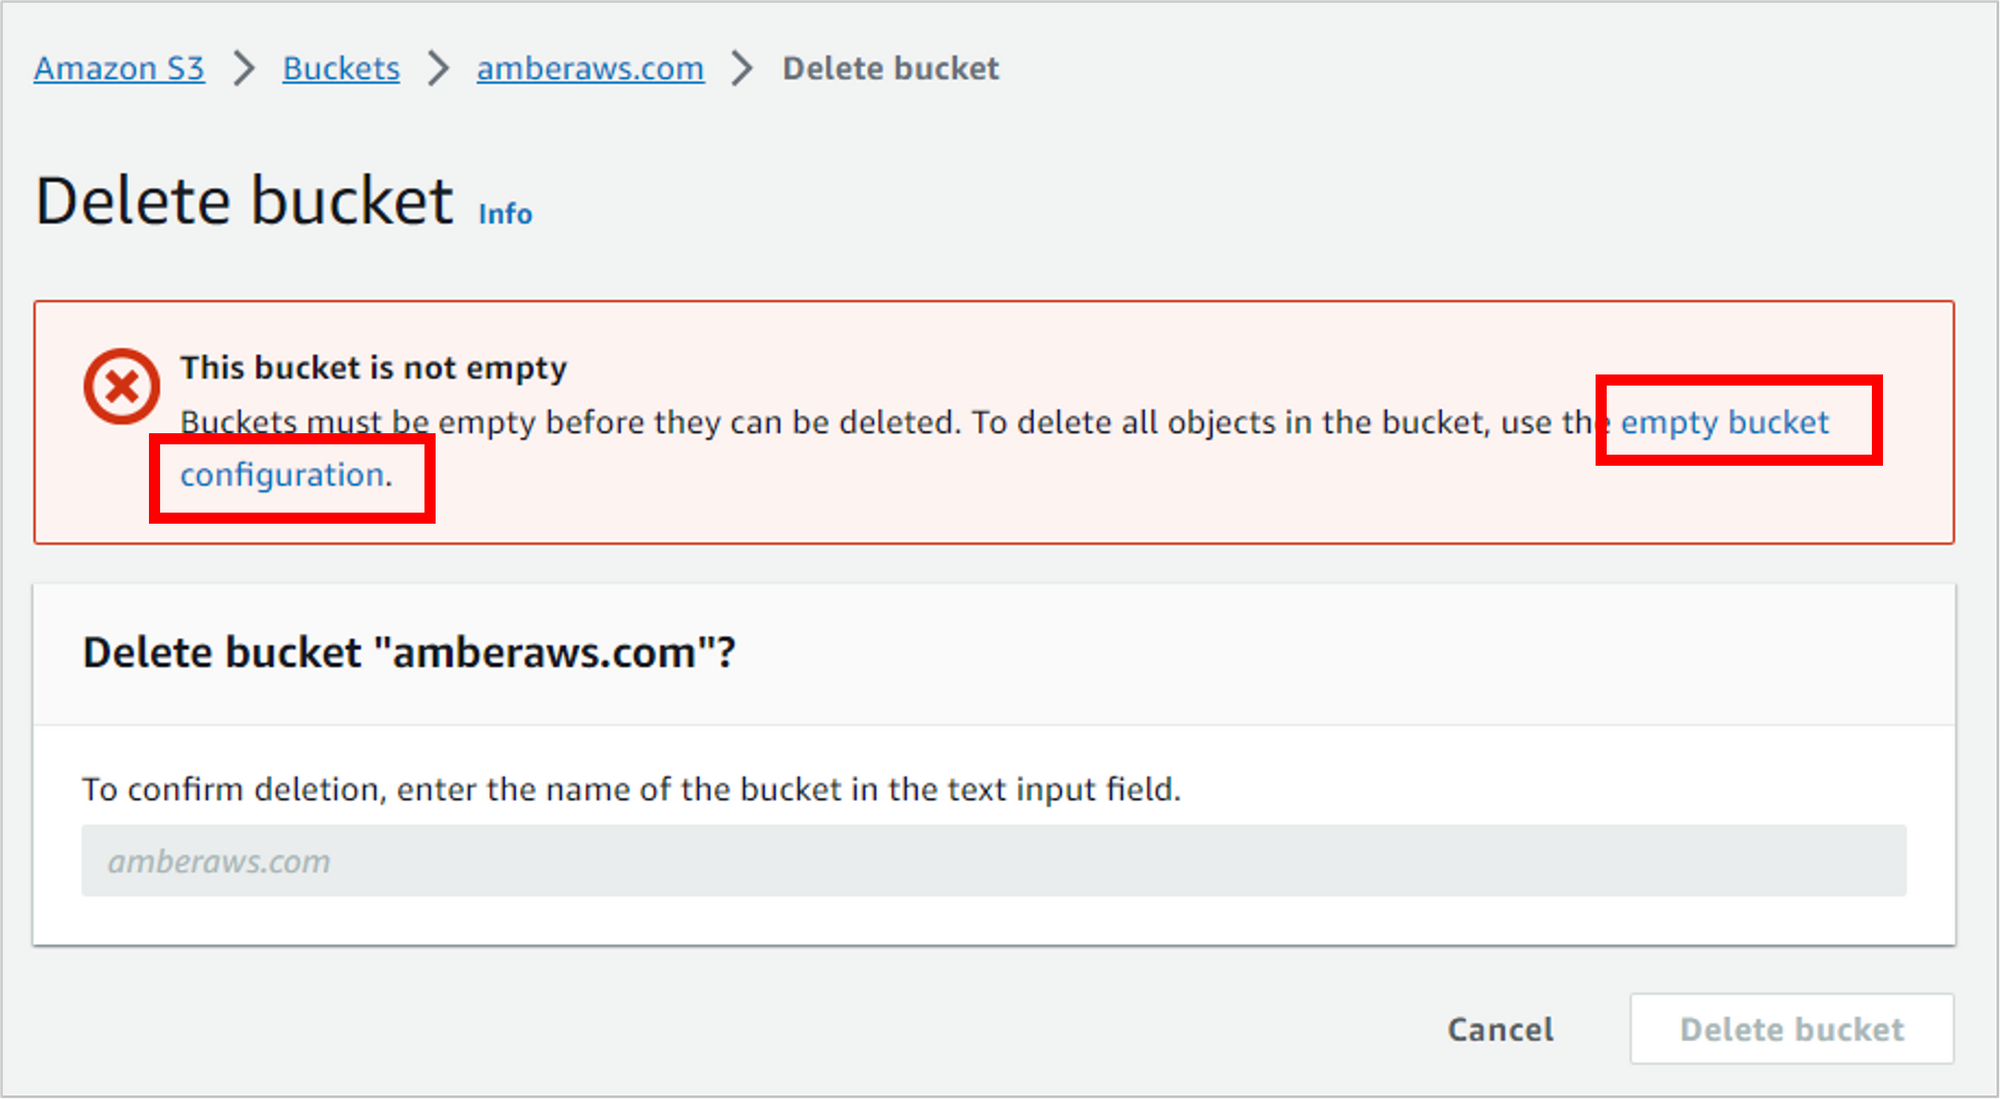
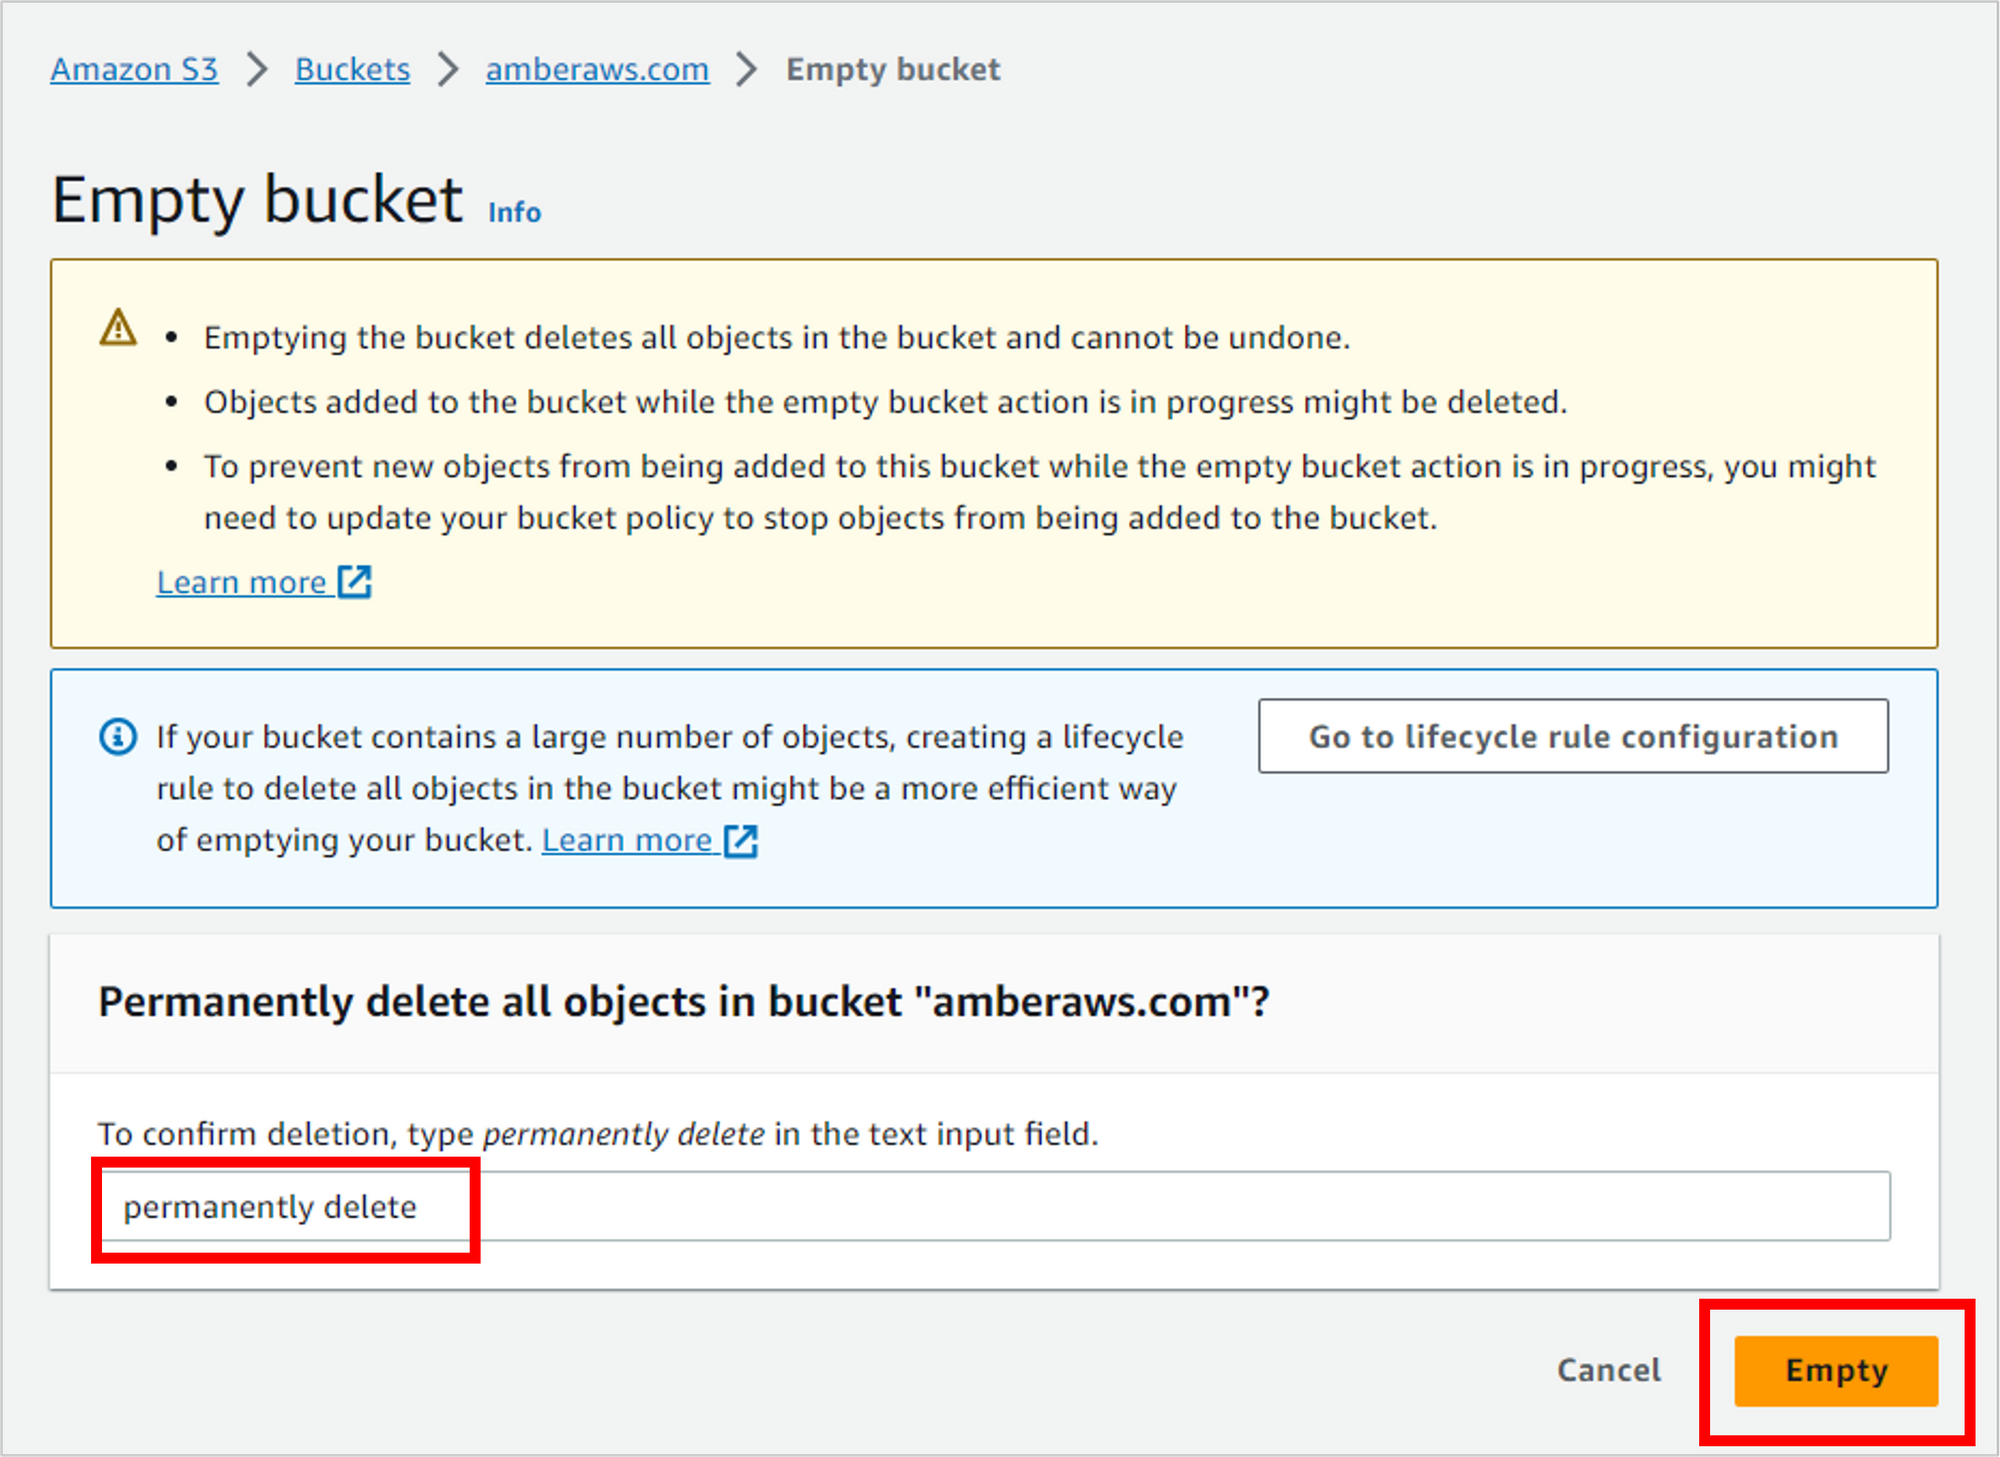
Before you can delete a bucket, you must first delete the files in it. AWS provides a handy link to do that. Click the link to empty bucket configuration.
Confirm that you want to permanently delete the files (you do) by typing “permanently delete” and then clicking Empty.
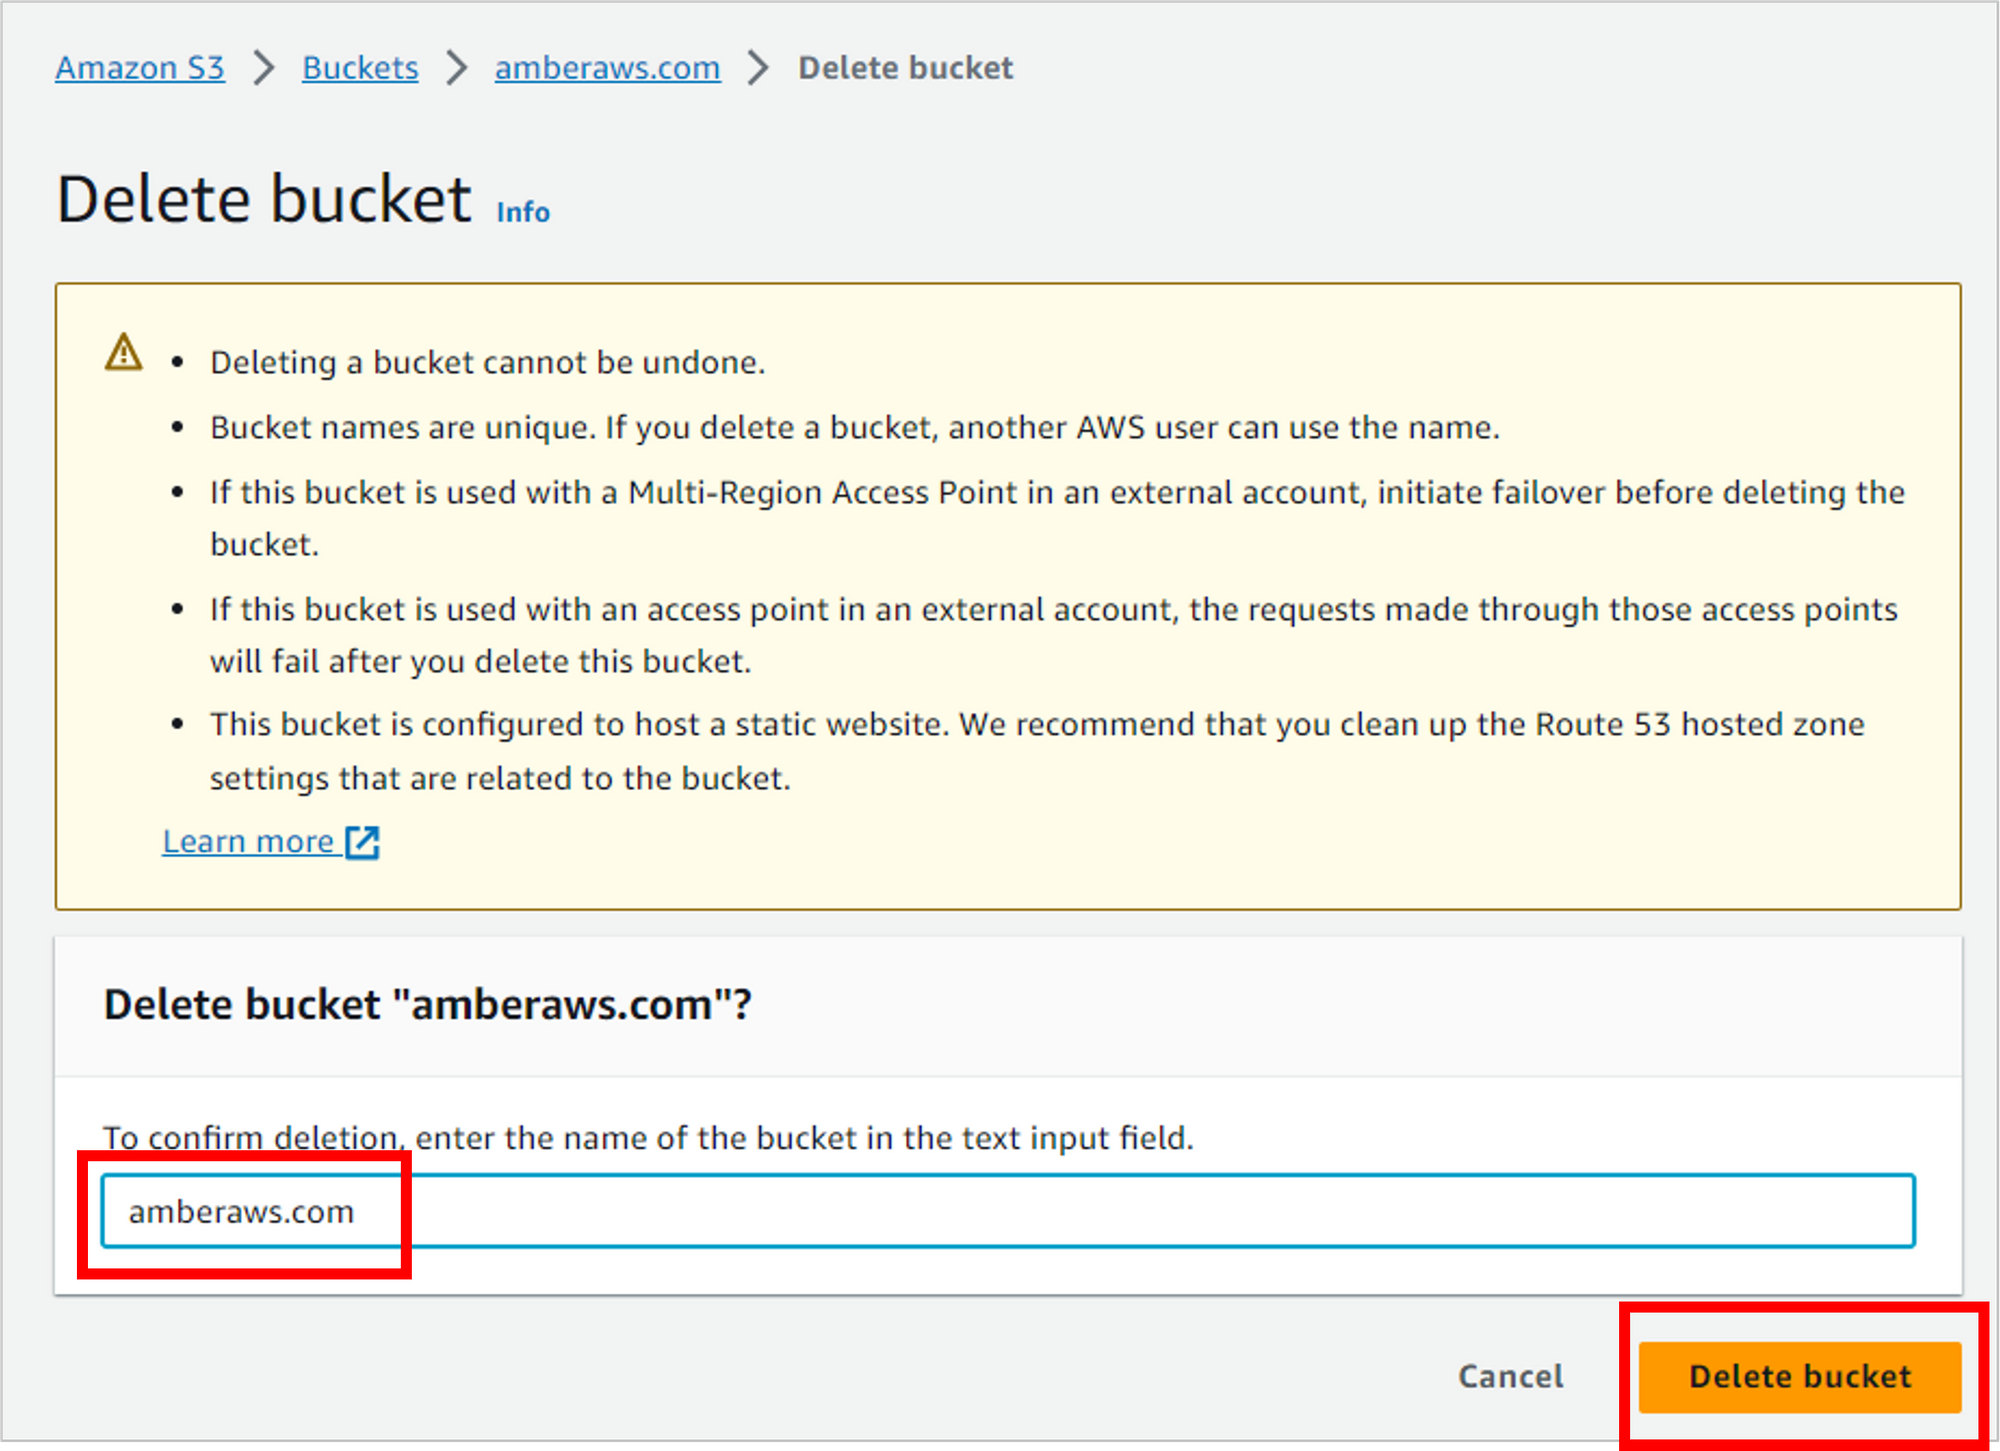
Now that the bucket is empty, you can delete it. And in the success message at the top of the screen, there’s a convenient link to do so. Click delete bucket configuration.

Confirm this action by typing in the name of your bucket, then clicking Delete bucket.
And that’s it! The resources have been deleted, and you shouldn’t incur any additional charges.
Wrapping up
Congratulations on making it all the way to the end! I hope you were able to successfully build out a résumé, and at the same time cement some of your AWS skills for the future. Feel free to share it with the world, and best of luck in your job search.
For more tutorials on AWS and other tech, head to Tiny Technical Tutorials on YouTube.
[ad_2]
Source link
